sion. Also, nonsoluble vegetable-based cooking
compounds or fibrous greases must not be used
inside the transmission.
12. Install the oil pan and gasket.
12.1 Guide the pan and gasket carefully into
place. Guard against dirt or foreign mate-
rial entering the pan. Retain the pan with
four 5/16–18 washer-head screws, in-
stalled by hand into the corners of the
pan.
12.2 Install the remaining seventeen washer-
head screws by hand, carefully threading
each through the gasket and into the
transmission. Bottom all of the screws
before tightening any of them.
12.3 Tighten all twenty-one screws evenly 10
to 15 lbf·ft (14 to 20 N·m). Check the gas-
ket fit while the screws are being tight-
ened.
IMPORTANT: The oil pan bolts must main-
tain a minimum torque of 60 lbf·in (680
N·cm) after the oil pan gasket has taken a
set.
13. Install the fill tube at the side of the pan. Tighten
the tube fitting 90 to 100 lbf·ft (122 to 136 N·m).
14. Install the drain plug and gasket, and tighten the
plug 15 to 20 lbf·ft (20 to 27 N·m).
15. Replace the external (auxiliary) fluid filter.
16. Clean the area around the fill tube and remove
the dipstick. Using a clean funnel in the fill tube,
add transmission fluid. See Table 4 for approved
transmission lubricants, and Table 5 for lubricant
capacities.
17. Check and adjust the fluid level using the proce-
dure under "Checking the Fluid Level."
MD and HD Series
When draining transmission fluid, check for evidence
of dirt or water contamination. A small amount of
condensation will appear in the fluid during operation.
Water contamination is normally characterized as a
milky discoloration of the transmission fluid. Obvious
contamination of the transmission fluid indicates a
leak between the water and fluid areas of the trans-
mission cooler. Inspect and pressure-test the cooler
to confirm the leak; replace leaking transmission
coolers.
CAUTION
To prevent dirt from entering the transmission,
use only clean containers and fillers for the trans-
mission fluid. Do not use fillers or containers that
have been used for water or antifreeze. Dirt, water,
or antifreeze could damage the transmission.
1. Park the vehicle on a level surface, apply the
parking brakes, and chock the rear tires.
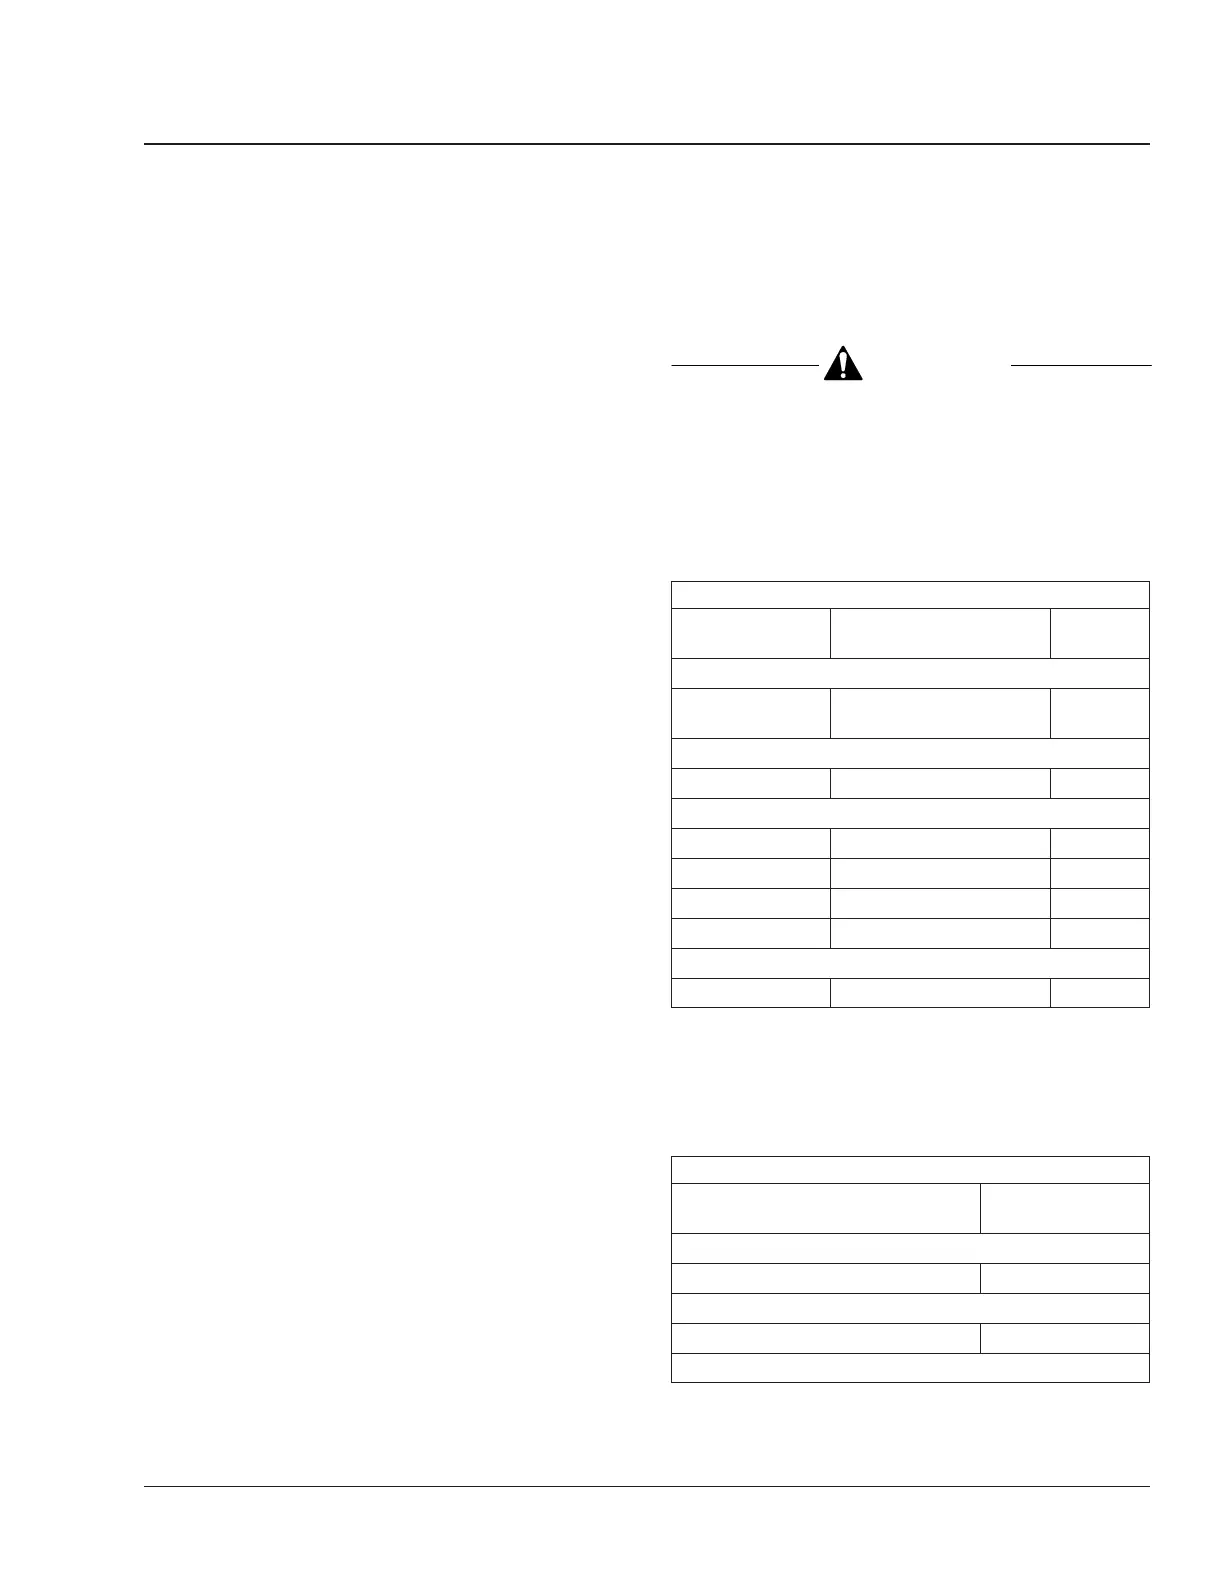
Approved Allison Transmission Lubricants
Lubricant Type
*
Temperature in °F (°C)
SAE
Viscosity
All Allison Transmissions
Castrol
TranSynd
™
Above –67 (–55) —
AT and MD Series
†‡
Dexron
®
II –25 to +120 (–32 to +48) —
MT Series
Dexron IIE –10 to +120 (–23 to +48) —
Dexron III Above –17 (–27) —
Type C4 10 to 120 (–12 to +48) SAE 10W
Type C4 32 to 120 (0 to 48) SAE 30W
HD Series
‡
Dexron III Above –17 (–27) —
*
Lubricants listed in order of preference. Do not mix types of oil.
†
Factory filled with Dexron
®
II.
‡
For off-highway operation or where ambient temperature is consistently
above 86°F (30°C) or below –17°F (–27°C), refer to the manufacturer’s fluid
recommendations.
Table 4, Approved Allison Transmission Lubricants
Allison Transmission Lubricant Capacities
Transmission Model
Refill Capacity
*
in Quarts (liters)
On-Highway Series
1000/2000/2400 15.0 (14.2)
AT Series
AT–545 16.0 (15.1)
MT Series
Transmission 26
Business Class Trucks Maintenance Manual, February 2003 26/7
 Loading...


