Page 4
CLEANING
1. Remove pad frames and set them aside.
2. Remove the overow standpipe from the drain bushing and allow the
reservoir to empty.
3. Clean the internal surfaces of the cooler with a cloth and clean water. DO
NOT USE WIRE BRUSHES OR OTHER MEANS THAT MIGHT SCRATCH
THE PAINT. DO NOT USE ANY CHEMICALS OTHER THATN SOAP OR
DETERGENT TO CLEAN THE COOLER.
4. Rinse the cooler bottom pan throughly.
5. Clean the pump screen and remove any foreign material in the hose
adapter between the pump and hose. Remove any foreign material in the
distributor adapter located between the top end of the hose and the water
distributor.
6. Touch up and scratches or bare spots inside the cooler with a suitable
cooler coating.
OILING
Fill the oil cups on the blower shaft bearings with SAE#30 non-detergent
motor oil.
BELT ADJUSTMENT
Check belt tension. Re-adjust, if loose, per instructions in the Operation
section of this manual.
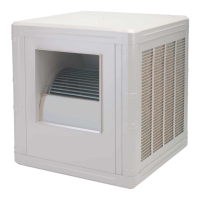
WIRE PAD RETAINER
ASPEN PAD
PAD FRAME
PAD REPLACEMENT
1. Lay pad frame on smooth surface with wire pad retainers up. Remove wire
retainers.
2. Remove and discard used pads.
3. Clean pad frames. Do NOT use wire brush or harsh chemicals that might
harm the paint nish. Touch up scratches and bare spots with touch up
paint.
4. Check slots in trough at top of pad frame to be sure they are open.
5. Replace pads with new media pads of the correct size.
6. Reinstall wire retainers.
7. Thoroughly wet pads with garden hose before re-installing.
MAINTENANCE
The cooler should be serviced at least once a year and more often if required.
This includes cleaning, oiling, belt adjustment or replacement (if required) and
pad replacement.
WARNING: ALWAYS DISCONNECT ELECTRICAL
POWER TO THE COOLER BEFORE WORKING ON
COOLER.
TROUBLESHOOTING:
The following guide is intended to help you diagnose and x some of the most commonly encountered problems; by no means does
this guide cover all of the possible problems you may encounter. If you cannot diagnose and correct the problem, or if it persists,
contact qualied service personnel. All electrical work should be done by, or with the help of, a qualied electrician.
PROBLEMS / SYMPTOMS POSSIBLE CAUSE CORRECTIVE ACTION
Water overow
1. Float valve out of adjustment
2. Float movement obstructed
3. Float valve defective
1. Adjust oat to 2½" water depth.
2. Free oat from obstruction
3. Replace oat assembly
Blower will not operate
1. Electrical power disconnected
2. Motor defective
3. Switch or thermostat defective
4. Blower belt broken
1. Check power receptacle and cord
2. Replace motor
3. Replace switch or thermostat
4. Replace belt
Fuse blown or circuit breaker
tripped
1. Wiring faulty or wired incorrectly
2. Motor faulty
3. Water pump faulty
1. Repair or replace defective wiring
2. Replace motor
3. Replace water pump
Dry pads
1. Water level incorrect
2. Pump intake clogged
3. Water pump faulty
4. Clogged water line
5. Trough clogged
6. Switch faulty
7. Wiring faulty
1. Adjust oat to 2-1/2" water depth
2. Remove obstruction
3. Replace water pump
4. Locate and free obstruction
5. Clear debris from trough
6. Replace switch
7. Repair or replace defective wiring
Noisy operation
1. Blower rubbing on housing
2. Motor sheave loose
3. Blower set screws loose
1. Reposition wheel
2. Tighten screws
3. Tighten set screws
Inadequate air ow
1. Pad plugged
2. Belt loose
3. Insufcient exhaust vent area
1. Replace pads
2. Adjust belt tension
3. Open windows or doors
 Loading...