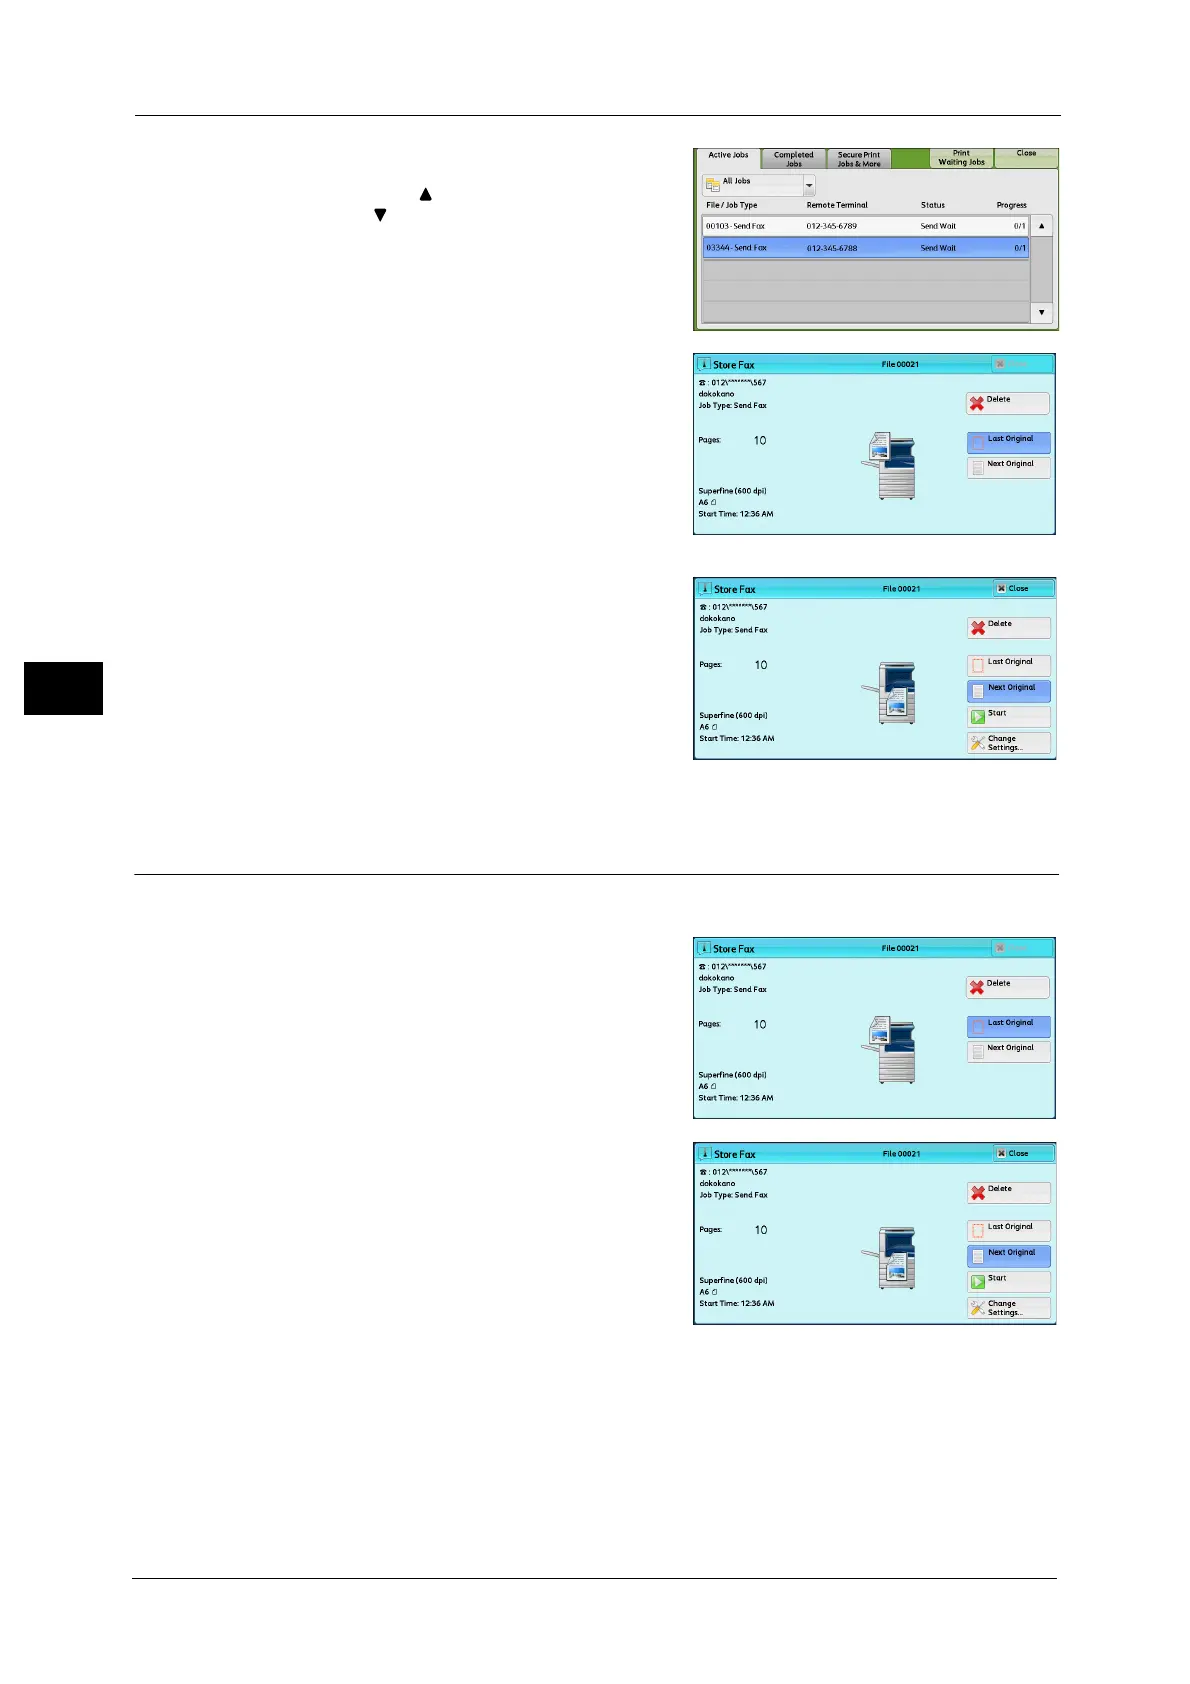
Home
Fuji Xerox
All in One Printer
DocuCentre-IV C2265
Fuji Xerox DocuCentre-IV C2265 User Manual
4
of 1
of 1 rating
443 pages
Give review
Manual
Specs
To Next Page
To Next Page
To Previous Page
To Previous Page
Loading...
4 Fax
166
Fax
4
2
Se
lect th
e job
to canc
el.
Note
•
Selec
t [
] to return to the previous screen or
[
] to move to
the next sc
reen.
3
Select
[Del
ete].
4
Select
[Del
ete].
Changing the Scan Settings
You can change the scan settings while scanning a documen
t.
1
Se
lect [Nex
t Origin
al] on t
he touc
h screen
.
2
Selec
t [Change Settin
gs].
165
167
Table of Contents
Default Chapter
3
Table of Contents
3
Before Using the Machine
13
Preface
14
Types of Manuals
15
Using this Guide
16
Organization of this Guide
16
Conventions
17
Safety Notes
19
Electrical Safety
20
Machine Installation
21
Operational Safety
26
Consumable
29
Location of Warning and Caution Labels
30
Regulation
31
Radio Frequency Emissions (Class B)
31
Product Safety Certification (UL, CB)
31
Environment
32
About License
33
Rsa Bsafe
33
Heimdal
33
JPEG Code
33
Libcurl
34
Freebsd
34
Openldap
35
Des
36
Aes
37
TIFF (Libtiff)
37
ICC Profile (Little Cms)
37
XPS (XML Paper Specification)
37
EDICT and COMPDIC
37
Cyrus SASL
38
Legal Notice
39
Product Overview
41
Machine Components
42
Power Source
51
Switching the Main Power on
51
Switching the Power on
52
Switching the Power off
53
Switching the Main Power off
53
Ground Fault Interrupter
55
Energy Saver Mode
57
Entering the Energy Saver Mode
58
Exiting the Energy Saver Mode
58
Cooling Mode
60
Control Panel
61
Screens and Buttons Displayed
65
About the [Services Home] Screen
66
Entering Text
70
Installing the Tray Attachment on the Finisher-B1
71
Copy
73
Copying Procedure
74
Step 1 Loading Documents
74
Step 2 Selecting Features
76
Step 3 Entering a Quantity
77
Step 4 Starting the Copy Job
78
Step 5 Confirming the Copy Job in Job Status
79
Operations During Copying
80
Stopping the Copy Job
80
Changing the Number of Copies
81
Interrupting the Copy Job
82
Simple Copy
83
Paper Supply (Selecting the Paper for Copying)
83
Reduce/Enlarge (Making Enlarged/Reduced Copies)
85
Sided Copying (Making 2 Sided Copies)
85
Auto/Color/Black & White (Selecting the Color for Copying)
86
Lighten/Darken (Adjusting the Copy Density)
86
Pages Per Side (Copying Two Pages Onto One Sheet)
87
Staple
87
Copy
88
Reduce/Enlarge (Making Enlarged/Reduced Copies)
88
Paper Supply (Selecting the Paper for Copying)
92
Output Color (Selecting the Color for Copying)
95
Sided Copying (Making 2 Sided Copies)
99
Copy Output (Specifying Finishing Options)
99
Pages Per Side (Copying Multiple Pages Onto One Sheet)
100
Lighten/Darken (Adjusting the Copy Density)
100
Image Quality
101
Original Type (Selecting the Document Type)
101
Image Options (Adjusting Copy Density/Sharpness/Saturation of Images)
103
Image Enhancement (Erasing the Background Color of Documents/Adjusting Contrast)
103
Color Effects (Selecting an Image Quality)
104
Color Balance (Adjusting Color Balance)
105
Color Shift (Adjusting the Color Tone)
107
Layout Adjustment
108
Screen
108
Sided Copying (Making 2 Sided Copies)
109
Book Copying (Copying Facing Pages Onto Separate Sheets)
110
Sided Book Copying (Making 2 Sided Copies of Facing
112
Original Size (Specifying the Scan Size for the Document)
113
Mixed Size Originals (Scanning Different Size Documents Simultaneously)
114
Edge Erase (Erasing Edges and Margin Shadows of the Document)
115
Image Shift (Adjusting the Image Position)
117
Invert Image (Making Reversed Copies of Images)
119
Original Orientation (Specifying the Orientation of Loaded Documents)
120
Image Rotation (Changing the Orientation of Images)
121
Output Format
123
Sided Copying (Making 2 Sided Copies)
123
Select [Copy] on the [Services Home] Screen
123
Booklet Creation (Creating a Booklet)
124
Covers (Attaching Covers to Copies)
127
Pages Per Side (Copying Multiple Pages Onto One Sheet)
128
Poster (Making Enlarged Copies Spread over Multiple Sheets)
129
Repeat Image (Making Multiple Copies on One Sheet)
131
Annotations (Adding a Comment/A Date/Page Numbers to Copies)
132
Watermark (Printing Control Numbers on the Background of Copies)
138
Folding (Outputting Bi-Folded)
141
Preset Repeat Image (Making Multiple Copies on a Single Sheet)
142
Copy Output (Specifying Finishing Options)
143
ID Card Copy (Copying both Sides of an ID Card)
146
Job Assembly
148
Build Job (Processing Documents Scanned with Different Settings as One Job)
148
Sample Job (Checking the Finished Output of the Copy)
152
Combine Original Sets (Adding Originals)
153
Delete Outside/Delete Inside (Deleting Outside or Inside of the Selected Area)
155
Stored Programming (Calling a Stored Program for Build Job)
156
Fax
157
Fax Procedure
158
Step 1 Loading Documents
158
Step 2 Selecting Features
160
Step 3 Specifying Destinations
161
Step 4 Starting the Fax Job
163
Step 5 Confirming the Fax Job in Job Status
164
Operations During Faxing
165
Stopping the Fax Job
165
Changing the Scan Settings
166
About Internet Fax
168
Internet Fax Features
168
Sending Internet Fax
170
Receiving Internet Fax
171
Useful Features
172
About IP Fax (SIP)
175
IP Fax (SIP) Features
176
Feature Comparison with Regular Fax
177
Sending IP Fax (SIP)
178
Receiving IP Fax (SIP)
178
About Server Fax
179
Sending Server Fax
179
Simple Fax
181
Specifying a Destination Using the Numeric Keypad
181
Speed Dialing (Specifying a Destination Using an Address Number)
182
Specifying a Destination Using a One Touch Button
183
Resolution (Specifying the Scanning Resolution)
184
Original Type (Selecting the Document Type)
184
Sided Scanning (Transmitting 2-Sided Originals)
185
Fax/Internet Fax
186
Internet Fax/Fax/Ip Fax (SIP) (Selecting Internet Fax/Fax/Ip Fax (SIP))
186
Add (Sending Faxes to Multiple Recipients)
187
Specifying a Destination Using the Address Book
187
Speed Dialing (Specifying a Destination Using an Address Number)
191
Add New Address (Registering a Destination on the Address Book)
192
Specifying a Destination Using a One Touch Button
195
Specifying a Destination Using the Keyboard Screen
195
Specifying a Destination Using the Redial Feature
196
Specifying a Line (Port)
197
Entering Specific Symbols
198
Removing/Confirming a Recipient
198
Lighten/Darken (Adjusting Fax Density)
199
Sided Scanning (Transmitting 2-Sided Originals)
199
Original Type (Selecting the Document Type)
201
Resolution (Specifying the Scanning Resolution)
201
Layout Adjustment
203
Sided Scanning (Transmitting 2-Sided Originals)
203
Original Type (Selecting the Document Type)
203
Resolution (Specifying the Scanning Resolution)
203
Original Size (Specifying the Scan Size for the Original)
203
Mixed Size Originals (Scanning Different Size Documents Simultaneously)
204
Book Faxing (Scanning Facing Pages Onto Separate Sheets)
205
Reduce/Enlarge (Specifying a Scan Ratio)
207
Stamp (Adding a Stamp When Scanning a Document)
208
Fax/Internet Fax Options
209
Acknowledgement Report (Confirming Transmission Results)
209
Confirmation Options
210
Starting Rate (Selecting a Communication Mode)
211
Priority Send/Delay Start (Specifying Send Priority/Send Time)
212
Delay Start
213
Transmission Header Text (Adding Sender Name and Phone Number to Faxes)
214
Cover Page (Transmitting Documents with a Cover Page)
215
Internet Fax Subject (Specifying the Internet Fax Subject)
217
Internet Fax Message (Editing the Internet Fax Mail Contents)
217
Recipient Print Sets (Printing Multiple Sets at the Remote Machine)
218
Pages Per Side (Combining Multiple Pages into One Sheet)
219
Remote Folder (Using Remote Folder)
219
F Code (Using F Code Transmission)
223
Internet Fax Profile (Specifying Internet Fax Profiles)
226
Encryption (Sending Internet Fax Encrypted by S/MIME)
227
Digital Signature (Sending Internet Fax with a Digital Signature by S/MIME)
228
More Options
229
Remote Polling (Retrieving Files from Remote Machines)
229
Select [Fax/Internet Fax] on the [Services Home] Screen
229
Store for Polling (Storing Files on the Machine that a Remote Machine Can Retrieve)
232
On-Hook (Confirming Remote Machine Response Prior to Transmission)
233
Broadcast
235
Broadcast Send (Transmitting to Multiple Recipients)
235
Relay Broadcast (Transmitting Documents through a Relay Station)
236
Remote Relay Broadcast (Performing Relay Broadcast to Remote Locations)
239
Receiving Faxes
243
Switching between Auto Receive and Manual Receive
243
Using Auto Receive
244
Using Manual Receive
244
Using Folder Receive
245
Facsimile Information Services
246
Using the Receiver
246
When Not Using a Receiver
246
Scan
249
Scanning Procedure
250
Step 1 Loading Documents
250
Step 2 Selecting the Features
252
Step 3 Starting the Scan Job
255
Step 4 Confirming the Scan Job in Job Status
256
Step 5 Saving the Scanned Data
257
Operations During Scanning
258
Stopping the Scan Job
258
Previewing the Scanned Images During a Scan Job
259
Changing Scan Settings
260
E-Mail
261
Address Book (Specifying an E-Mail Address)
262
Add New Address (Registering a Recipient on the Address Book)
267
Specifying a Destination Using a One Touch Button
269
New Recipient (Entering an Address)
270
Add Me (Adding the Sender's Address)
271
Recipient(S) (Editing a Recipient)
272
From (Setting the Sender's Address)
273
Subject (Setting the Subject)
274
Message (Entering the E-Mail Body)
274
Preview (Previewing the Scanned Images During a Scan Job)
274
Color Scanning (Selecting an Output Color)
275
Sided Scanning (Scanning both Sides of a Document)
275
Original Type (Selecting the Document Type)
277
File Format (Selecting a File Format for Output Data)
277
Language of the Original
282
Network Scanning
289
Preview (Previewing the Scanned Images During a Scan Job)
290
Color Scanning (Selecting an Output Color)
290
Sided Scanning (Scanning both Sides of a Document)
290
Original Type (Selecting the Document Type)
290
File Format (Selecting a File Format for Output Data)
290
Scan to PC
291
Transfer Protocol (Selecting a Transfer Protocol)
292
Address Book (Specifying a Destination PC Using the Address Book)
292
Add New Address (Registering a Destination PC on the Address Book)
294
Specifying a Destination PC Using a One Touch Button
297
Browse (Specifying a Destination PC by Browsing Your Network)
298
Specifying a Destination (Specifying a Destination PC Using the Screen Keyboard)
299
Preview (Previewing the Scanned Images During a Scan Job)
301
Color Scanning (Selecting an Output Color)
301
Sided Scanning (Scanning both Sides of a Document)
301
Original Type (Selecting the Document Type)
301
File Format (Selecting a File Format for Output Data)
301
Store to Folder
302
Color Scanning (Selecting an Output Color)
303
Sided Scanning (Scanning both Sides of a Document)
303
Original Type (Selecting the Document Type)
303
Preview (Previewing the Scanned Images During a Scan Job)
303
Store to USB
304
Save in (Specifying a Storage Location in the USB Memory Device)
308
Details (Displaying the Details of a Storage Location in the USB Memory Device)
309
Preview (Previewing the Scanned Images During a Scan Job)
310
Color Scanning (Selecting an Output Color)
310
Sided Scanning (Scanning both Sides of a Document)
310
Original Type (Selecting the Document Type)
310
File Format (Selecting a File Format for Output Data)
310
Store & Send Link
311
Scan to (Displaying the E-Mail Address of the Authenticated User)
311
From (Displaying the E-Mail Address of the Authenticated User)
312
Subject (Setting the Subject)
312
Message (Entering the E-Mail Body)
312
Color Scanning (Selecting an Output Color)
312
Sided Scanning (Scanning both Sides of a Document)
312
Original Type (Selecting the Document Type)
312
Preview (Previewing the Scanned Images During a Scan Job)
312
File Format (Selecting a File Format for Output Data)
313
Store to WSD
314
Computer (Starting a Scan Job Via Computer Operation)
314
This Device (Storing Data Scanned by the Machine on a Network Computer)
316
Advanced Settings
317
Color Scanning (Selecting an Output Color)
317
Original Type (Selecting the Document Type)
317
Photographs (Scanning a Color Photograph)
318
Image Options (Adjusting Scan Density and Image Sharpness)
318
Image Enhancement (Erasing the Background Color of Documents/Adjusting Contrast)
319
Image Enhancement (Erasing the Background Color of Documents/ Adjusting Contrast)
319
Shadow Suppression (Suppressing the Document Background)
319
Color Space (Specifying Color Space)
320
Layout Adjustment
322
Resolution (Specifying a Scanning Resolution)
322
Sided Scanning (Scanning both Sides of a Document)
323
Book Scanning (Scanning Facing Pages on Separate Sheets)
323
Original Size (Specifying a Scan Size)
324
Mixed Size Originals (Scanning Different Size Documents Simultaneously)
325
Edge Erase (Erasing Edges and Margin Shadows in the Document)
326
Reduce/Enlarge (Specifying a Scanning Ratio)
328
Original Orientation (Specifying the Orientation of the Loaded Document)
329
E-Mail Options/Filing Options
330
On the [Services Home] Screen, Select [E-Mail]
330
On the [Services Home] Screen, Select [E-Mail], [Store to Folder], [Network Scanning], [Scan to PC], [Store & Send Link], or [Store to USB]
330
File Format (Selecting a File Format for Output Data)
331
Quality/File Size (Specifying an Image Compression Ratio When Scanning)
331
Read Receipts (Specifying Read Receipts)
331
Split Send (Sending in Sections)
332
File Name (Specifying a Name for the File to be Sent)
333
Reply to (Specifying a Reply Address)
333
File Name (Specifying a Name for the File to be Saved)
334
File Name Conflict (Setting the Action to be Taken for File Name Conflict)
334
Digital Signature (Sending E-Mail with a Digital Signature by S/MIME)
335
Encryption (Sending E-Mail Encrypted by S/MIME)
335
Login Name
335
Meta Data
336
Password
336
Send from Folder
337
Folder Operating Procedure
338
Step 1 Opening the [Send from Folder] Screen
338
Step 2 Selecting a Folder
339
Step 3 Checking/Selecting Files in a Folder
339
Step 4 Operating Files in a Folder
339
Selecting a Folder
340
Checking/Operating Files in a Folder
341
Checking File Details
343
Printing Files in a Folder
345
Sided Printing
346
Configuring/Starting Job Flow
348
[Link Job Flow Sheet to Folder] Screen
350
Job Flow Restrictions
353
Job Flow Sheets
355
Job Flow Procedure
356
Step 1 Opening the [Job Flow Sheets] Screen
356
Step 2 Selecting a Job Flow Sheet
356
Step 3 Confirming/Changing the Job Flow Sheet
357
Step 4 Starting the Job Flow Sheet
357
Selecting/Changing a Job Flow Sheet
358
Stored Programming
361
Stored Programming Overview
362
Registering/Deleting/Renaming Stored Programs
363
Registering Stored Programs
364
Notes and Restrictions on Registering Stored Programs
365
Registering Stored Programs for Build Job
366
Deleting Stored Programs
367
Entering/Changing a Stored Program Name
367
Assigning/Changing Icons for Stored Programs
368
Calling a Stored Program
369
Calling a Stored Program for Build Job
370
Media Print (Text and Photos)
371
Overview of Media Print
372
Supported Media and File Formats
373
Notes and Restrictions on Media Print
373
Inserting a USB Memory Device
375
Media Print - Text
378
Selecting Files
378
[Select from List] Screen
379
Media Print - Photos
380
Selecting Files
380
[Select from List] Screen
381
Selecting the Printing Options
382
Media Print - Photos
382
Media Print - Text
383
Index Print
384
Job Status
385
Job Status Overview
386
Checking Current/Pending Jobs
387
Checking Completed Jobs
389
Printing and Deleting Stored Jobs
390
Secure Print
390
Sample Set
392
Delayed Print
394
Charge Print
395
Private Charge Print
398
Public Folder
400
Undelivered Faxes
401
Printing Pending Jobs
403
Handling Error Terminations
404
Computer Operations
405
Features Overview
406
Print
407
Print Features
407
Direct Printing
408
Setup
409
Printing
409
E-Mail Printing
410
Setup
410
Receiving E-Mail
410
Sending Fax
412
Registering Destinations
412
Importing Scanned Data
415
Importing to a TWAIN Compatible Application
415
Importing Using Stored File Manager 3
417
Importing Using Centreware Internet Services
419
Importing Using Easyoperator
421
Centreware Internet Services
423
Browser Settings
425
Proxy Server and Port Number
425
Starting Centreware Internet Services
426
12 Appendix
427
Glossary
428
Index
435
4
Based on 1 rating
Ask a question
Give review
Questions and Answers:
Need help?
Do you have a question about the Fuji Xerox DocuCentre-IV C2265 and is the answer not in the manual?
Ask a question
Fuji Xerox DocuCentre-IV C2265 Specifications
General
Brand
Fuji Xerox
Model
DocuCentre-IV C2265
Category
All in One Printer
Language
English
Related product manuals
Fuji Xerox DocuCentre-IV C2263
443 pages
Fuji Xerox DocuCentre-IV C2260
401 pages
Fuji Xerox docucentre-iv C2270
433 pages
Fuji Xerox DocuCentre-IV C3373
459 pages
Fuji Xerox DocuCentre-IV C5570
433 pages
Fuji Xerox docucentre-iv C4470
433 pages
Fuji Xerox docucentre-iv C3370
433 pages
Fuji Xerox DocuCentre-IV C4475
459 pages
Fuji Xerox DocuCentre-IV C3375
459 pages
Fuji Xerox DocuCentre-IV C5575
459 pages
Fuji Xerox DocuCentre-IV 3065
399 pages
Fuji Xerox DocuCentre-IV 2060
399 pages