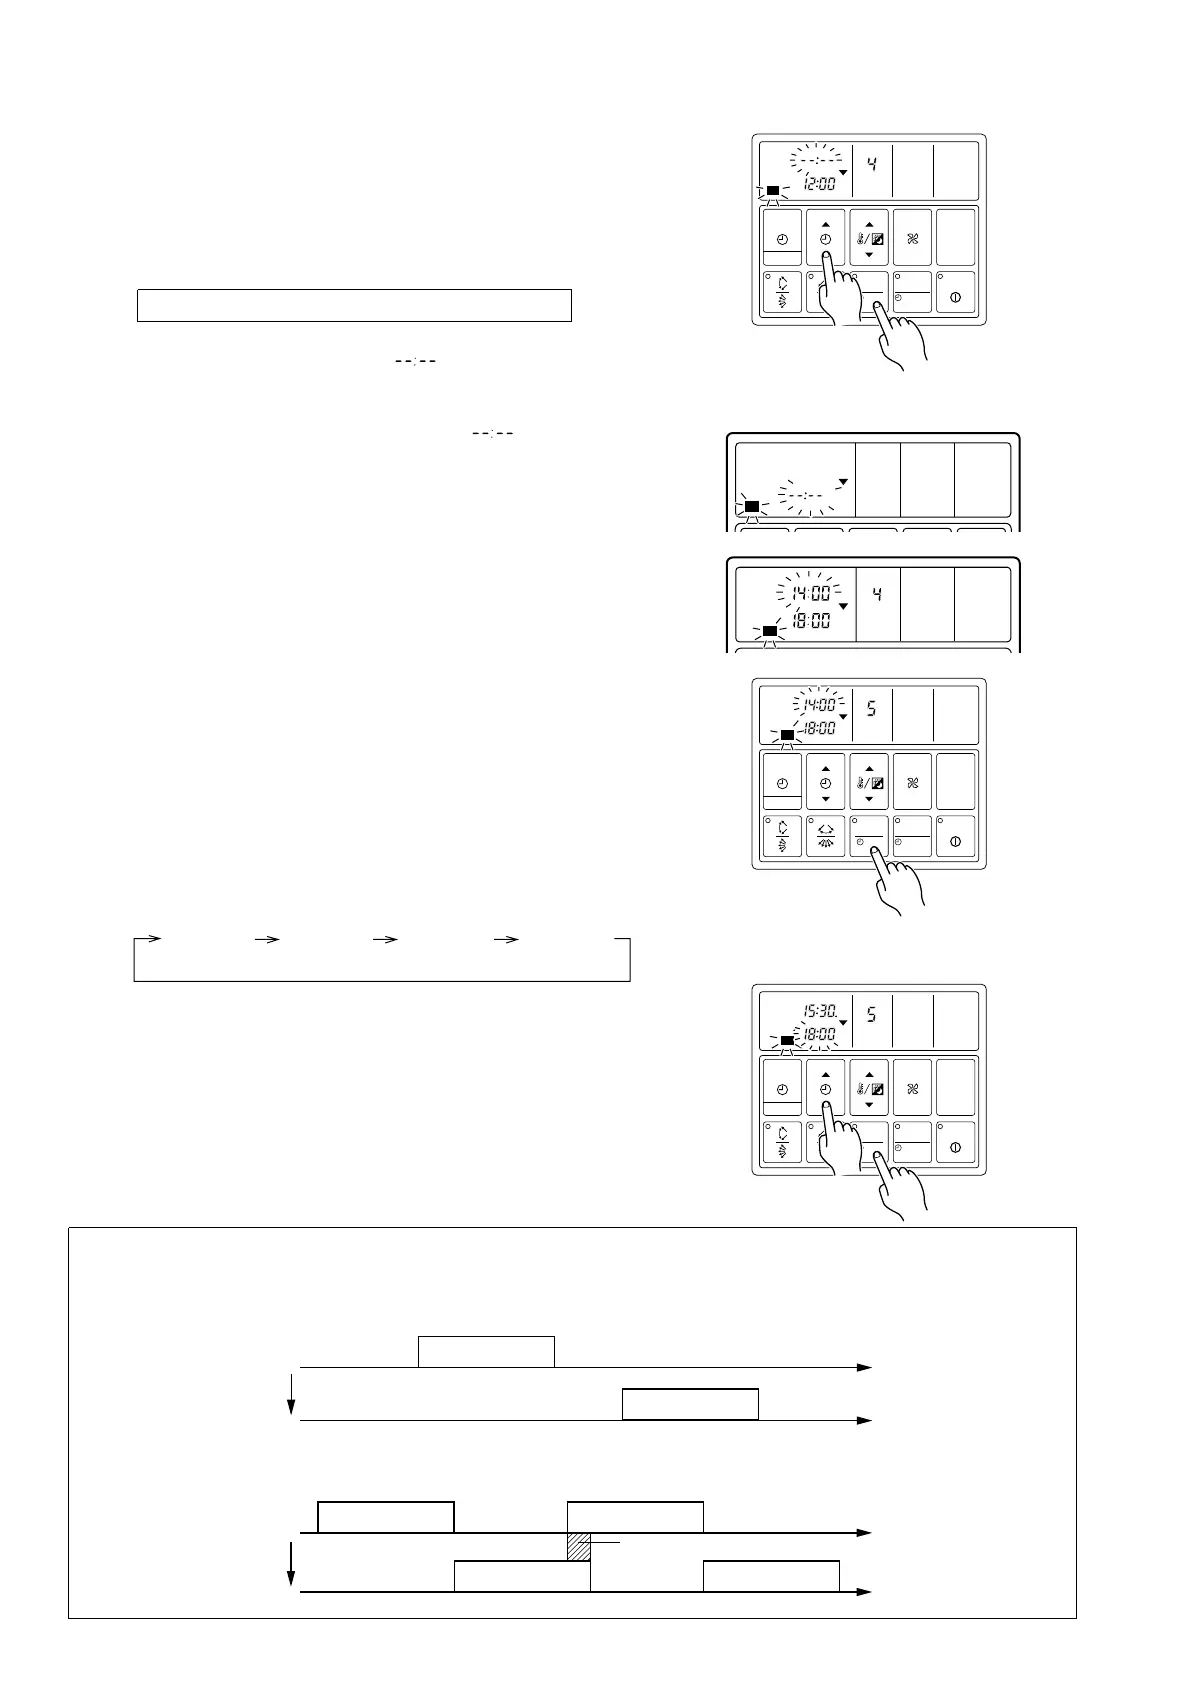
Cancelling Selected Time Settings
Press the START/STOP button to stop the air conditioner, and
then proceed as follows.
1. Carry out steps 1 to 3 of the "Setting Up the Weekly Timer
Operation" procedure to select the day you want to edit.
2.
Press the SET button to select the ON time that you want to cancel.
To Change Selected Time Settings
Press the START/STOP button to stop the air conditioner, and
then proceed as follows.
1. Carry out steps 1 to 3 of the "Setting Up the Weekly Timer
Operation" procedure to select the day you want to edit.
2.
Press the SET button to select the time that you want to change.
The selected setting flashes on the display. Each press
moves you to the next setting for the selected day, as follows.
3. Hold down the ▼ side of the SET TIME button until the
time display becomes blank " ".
4. Press the SET button.
The first OFF time setting ("WEEKLY 1" OFF time) is deleted
and replaced by a flashing blank pattern " ".
5. Press the SET button again.
This completes deletion of the "WEEKLY 1" ON/OFF settings.
The second ON time setting ("WEEKLY 2" ON time) appears
and flashes.
If you wish to delete other time settings, repeat steps 2
through 5.
6. Once the setting has been canceled, hold down the SET
button for 3 seconds.
The WEEKLY display flashes briefly, and then the clock dis-
play appears.
TIMER
DAY
WEEKLY
AUTO
ON
OFF
TIMER
MODE
START/STOP
CLOCK ADJUST
SET TIME TEMP./DAY FAN
CONTROL
MASTER
CONTROL
21
AUTO
DEFROST TEST
SET
DAY OFF
2
3
TIMER
DAY
WEEKLY
AUTO
ON
OFF
21
AUTO
DEFROST TEST
TIMER
DAY
WEEKLY
AUTO
ON
OFF
21
AUTO
DEFROST TEST
Be sure to select an ON time (the upper time display).
Example : Clearing the "WEEKLY 1" ON/OFF
times for day 4 (Thursday).
Example : Changing the "WEEKLY 2" ON setting
for day 5 (Friday) from 14:00 to 15:30.
WEEKLY 1
ON
WEEKLY 1
OFF
WEEKLY 2
ON
WEEKLY 2
OFF
NOTES:
In the following cases, cancel the set time prior to making the required amendments.
(1) If you want to change the ON time to a time that is later than the currently set OFF time.
(2)
If the change would cause a temporary overlap between the first and second ON/OFF time spans.
ON OFF
WEEKLY 1
ON OFF
WEEKLY 1
Change
Time
Time
Temporary overlap
Change
Time
Time
ON OFF
WEEKLY 1
ON OFF
WEEKLY 2
OFF ONON OFF
WEEKLY 1 WEEKLY 2
3. Press the SET TIME button to change the time setting.
4. Press the SET button.
The new setting overwrites the previous setting.
5. Once the setting has been canceled, hold down the SET
button for 3 seconds.
The WEEKLY display flashes briefly, and then the clock dis-
play appears.
MASTER
CONTROL
FAN
CONTROL
TIMER
MODE
TEMP./DAY
SET TIME
CLOCK ADJUST
START/STOP
SET
DAY OFF
ZONE
ENERGY SAVE
COOL
FAN
DRY
HEAT
AUTOAUTO
CLOCK
OFF
OFF
ON
ON
C
F
NEXT DAY
DAY
TIMER
NON STOP
OFFON
TIMER
WEEKLY
ANTI FREEZE
CENTRAL
DAY OFF
DEFROST
TEST
1 2
MASTER
CONTROL
FAN
CONTROL
TIMER
MODE
TEMP./DAY
SET TIME
CLOCK ADJUST
START/STOP
SET
DAY OFF
ZONE
ENERGY SAVE
OFF
ON
DAY
TIMER
WEEKLY
1
MASTER
CONTROL
FAN
CONTROL
TIMER
MODE
TEMP./DAY
SET TIME
CLOCK ADJUST
START/STOP
SET
DAY OFF
ZONE
ENERGY SAVE
OFF
ON
DAY
TIMER
WEEKLY
2
MASTER
CONTROL
FAN
CONTROL
TIMER
MODE
TEMP./DAY
SET TIME
CLOCK ADJUST
START/STOP
SET
DAY OFF
ZONE
ENERGY SAVE
OFF
ON
DAY
TIMER
WEEKLY
2
– 63 –
1
2
3
2
4
3