En-4
Hanger × 2
(Accessories)
Tapping screw A × 4
(Accessories)
(2) If hung on a wall
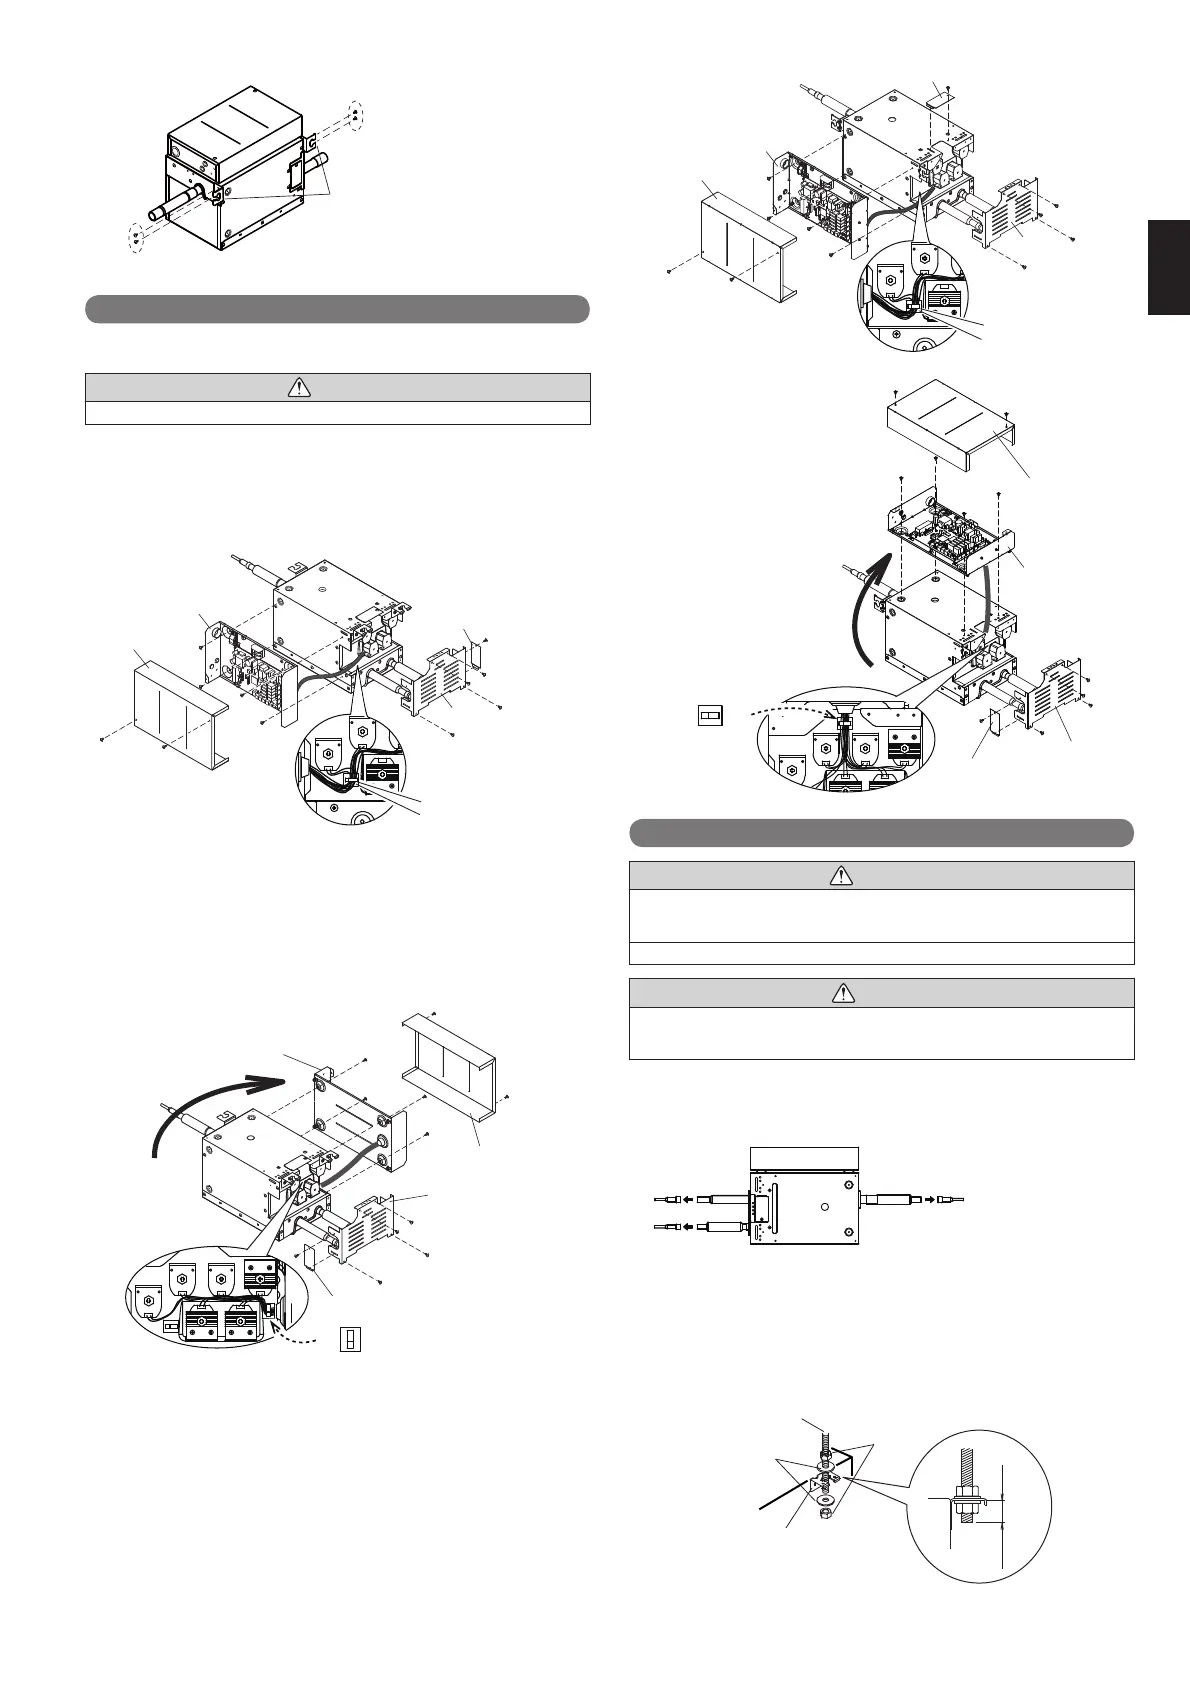
5.6. Changing the positioning of the control box
5.6.1. Attaching to the opposite horizontal face
CAUTION
Change the positioning of the control box on-site before performing the installation.
Change the control box attachment side as required.
(1) Remove Cover-A. (4 screws)
(2) Remove Cover-B. (1 screw)
(3) Remove the cable from the cable clamp.
(4) Remove the control box cover. (2 screws)
(5) Remove the control box. (4 screws)
(1)
(1)
(5)
(5)
(5)
(2)
(1)
(1)
(5)
(4)
(4)
(3)
Cover-B
Cover-A
Control box
Control box
cover
Cable clamp
(6) Change the control box attachment position.
(At this time, move the control box up or down.)
(7) Attach the cable clamp (accessory). Thereafter, put the cable in the cable
clamp.
(8) Fix the control box position. (4 screws)
(9) Attach Cover-B to Cover-A. (1 screw)
(Attach 1 screw to the reverse side from the removed part.)
(10) Attach Cover-A. (4 screws)
(11) Attach the control box cover. (2 screws)
(8)
(8)
(8)
(6)
(8)
(9)
(10)
(10)
(10)
(10)
(11)
(11)
(7)
Cable clamp
(Accessory)
Control box
cover
Cover B
Cover A
Control box
5.6.2. If attaching on the top
Change the control box attachment side as required.
(1) Remove Cover-A. (4 screws)
(2) Remove Cover-B. (1 screw)
(3) Remove the cable from the cable clamp.
(4) Remove the control box cover. (2 screws)
(5) Remove the control box. (4 screws)
(1)
(1)
(1)
(2)
(4)
(4)
(5)
(5)
(5)
(5)
(3)
Cover-B
Cover-A
Control box
Control box
cover
Cable clamp
(6) Change the control box
attachment position.
(7) Attach the cable clamp (ac-
cessory). Thereafter, put the
cable in the cable clamp.
(8) Fix the control box position.
(4 screws)
(9) Attach Cover-B to Cover-A.
(1 screw)
(10) Attach Cover-A.
(4 screws)
(11) Attach the control box
cover.
(2 screws)
5.7. Installation of the unit
WARNING
Perform installation in a location which can properly withstand the weight of the unit.
Failure to install in a faulty installment may cause the equipment to fail, water leak-
age, electric shock or fi re.
During installation, secure the hanger bolt so it does not come off.
CAUTION
Be sure to provide adequate maintenance space when installing the unit above the
ceiling.
(Refer to the installation restrictions contained in “5.2 Installation dimensions”.)
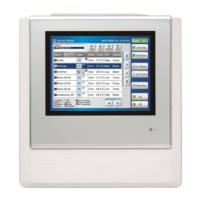
5.7.1. Removing the pinch pipe
Melt the brazing fi lter metal on connecting part using a torch
and remove the pinch pipe.
Pinch pipe
Pinch pipe
5.7.2. Fix the unit (When hanging from the ceiling)
(1) Attach the hanger (accessories) to the hanger bolts as shown in the overview
diagram below. (in 3 places)
(2) After checking that the equipment is horizontal, fi rmly fi xed in place with the
nuts (locally purchased) and washers (accessories).
Hanger bolt
(8 to 10)
Hexagonal nuts
(Locally purchased)
Hanger
(Accessories)
Washers
(Accessories)
20 to 30
(Unit: mm)
(6)
(8)
(9)
(10)
(11)
(11)
(8)
(8)
(10)
(10)
(10)
(8)
(7)
Cable clamp
(Accessory)
Cover B
Cover A
Control box
Control box
cover
9366249047-03_IM.indb Sec1:49366249047-03_IM.indb Sec1:4 2015/3/10 14:27:462015/3/10 14:27:46

 Loading...