En-8
AIR
Bottom side
Drain pipe mounting place
Since the drain water ows out of the outdoor unit during heating operation, install the drain
pipe and connect it to a commercial 16 mm hose. (Reverse cycle model only)
When installing the drain pipe, plug all the holes other than the drain pipe mounting hole
in the bottom of the outdoor unit with putty so there is no water leakage. (Reverse cycle
model only)
Base of the outdoor unit
Drain pipe
Drain pipe mounting hole
3.5. Pipe installation
CAUTION
• Do not use mineral oil on a ared part. Prevent mineral oil from getting into the sys-
tem as this would reduce the lifetime of the units.
• While welding the pipes, be sure to blow dry nitrogen gas through them.
• The maximum lengths of this product are shown in the table. If the units are further
apart than this, correct operation cannot be guaranteed.
■
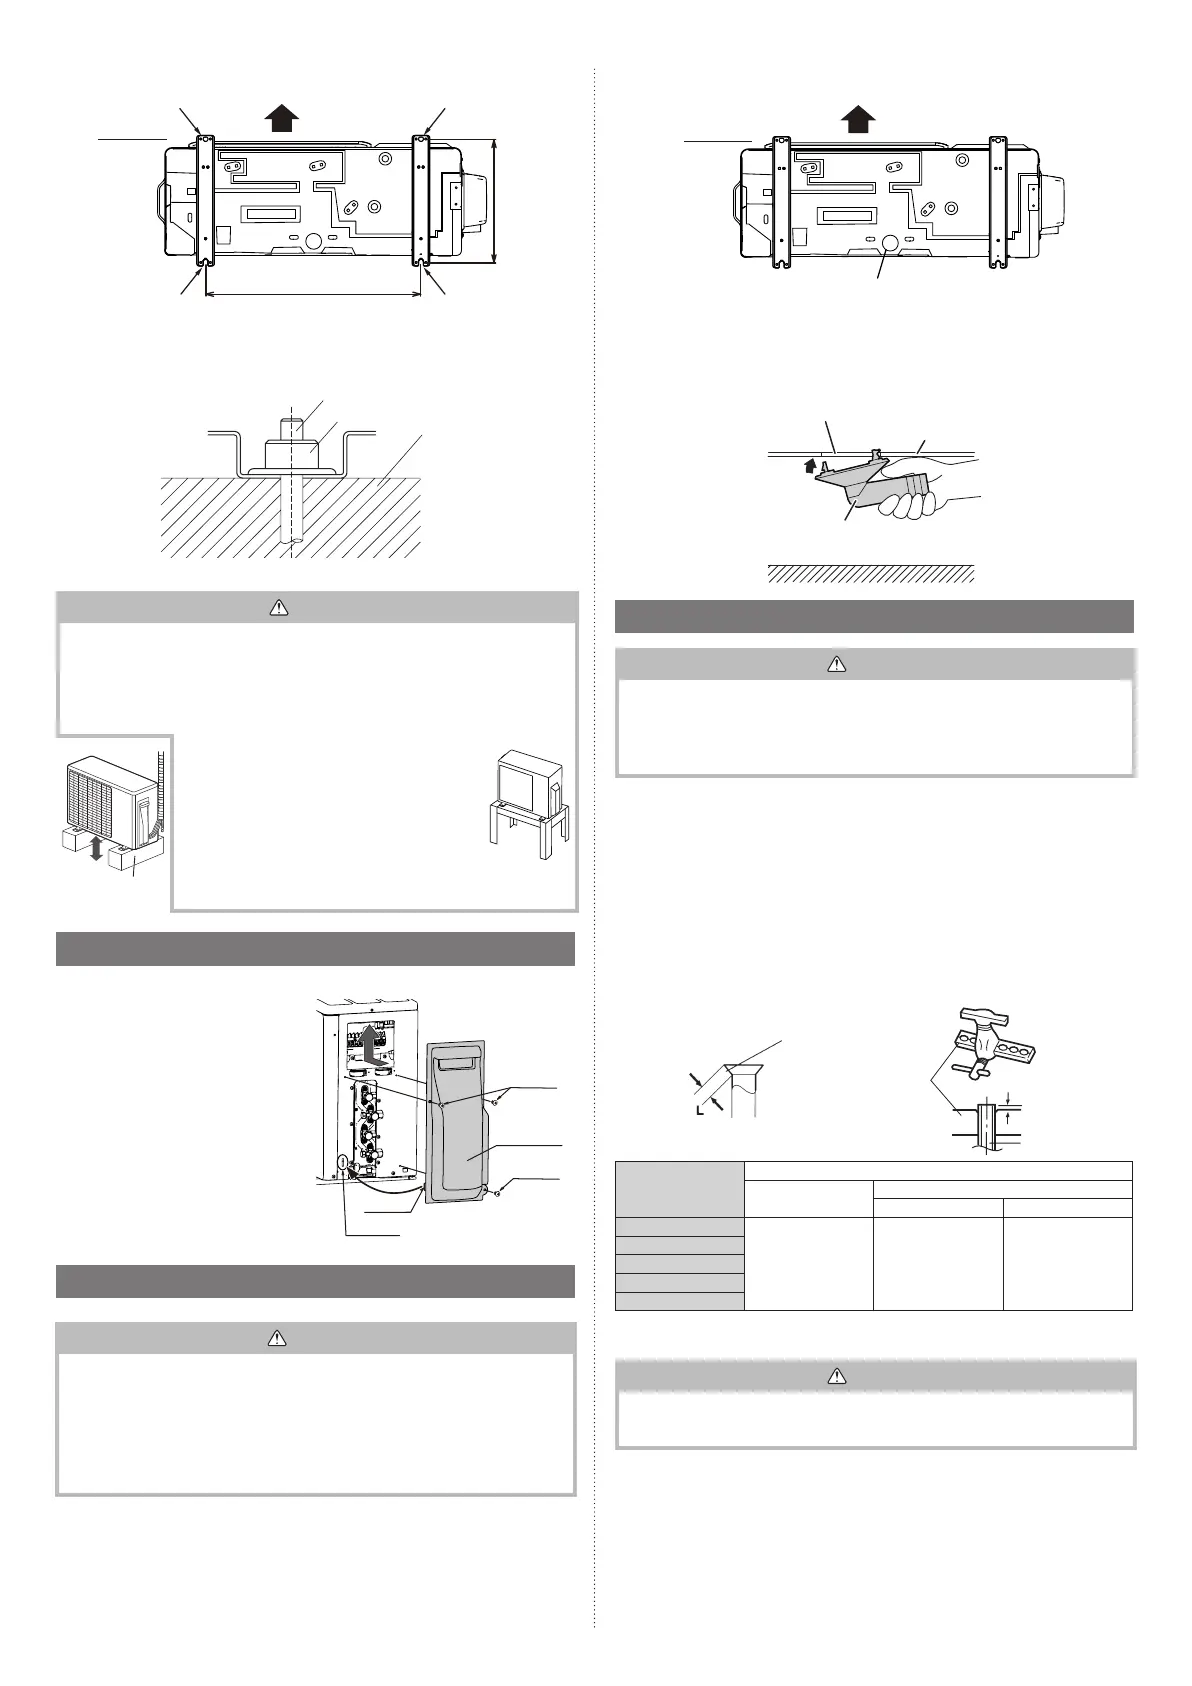
Flaring
(1) Cut the connection pipe to the necessary length with a pipe cutter.
(2) Hold the pipe downward so that cuttings will not enter the pipe and remove the
burrs.
(3) Insert the are nut onto the pipe and are the pipe with a aring tool
.
Insert the are nut (always use the are nut attached to the indoor and outdoor
units respectively) onto the pipe and perform the are processing with a are tool.
Use the special R32(R410A) are tool, or the conventional (for R22) are tool.
When using the conventional are tool, always use an allowance adjustment gauge and
secure the A dimension shown in the following table.
Check if [L] is ared uniformly and
is not cracked or scratched.
Die
A
Pipe
Pipe outside
diameter
A (mm)
Flaring tool for
R32 or R410A, clutch type
Conventional (R22) Flaring tool
Clutch type Wing nut type
ø 6.35 mm (1/4")
0 to 0.5 1.0 to 1.5 1.5 to 2.0
ø 9.52 mm (3/8")
ø 12.70 mm (1/2")
ø 15.88 mm (5/8")
ø 19.05 mm (3/4")
■
Bending pipes
CAUTION
• To prevent breaking of the pipe, avoid sharp bends. Bend the pipe with a radius of
curvature of 100mm or more.
• If the pipe is bent repeatedly at the same place, it will break.
• If pipes are shaped by hand, be careful not to collapse them.
• Do not bend the pipes at an angle of more than 90°.
• When pipes are repeatedly bent or stretched, the material will harden, making it dicult to
bend or stretch them any more.
• Do not bend or stretch the pipes more than 3 times.
AIR
Bottom side
580 mm
330 mm
Fix securely with bolts on a solid block. (Use 4 sets of commercially available M10 bolt,
nut and washer.)
Bolt
Nut
Block
CAUTION
• Do not install the outdoor unit in two-stage where the drain water could freeze. Oth-
erwise the drainage from the upper unit may form ice and cause a malfunction of the
lower unit.
• When the outdoor temperature is 0 °C or less, do not use the accessory drain pipe.
If the drain pipe is used, the drain water in the pipe may freeze in extremely cold
climate.
Base
50 mm
or more
• If the unit is installed in a region that is exposed to
high winds, freezing conditions, freezing rain, snow
fall or heavy snow accumulation, take appropriate
measures to protect it from those elements.
To ensure stable operation, the outdoor unit must
be installed on a raised stand or rack, at or above
the anticipated snow depth for the region.
The installation of snow hoods and drift preven-
tion fencing is recommended when blowing and
drifting snow is common to the region.
3.3. Removing and replacing part
■
Switch cover removal
(1) Remove the tapping screws.
(2) Slide the switch cover downwards to
release.
■
Installing the switch
cover
(1) After inserting the hooks (2 places) on
the switch cover into the hole on the
outdoor unit, slide the switch cover
upwards.
(2) Replace the tapping screws.
Screws
Screws
Switch cover
Hole
Hook
3.4. Drain installation
CAUTION
• Perform drain work in accordance with this Manual, and ensure that the drain water
is properly drained. If the drain work is not carried out correctly, water may drip down
from the unit, wetting the furniture.
• When the outdoor temperature is 0 °C or less, do not use the accessory drain pipe
and drain cap. If the drain pipe and drain cap are used, the drain water in the pipe
may freeze in extremely cold weather. (Reverse cycle model only)
• Outdoor unit to be fasten with bolts at the four places indicated by the arrows without
fail.
9319205281-03_IM.indb 8 04-Dec-20 11:51:20
 Loading...