En-4
Removal method of drain hose
Removethescrewattheleftofdrain
hoseandpulloutdrainhose.
Installation method of drain hose
Verticallyinsertthedrainhosetowardthe
inside,sothatthedrainxture(white)canac
-
curatelyalign with the screw hole around the
draincock.
Afterinserting and before replacing,please
reinstallandxtheremovedscrews.
• Pleaseholdaroundthejointofthedrainhoseduringworking.
•
Asthescrewisinside,besuretousescrewdrivertreatedwithmagnet.
Screw
Drainfixture
Drainhose
Screwhole
Draincock
Drainhose
Screw
Drainfixture
•
Forleftpipingandleftrearpiping,alignthemarksonthewallhookbracketandshapethe
connectionpipe.
•Bendtheconnectionpipingatabendradiusof70mmormoreandinstallnomorethan
35mmfromthewall.
•
Afterpassingtheindoorpipinganddrainhosethroughthewallhole,hangtheindooruniton
thehooksatthetopandbottomofthewallhookbracket.
[Installing the indoor unit]
• Hangtheindoorunitfromthehooksatthetopofthewallhookbracket.
• Insertthespacer,etc.betweentheindoorunitandthewallhookbracketandseparate
thebottomoftheindoorunitfromthewall.
Indoorunit
Wallhookbracket
(Spacer)
Connectionpipe(6.35mmdia.)
Alignthemarks
Indoorunit
Connectionpipe(9.52or12.7mmdia.)
Tophooks
Bottomhooks
Wallhookbracket
BendR70mmwith
apipebender
Afterhookingtheindoorunittothetophook,hookthettingsoftheindoorunittothe2
bottomhookswhileloweringtheunitandpushingitagainstthewall.
6.6. Flare connection (Pipe connection)
CAUTION
Tightenthearenutswithatorquewrenchusingthespeciedtighteningmethod.Oth-
erwise,thearenutscouldbreakafteraprolongedperiod,causingrefrigeranttoleak
andgeneratehazardousgasiftherefrigerantcomesintocontactwithaame.
6.6.1. Flaring
UsespecialpipecutterandaretoolexclusiveforR410A.
(1) Cuttheconnectionpipetothenecessarylengthwithapipecutter.
(2) Holdthepipedownwardsothatcuttingswillnotenterthepipeandremoveanyburrs.
(3)
Inserttheare nut (always use the are nutattachedtothe indoor unit(s) and outdoor
unitrespectively)ontothepipeandperformtheareprocessingwithaaretool.Usethe
specialR410Aaretool,ortheconventionalaretool.Leakageofrefrigerantmayresultif
otherarenutsareused.
(4) Protectthepipes bypinchingthem orwithtape topreventdust, dirt, orwaterfrom
enteringthepipes.
Die
A
Pipe
B
L
Checkif[L]isflareduniformly
andisnotcrackedorscratched.
Pipe outside diameter
[mm (in.)]
Dimension A [mm]
Dimension B
[mm]
Flare tool for R410A, clutch type
6.35(1/4)
0to0.5
9.1
9.52(3/8) 13.2
12.70(1/2) 16.6
15.88(5/8) 19.7
19.05(3/4) 24.0
WhenusingconventionalaretoolstoareR410Apipes,thedimensionAshouldbeap-
proximately0.5mmmorethanindicatedinthetable(foraringwithR410Aaretools)to
achievethespeciedaring.UseathicknessgaugetomeasurethedimensionA.
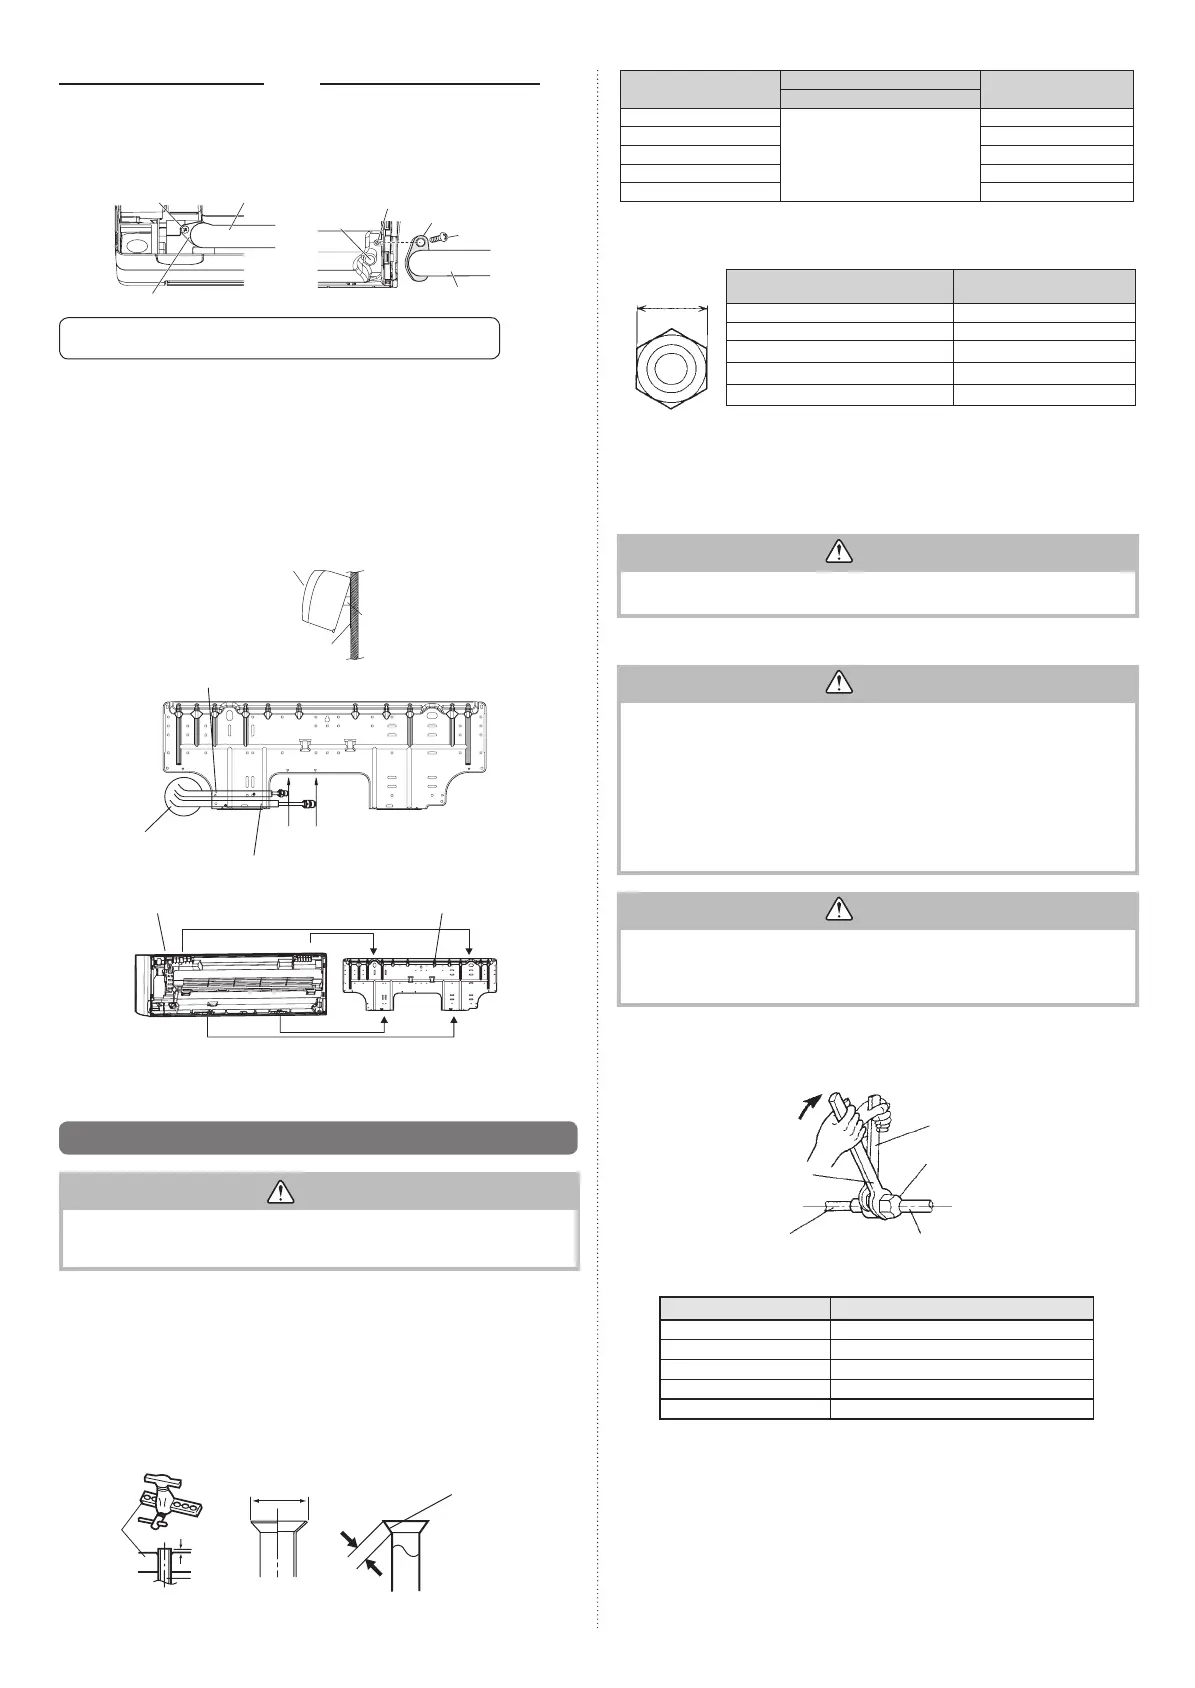
Widthacross
flats
Pipe outside diameter
[mm (in.)]
Width across flats of Flare
nut [mm]
6.35(1/4) 17
9.52(3/8) 22
12.70(1/2) 26
15.88(5/8) 29
19.05(3/4) 36
6.6.2. Bending pipes
• Ifpipesareshapedbyhand,becarefulnottocollapsethem.
• Donotbendthepipesinananglemorethan90°.
• Whenpipesarerepeatedlybendorstretched,thematerialwillharden,makingitdifcult
tobendorstretchthemanymore.
• Donotbendorstretchthepipesmorethan3times.
CAUTION
•Topreventbreakingofthepipe,avoidsharpbends.
•Ifthepipeisbentrepeatedlyatthesameplace,itwillbreak.
6.6.3. Pipe connection
CAUTION
•Besuretoinstallthepipeagainsttheportontheindoorunitcorrectly.Ifthecenter-
ingis improper,the are nut cannot tighten smoothly. If theare nut is forcedto
turn,thethreadswillbedamaged.
•Donotremovethearenutfromtheindoorunitpipeuntilimmediatelybeforecon-
nectingtheconnectionpipe.
•Holdthetorquewrenchatitsgrip,keepingitintherightanglewiththepipe,inorder
totightenthearenutcorrectly.
•Tightenthe are nuts with a torque wrench using the specied tightening method.
Otherwise,thearenutscouldbreakafteraprolongedperiod,causingrefrigerantto
leakandgeneratehazardousgasiftherefrigerantcomesintocontactwithaame.
CAUTION
•Connectthepipingsothatthecontrolboxcovercaneasilyberemovedforservic-
ingwhennecessary.
•Inordertopreventwaterfromleakingintothecontrolbox,makesurethatthepip-
ingiswellinsulated.
Whentheflarenutistightenedproperlybyyourhand,holdthebodysidecouplingwitha
wrench,thentightenwithatorquewrench.(Seethetablebelowfortheflarenuttightening
torques.)
Tightenwithtwowrenches.
Holdingwrench
Flarenut
Connectionpipe
Torquewrench
Indoorunitpipe
(Bodyside)
Flarenut[mm(in.)] Tighteningtorque[N·m(kgf·cm)]
6.35(1/4)dia. 16to18(160to180)
9.52(3/8)dia. 32to42(320to420)
12.70(1/2)dia. 49to61(490to610)
15.88(5/8)dia. 63to75(630to750)
19.05(3/4)dia. 90to110(900to1,100)
9333005225_IM_2L.indb 4 10/12/2017 08:48:43

 Loading...