En-3
•Donotinstalltheunitnearasourceofheat,steam,orammablegas.
•Installtheunitwheredrainagedoesnotcauseanytrouble.
•Installtheindoorunit,outdoorunit,powersupplycable,connectioncable,andremote
controlcableatleast1mawayfromatelevisionorradioreceivers.Thepurposeof
thisistopreventTVreceptioninterferenceorradionoise.
•(Eveniftheyareinstalledmorethan1mapart,youcouldstillreceivenoiseunder
somesignalconditions.)
•Ifchildrenunder10yearsoldmayapproachtheunit,takepreventivemeasuresso
thattheycannotreachtheunit.
•Installtheindoorunitonthewallwheretheheightfromtheoorsmorethan1800mm.
6. INSTALLATION WORK
6.1. Installation dimensions
Outlineoftheindoorunit
Unit:mm
Wallhookbracket
144or
more
1,500
ormore
1,800ormore
(52or
more)
(25or
more)
86or
more
63or
more
(45or
more)
6.2. Indoor unit piping direction
Thepipingcanbeconnectedinthe
6
directionsindicatedinthefollowing.
Whenthepipingisconnectedindirection
2
,
3
,
4
or
5
,
cutalongthepipinggroovein
thesideofthefrontcoverwithahacksaw.
2
Right
outlet
5
Left
outlet
6
Leftrear
outlet
3
Bottomoutlet
1
Rearoutlet
4
Leftbottomoutlet
(Rear)
6.3.
Cutting the hole in the wall for the connecting piping
(1) Cuta65mmdiameterholeinthewallatthepositionshowninthefollowing.
(2) Cuttheholesothattheoutsideendislower(5to10mm)thantheinsideend.
(3) Alwaysalignthecenterofthewallhole.Ifmisaligned,waterleakagewilloccur.
(4)
Cutthewallpipetomatchthewallthickness,stickitintothewallcap,fastenthecapwith
vinyltape,andstickthepipethroughthehole.
(5) Forleftpipingandrightpiping,cuttheholealittlelowersothatdrainwaterwillow
freely.
Wall
Fastenwith
vinyltape*
65mmdia.hole
65mmdia.hole
Wallhookbracket
Centermark
Centermark
Wallcap*
Wallpipe*
(Inside)
(Outside)
5to10mmlow
*Locallypurchased
WARNING
Ifthewallpipeisnotused,thecableinterconnectingtheindoorunit(s)andoutdoorunit
maytouchmetalandcauseelectricdischarge.
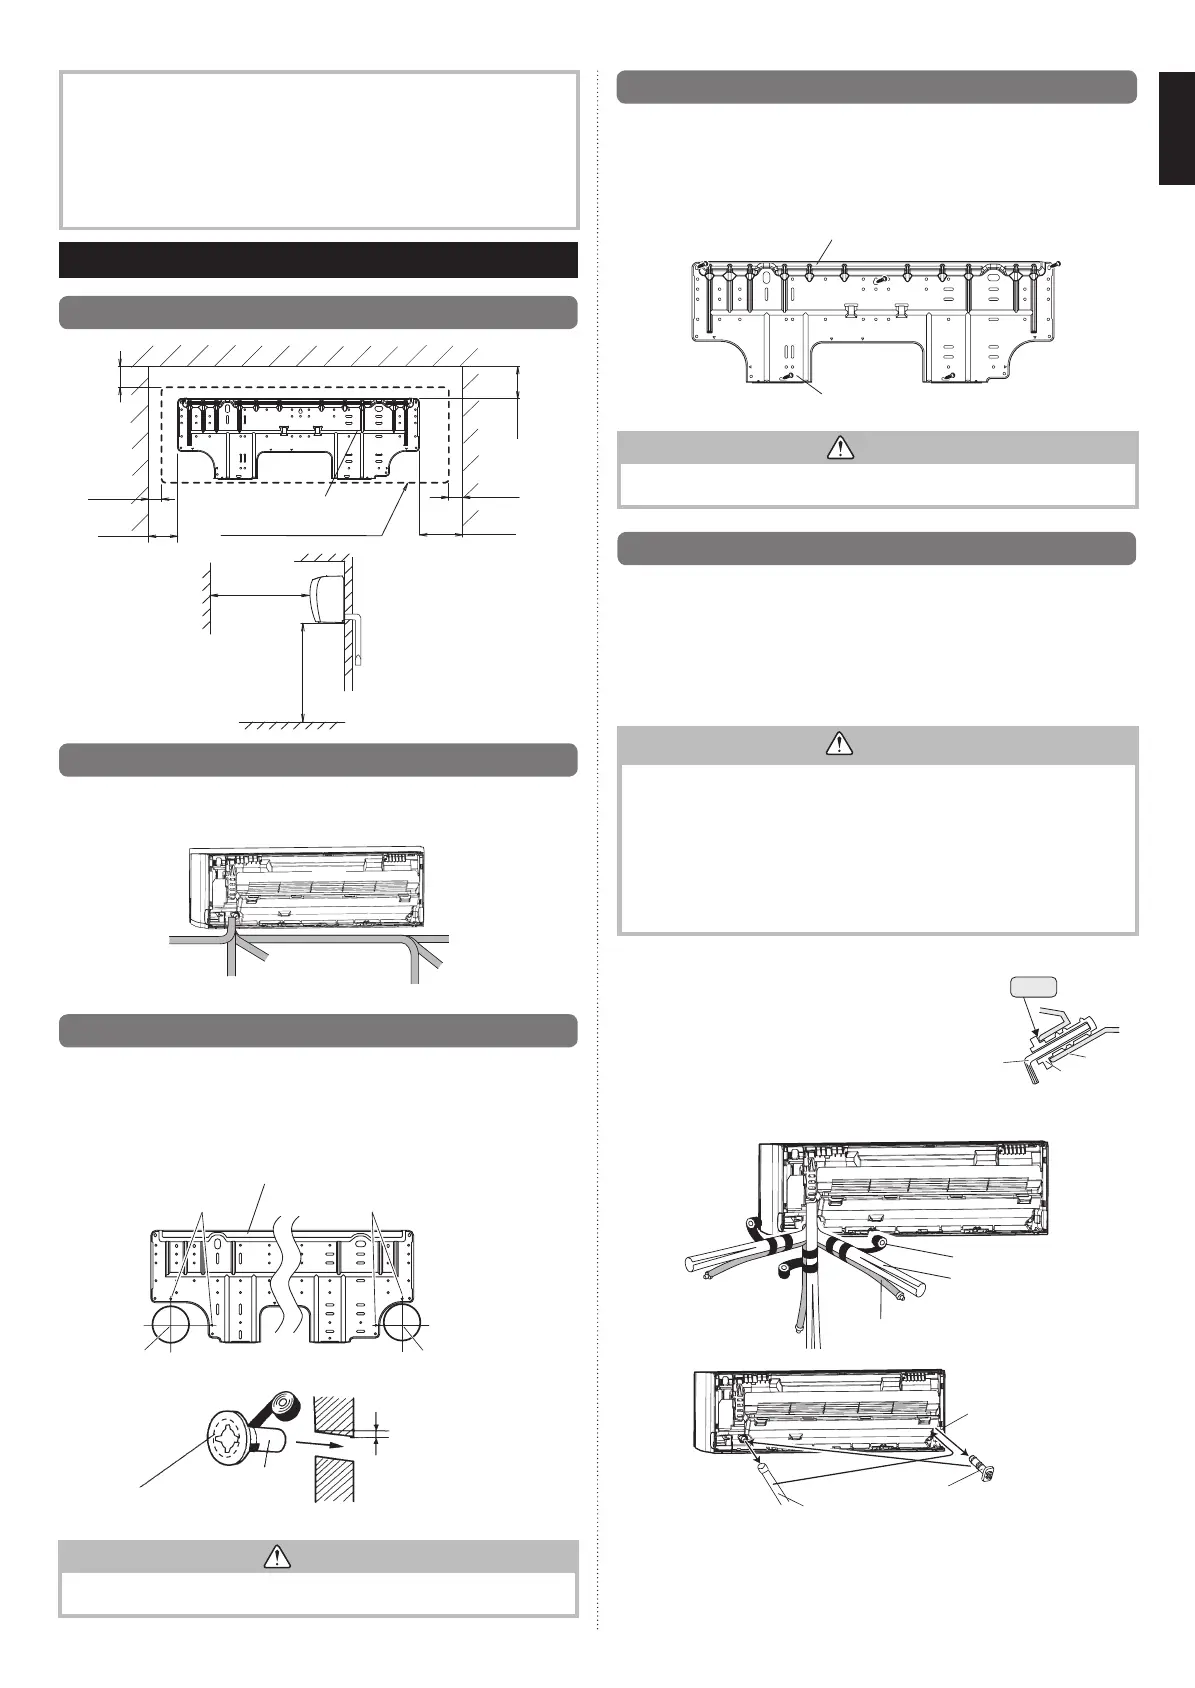
6.4. Installing the wall hook bracket
•Removethewallhookbracketfromtheindoorunit.(Remove2screws).
(1)Installthewallhookbracketsothatitiscorrectlypositionedhorizontallyandvertically.
Ifthewallhookbracketistitled,waterwilldriptotheoor.
(2)
Installthewallhookbracketsothatitisstrongenoughtosupporttheweightoftheunit.
•Fasten thewallhook brackettothe wallwith5 or morescrewsthrough theholes
neartheouteredgeofthebracket.
•Checkthatthereisnorattleatthewallhookbracket.
Wallhookbracket
Tappingscrews(large,accessories)
CAUTION
Installthewallhookbracketbothhorizontallyandverticallyaligned.Misalignedinstalla-
tionmaycausewaterleakage.
6.5. Forming the drain hose and pipe
[Rear piping, Right piping, Bottom piping]
•Installtheindoorunitpipinginthedirectionofthewallholeandbind thedrainhose
andpipetogetherwithvinyltape.
•Installthepipingsothatthedrainhoseisatthebottom.
•Wrapthepipesoftheindoorunitthatarevisiblefromtheoutsidewithdecorativetape.
[For Left rear piping, Left piping]
Interchangethedraincapandthedrainhose.
CAUTION
•
Insertdrainhoseanddraincapsecurely.Drainshouldslopedowntoavoidwaterleakage.
•When inserting,besurenottoattachanymaterialbesideswater.Ifanyother
materialisattached,itwillcausedeteriorationandwaterleakage.
•Afterremovingdrainhose,besurenottoforgetmountingdraincap.
•Besuretoxthedrainhosewithtapetothebottomofpiping.
•Preventdrainwaterfreezingunderlowtemperatureenvironment.
Wheninstallingindoorunit’sdrainhoseoutdoors,necessarymeasureforfrost
protectionshouldbetakentopreventdrainwaterfreezing.
Underlowtemperatureenvironment(whenoutdoortemperatureunder0°C),after
coolingoperationisexecuted,waterinthedrainhosecouldbefrozen.Oncedrainwater
isfrozen,thedrainhosewillbeblockedandwaterleakagemayresultattheindoorunit.
Installation method of Drain cap
Useahexagonalwrench4mmatoppositesidetoinsert
thedraincap,tillthedraincapcontactsthetipofdrain
cock.
Rightpiping
Bottompiping
Bindwithvinyltape
Refrigerantpipes(top)
Rearpiping
Indoorunitdrainhose(bottom)
Forleftoutletpiping,
cutoffthepiping
outletcuttinggroove
withahacksaw.
Indoorunit
drainhose
Draincap
Removethedraincapbypull-
ingattheprojectionattheend
ofthecapwithpliers,etc.
Nogap
Hexagonal
wrench
Drain
cock
Draincap
9333005225_IM_2L.indb 3 10/12/2017 08:48:41

 Loading...