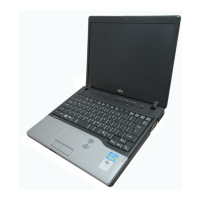
This document serves as a BIOS Guide for the Fujitsu LifeBook L Series, specifically model LH530. It details the functionality, navigation, and configuration options available within the BIOS Setup Utility.
Function Description:
The BIOS Setup Utility is a fundamental program that allows users to configure the operating environment of their Fujitsu LifeBook LH530 notebook. It manages device control feature parameters, such as I/O addresses and boot devices, and system data security feature parameters, including passwords. The BIOS is factory-set for normal operating conditions, so changes are typically not required for basic operation. The utility is structured into six main menus: Info, System, Advanced, Security, Boot, and Exit, each addressing different aspects of the system's configuration.
Usage Features:
Entering the BIOS Setup Utility:
To access the BIOS Setup Utility, users must turn on or restart the notebook and press the [F2] key once the Fujitsu logo appears on the screen. This action opens the main menu, displaying current settings. Navigation through the various setup menus (Info, System, Advanced, Security, Boot, and Exit) is achieved using the [RIGHT ARROW] or [LEFT ARROW] keys.
Alternatively, the SecureCore Menu can be accessed by pressing the [Enter] key or clicking the left mouse/touchpad button when the Fujitsu logo is displayed. This menu offers shortcuts to several screens and actions, including BIOS Setup, Diagnostic Screen, Boot Menu, Patent Information, System Information, and Continue Booting. Clicking on any of these fields will activate the corresponding function. The Boot Menu can also be directly invoked by pressing [F12] during the Fujitsu logo display.
Navigating the Setup Utility:
Within the utility, cursor keys ([←], [→]) select menus, while ([↑], [↓]) select fields within a menu or submenu. Values for fields can be changed using the [Spacebar] or [+] for the next lower selection, and [F5] or [-] for the next higher selection. Submenus are activated by pressing [Enter], and returning to a parent menu is done with [Esc]. The [Esc] key also serves to navigate to the Exit menu from any other menu. A help message for the currently selected field is displayed on the right-hand side of the screen. Pressing [Enter] on a non-submenu selection will show a list of options, and pressing [Enter] again will select the highlighted choice.
Special Keys:
- [F9] resets all BIOS items to default values.
- [F10] saves the current configuration and exits the utility, prompting for verification.
- [F1] displays a general help screen.
Entering Setup After Configuration Change or System Failure:
If a system configuration change or failure occurs, the system may beep and/or display an error message after the Power On Self Test (POST). If the error is not severe, users can press [F1] to continue booting into the operating system or [F2] to enter the setup utility. If the setup utility starts with a fault, a "Warning! Error message [Continue]" message appears, and pressing any key will lead to the Info Menu with current parameters.
This is a display-only screen providing basic system configuration information. It shows details such as Product Name (LH530), Serial Number, BIOS Version, Processor Type (e.g., Intel(R) Core(TM) M330/M540), Processor Speed (2.13 GHz), Total Memory (2048 MB), Memory Slot 1 (None), Memory Slot 2 (2048 MB DDR3 SDRAM), Onboard MAC Address, UUID, and Panel ID. These fields are for reference only and cannot be modified. The displayed information may vary based on the specific unit purchased.
This menu allows users to set or view standard system parameters, including System Time and System Date.
- System Time: Sets the current time in HH:MM:SS (24-hour) format. Segments can be changed using [Tab] and [Shift] + [Tab].
- System Date: Sets the current date in MM/DD/YYYY format. Segments can be changed using [Tab] and [Shift] + [Tab].
- Drive0: Displays the type of device on the Serial ATA/IDE interface (e.g., WDC WD3200BEVS-16VAT0-(S1)). Pressing [Enter] accesses the Drive0 Serial ATA drive submenu for additional configuration.
- Drive1: Displays the type of device on the secondary ATA/IDE interface (e.g., TSSTcorp CDDVDW TS-L633B-(S2)). Pressing [Enter] accesses the Drive1 Serial ATA drive submenu for additional configuration.
Identifies installed ATA devices.
- Drive0: Enables or disables Drive0. Options: [Disabled], [Enabled] (Default: Enabled).
- Type: Displays the drive device type (e.g., Hard Disk). Information only.
- Model: Displays the model number of the device (e.g., WDC WD3200BEVS-16VAT0-(S1)). Information only.
- Capacity: Displays the maximum capacity of the hard disk (e.g., 320GB SATA1). Information only.
Configures secondary ATA devices.
- Drive1: Enables or disables Drive1. Options: [Disabled], [Enabled] (Default: Enabled).
- Type: Displays the drive device type (e.g., CD/DVD). Information only.
- Model: Displays the model number of the device (e.g., TSSTcorp CDDVDW TS-L633B-(S2)). Information only.
This menu controls various device features.
- Legacy USB Support: Enables or disables Legacy USB Emulation, allowing USB devices to be available without a USB-aware OS. Options: [Disabled], [Enabled] (Default: Enabled).
- Serial ATA Controller: Enables or disables the Serial ATA port. Options: [Disabled], [Enabled] (Default: Enabled).
- AHCI Configuration: Enables or disables the selected Advanced Host Controller Interface (AHCI). Options: [Disabled], [Enabled] (Default: Enabled).
- Multi-core: Enables or disables Intel Core Multi-Processing features. Options: [Disabled], [Enabled] (Default: Enabled).
- HT Technology: Enables or disables Hyper-Threading features. Options: [Disabled], [Enabled] (Default: Enabled).
- Virtualization Technology: Enables or disables Intel Virtualization Technology hardware enhancements. Options: [Disabled], [Enabled] (Default: Disabled).
- Wake up on LAN: Allows the system to wake up upon receiving a specific signal via the internal LAN device while in power-off state. Options: [Disabled], [Enabled] (Default: Disabled).
- FAN Control: Adjusts fan operation volume. Options: [Normal], [Silent] (Default: Normal). "Normal" operates at normal volume, "Silent" lowers it.
This menu manages data security features, including passwords.
- Supervisor Password Is: Display-only field indicating if a supervisor password is set ("Set") or not ("Clear").
- User Password Is: Display-only field indicating if a general user password is set ("Set") or not ("Clear").
- Drive0 HDD Password Is: Display-only field indicating if a hard drive password is set ("Set") or not ("Clear").
- Set Supervisor Password: Sets, changes, or cancels the Supervisor Password. It can be up to seven alphanumeric characters and is not case-sensitive. Pressing [Enter] without characters cancels it. A Supervisor Password is required to access the BIOS setup utility.
- Set User Password: Sets, changes, or cancels the User Password. Accessible only if a Supervisor Password is set. Similar rules apply for length and character type. A User Password is required to access the BIOS setup utility.
- Set Drive0 HDD Password: Sets, changes, or cancels the Drive0 HDD Password. Accessible only if the hard drive password is set. Similar rules apply for length and character type. If set, the hard disk is locked and cannot be read in other systems without the password.
- BIOS Password on Boot: Determines if a password is required before the operating system boots. Options: [Disabled], [Enabled] (Default: Disabled).
- HDD Password on Boot: Determines if an HDD password is required before the operating system boots. Options: [Disabled], [First Boot], [Every Boot] (Default: Enabled). Note that the hard disk remains password-protected even if this is disabled.
Important Security Notes:
- Entering a password incorrectly three times locks out the keyboard and mouse, displaying "System Disabled." A reboot and correct password are required.
- A "Warning" message appears for incorrect re-entered passwords; press [Enter] to retry or [Esc] to abort.
- If "Security Panel on Resume" is Enabled and "Password on Boot" is Disabled, a password is not needed to resume from Suspend or Save-to-Disk modes. Power Management Security only works if "Password boot" is enabled.
- Crucially, remember all passwords. Fujitsu Computer Systems cannot reset forgotten User or Master hard disk passwords, potentially leading to data loss or requiring system board/hard disk replacement.
This menu allows users to select the order in which the BIOS searches for an operating system source.
- Boot priority order: Lists devices such as Floppy Disk Drive, Drive0 HDD, CD/DVD Drive, and NETWORK (Realtek LAN). Users can change the order using [↑], [↓] cursor keys and [+] or [-] to change the order number. [Spacebar] can also move items up. [x] excludes/includes devices from the list.
- Excluded from boot order: Lists devices like USB HDD and USB MEMORY that are not currently in the boot priority.
Important Boot Notes:
- Booting from a CD can overwrite files; exercise caution.
- A bootable CD-ROM can have either a floppy disk or hard drive format. If floppy disk format is used, the CD-ROM becomes Drive A. If hard drive format is used, the CD-ROM becomes Drive C only if the internal hard drive is absent or disabled. The C: designator is always reserved for the internal drive if present. The boot sequence ignores new drive designations, but application software will use them.
- Exit Saving Changes: Saves all current settings to BIOS memory and exits the utility. A confirmation prompt appears.
- Exit Discarding Changes: Exits the utility without saving changes. The BIOS loads the operating system.
- Load Setup Defaults: Loads factory preset default values for all menu fields. A confirmation prompt appears.
- Discard Changes: Loads previous values from BIOS memory for all menu fields. A confirmation prompt appears.
- Save Changes: Saves current settings to BIOS memory. A confirmation prompt appears.
- Save Changes and Power Off: Saves current settings to BIOS memory and then shuts down the system. A confirmation prompt appears. If "No" is selected, the system returns to the Exit menu.
Maintenance Features:
The BIOS Setup Utility itself does not include direct maintenance features but provides tools for system configuration that can indirectly support maintenance. For example, resetting to default values ([F9]) can help resolve configuration issues. The Diagnostic Screen, accessible via the SecureCore Menu, can be used for system diagnostics. The ability to enable/disable components like the Serial ATA Controller or adjust fan control can be part of a troubleshooting or optimization process.
Technical Specifications (as gleaned from the document):
- Model: Fujitsu LifeBook L Series LH530
- Processor: Intel(R) Core(TM) M330 or M540, 2.13 GHz
- Memory: 2048 MB DDR3 SDRAM (across two slots, one typically None, one 2048 MB)
- Hard Drive: WDC WD3200BEVS-16VAT0-(S1), 320GB SATA1
- Optical Drive: TSSTcorp CDDVDW TS-L633B-(S2) (CD/DVD)
- BIOS Version: 1.XX (XX/XX/2010)
- Connectivity: LAN (Realtek LAN), USB (with Legacy USB Support option)
- Date of Document: 07/07/2010
- Document Part Number: FPC58-2773-01