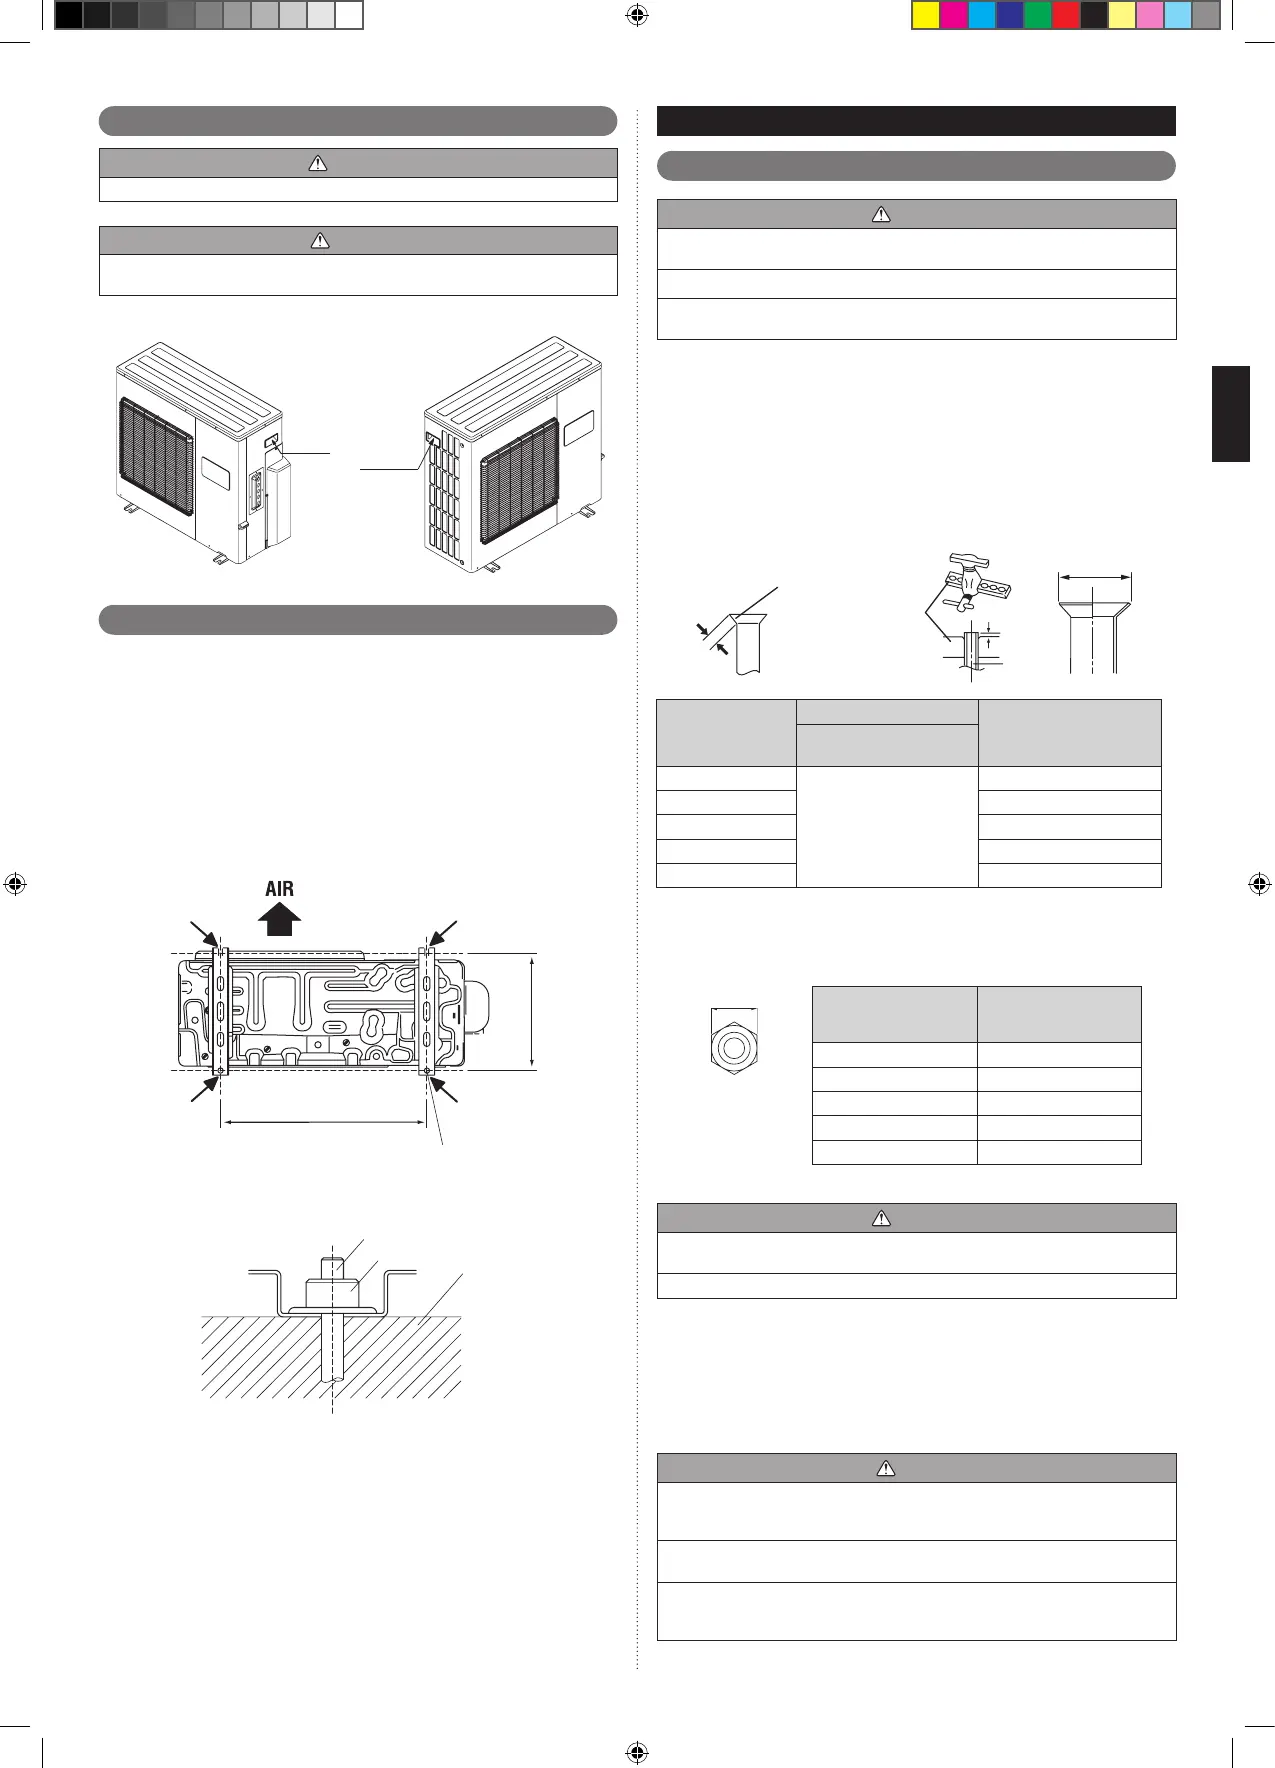
Transportation of the unit3. 4.
WARNING
Do not touch the ns. Otherwise, personal injury could result.
CAUTION
When carrying the unit, hold the handles on the right and left sides and be careful. If
the outdoor unit is carried from the bottom, hands or ngers may be pinched.
Be sure to hold the handles on the sides of the unit. Otherwise, holding the suction •
grille on the sides of the unit may cause deformation.
Handle
Handle
Installation of the unit3. 5.
Install 4 anchor bolts at the locations indicated with arrows in the gure.•
To reduce vibration, do not install the unit directly on the ground. Install it on a secure •
base (such as concrete blocks).
The foundation shall support the legs of the unit and have a width of 50 mm or more.•
Depending on the installation conditions, the outdoor unit may spread its vibration •
during operation, which may cause noise and vibration. Therefore, attach damping
materials (such as damping pads) to the outdoor unit during installation.
Install the foundation, making sure that there is enough space for installing the •
connection pipes.
Secure the unit to a solid block using foundation bolts. (Use 4 sets of commercially •
available M10 bolts, nuts, and washers.)
The bolts should protrude 20 mm. (Refer to the gure.)•
If overturning prevention is required, purchase the necessary commercially available •
items.
(Unit : mm (in.))
650
(25-19/32)
370
(14- 9/16)
Bottom side
4-ø12 (1-15/32) hole
Fix securely with bolts on a solid block. (Use 4 sets of commercially available M10
bolt, nut and washer.)
Bolt
Nut
Block
SYSTEM CONFIGURATION
PIPE INSTALLATION - 14.
Flare connection (pipe connection)4. 1.
CAUTION
Do not use mineral oil on a ared part. Prevent mineral oil from getting into the system
as this would reduce the lifetime of the units.
While welding the pipes, be sure to blow dry nitrogen gas through them.
The maximum lengths of this product are shown in the table. If the units are further
apart than this, correct operation cannot be guaranteed.
Flaring
Use special pipe cutter and are tool exclusive for R410A.•
(1) Cut the connection pipe to the necessary length with a pipe cutter.
(2) Hold the pipe downward so that the cuttings will not enter the pipe and remove
any burrs.
(3) Insert the are nut (always use the are nut attached to the indoor and outdoor
units respectively) onto the pipe and perform the are processing with a are tool.
Leakage of refrigerant may result if other are nuts are used.
(4) Protect the pipes by pinching them or with tape to prevent dust, dirt, or water from
entering the pipes.
Check if [L] is ared uniformly
and is not cracked or scratched.
Pipe
A
B
Die
Pipe outside
diameter [mm (in.)]
Dimension A [mm (in.)]
Dimension B
0
- 0.4
[mm (in.)]
Flare tool for R410A,
clutch type
6.35 (1/4)
0 to 0.5 (0 to 1/32)
9.1 (3/8)
9.52 (3/8) 13.2 (17/32)
12.70 (1/2) 16.6 (21/32)
15.88 (5/8) 19.7 (25/32)
19.05 (3/4) 24.0 (15/16)
When using conventional are tools to are R410A pipes, the dimension A should •
be approximately 1/32 in. more than indicated in the table (for aring with R410A
are tools) to achieve the specied aring. Use a thickness gauge to measure the
dimension A.
Pipe outside
diameter
[mm (in.)]
Width across ats
of Flare nut
[mm (in.)]
6.35 (1/4) 17 (21/32)
9.52 (3/8) 22 (7/8)
12.70 (1/2) 26 (1-1/32)
15.88 (5/8) 29 (1-5/32)
19.05 (3/4) 36 (1-13/32)
Width across ats
Bending pipes4. 1. 1.
CAUTION
To prevent breaking of the pipe, avoid sharp bends. Bend the pipe with a radius of
curvature of 100 mm (4 in.) or more.
If the pipe is bent repeatedly at the same place, it will break.
If pipes are shaped by hand, be careful not to collapse them.•
Do not bend the pipes at an angle of more than 90°.•
When pipes are repeatedly bent or stretched, the material will harden, making it •
difcult to bend or stretch them any more.
Do not bend or stretch the pipes more than 3 times.•
Pipe connection4. 1. 2.
CAUTION
Be sure to install the pipe against the port on the indoor unit and the outdoor unit
correctly. If the centering is improper, the flare nut cannot be tightened smoothly.
If the are nut is forced to turn, the threads will be damaged.
Do not remove the flare nut from the outdoor unit pipe until immediately before
connecting the connection pipe.
After installing the piping, make sure that the connection pipes do not touch the
compressor or outer panel. If the pipes touch the compressor or outer panel, they will
vibrate and produce noise.
 Loading...