47
Recording / Dubbing
EN
Setting for External Connection
(AV3)
Connect the external equipment using either the input
jacks, AV1(TV) (Rear), AV2(DECODER) (Rear) or
AV3 (Front). However, for AV3 jacks, you have to
select S-VIDEO input or VIDEO input jacks
depending on the connected devices.
Use a commercially available Scart, S-Video or Video
cable and an Audio cable for this connection.
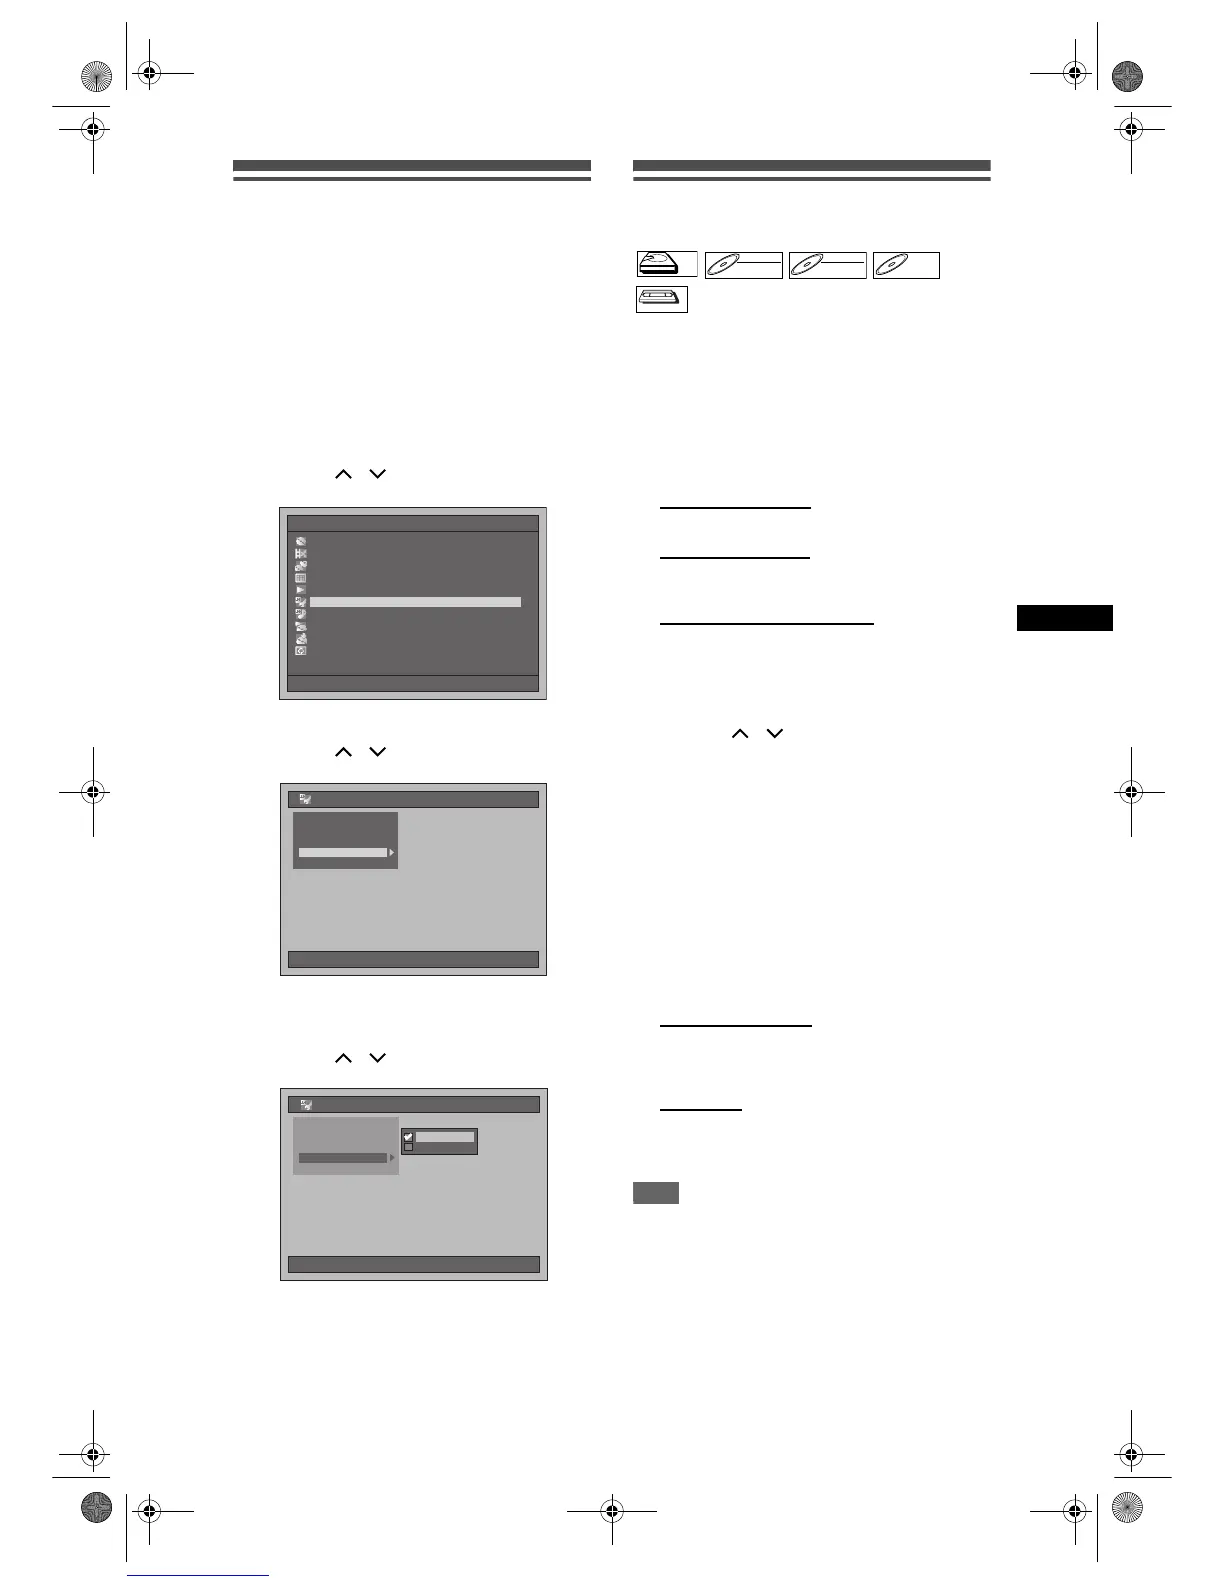
1 Press [SETUP] in stop mode.
Setup Menu will appear.
2 Select “Initial Setting” using
[Cursor
/ ], then press [ENTER].
3 Select “Select Video” using
[Cursor
/ ], then press [ENTER].
4 Select the video input type you use,
“Video In” or “S-Video In”, using
[Cursor
/ ], then press [ENTER].
The selected setting will be checked and
activated.
• The default setting is “Video In”.
5 Press [SETUP] to exit.
Dubbing from the External
Devices
When you dub a title has bilingual audio to Video
mode DVD-RW / R, select an appropriate audio
format in the “Bilingual Recording Audio” menu on
page 31.
1 Turn on the TV. Select the
appropriate external input channel.
(See pages 15 to 16.)
2 Select the media.
Dubbing to HDD:
Press [HDD] first.
Dubbing to DVD:
Press [DVD] first and insert a disc.
• It may take awhile to load the disc.
Dubbing to a videotape:
Press [VCR] and insert a videotape.
3 Select the appropriate external input
channel of this unit by pressing
[INPUT SELECT]. You also can use
[PROG.
/ ].
• If you are using the jacks on the front, set the
channel to “AV3”.
• If you are using the jacks on the rear, set the
channel to “AV1” and “AV2”.
4 Select a Rec Mode by pressing
[REC MODE].
Refer to “Rec Mode” on page 26 for HDD / DVD
or page 90 for VCR.
5 Press [RECORD I] (of the dubbing
device) on this unit to start dubbing.
6 Press the PLAY button on the
external device to dub from.
7 For HDD or DVD:
Press [STOP S] to stop dubbing.
• This operation may take awhile to be completed.
Then stop the external device.
For VCR:
Press [STOP/EJECT SO] to stop
dubbing.
Then stop the external device.
Note
• To avoid mistakes, it is recommended to use the
buttons on the front panel to operate.
• Read also the instructions for the external device
thoroughly.
• If you want to monitor the programme that you are
recording, make sure the device such as a Satellite
Box is powered off or press [DISPLAY] when it is
connected to AV2.
• NTSC dubbing is prohibited in this unit.
Setup Menu
01/01/07(Mon) 19:34
Disc Management
Editing
Dubbing
Timer Programme
Title List
Initial Setting
Digital Audio Setting
Playback
Recording
Display
01/01/07(Mon) 19:34
Initial Setting
Clock Setting
Channel Setting
Video Out
TV Aspect
Select Video
01/01/07(Mon) 19:34
Initial Setting
Clock Setting
Channel Setting
TV Aspect
S-Video InS-Video In
Video InVideo In
Video Out
Select Video
HDDHDD
DVD-RWDVD-RW
VR
DVD-RWDVD-RW
Video
DVD-RDVD-R
VCR


 To Next Page