Do you have a question about the Funbikes QD03K and is the answer not in the manual?
Covers hazards, rider age, supervision, and responsible use of the vehicle.
Obey laws, use controlled environments, avoid public roads, and ride defensively.
Follow speed limits, know limits, avoid hazardous conditions, and refrain from distractions.
Do not touch hot brakes or engine parts as they can cause burns.
Covers fuel mixture, storage, engine operation, and electrical safety precautions.
Never use alcohol/drugs; check insurance coverage for vehicle use.
Always wear approved safety helmet, elbow pads, kneepads, and suitable footwear.
Sticker A on the front fender warns about tire pressure and overloading risks.
Sticker B on the fuel cap warns about fuel type, mixture, and engine stop during fueling.
Sticker C warns against improper use, mandates protective gear, and restricts passengers.
Sticker D warns about age limits, supervision, passengers, and off-road use.
Sticker E on the engine warns about hot exhaust system components.
Explains how to locate the unique Product Identify Number (PIN) on the ATV frame.
Guide to unpacking the ATV and inspecting for shipping damage.
Lists required tools and estimates assembly time for the ATV.
Detailed steps for assembling the rear wheel onto the ATV.
Instructions for correctly mounting the rear shock absorber.
Step-by-step guide for assembling the front wheel.
Steps for assembling the tie rod and related components.
Instructions for fitting the front shock absorber.
Guidance on how to assemble the front bumper.
Instructions for installing the front and rear chain covers.
Steps for mounting the number board bracket to the steering rod plate.
Detailed instructions for assembling and securing the handlebars.
Warning about the critical importance of properly tightening handlebar bolts.
Covers correct tire pressure, assembly, and importance of tire condition.
Details on tire pressure, assembly, disassembly, and general tire care.
Guidance on checking tread, replacing tires, and understanding tire aging.
Comprehensive list of technical specifications for the ATV.
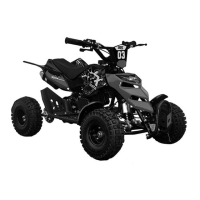
Diagram and list identifying all major parts of the ATV.
Identifies handlebar controls and explains parking brake operation.
Essential checks before riding: loose parts, fasteners, and brake function.
Inspect frame, fork, handlebars for damage and check tire pressure regularly.
Always wear safety gear and check all tightenings after first use.
Drive ecologically, perform maintenance, and follow fueling procedures.
Precautions during the first 25 hours of operation and initial oil change.
Step-by-step instructions for starting the engine using the manual pull.
How to access, clean, and reinsert the air filter element.
Guidance on checking spark plug condition, electrode gap, and replacement.
Instructions on how to inspect brake pads for wear and when to replace them.
Steps for adjusting the front and rear brakes using cable clamps.
Lubrication and drying procedures for components after washing.
Adjusting brake lever play and caliper settings for optimal performance.
Procedure for correctly calibrating the engine's idling speed.
Steps for safely releasing fuel from the carburetor after use.
Troubleshooting guide for engine start issues, misfires, overheating, and weak brakes.
Schematic diagram of the electrical system for the electric start version.
Read manual, obey age limits, use off-road only, no passengers.
Wear protective gear, avoid drugs/alcohol, check cold tire pressure.
This document serves as an owner's manual for a 49CC Mini ATV, specifically models QD03 and QD03K. It provides essential information for safe operation, assembly, maintenance, and troubleshooting of the vehicle.
The 49CC Mini ATV is a recreational off-road vehicle designed for single-rider use in controlled environments, away from public road traffic. It is powered by a 49cc single-cylinder, 2-stroke, forced air-cooled engine. The vehicle features an automatic transmission with a centrifugal clutch and can be started either manually with a pull start or optionally with an electric start (12V 4AH battery). It is equipped with front and rear disc brakes, mechanically controlled, for stopping power. The ATV is designed for off-road use only and is not a toy.
The manual emphasizes several key usage features and safety guidelines:
The manual provides detailed instructions for maintaining the ATV to ensure a long and trouble-free operating life:
| Model | QD03K |
|---|---|
| Category | Motorized Toy Car |
| Power Source | Electric |
| Recommended Age | 3-8 years |
| Maximum Speed | 5 km/h |
| Battery Voltage | 12V |
| Battery | 12V 7Ah |
| Charging Time | 8-12 hours |
| Usage Time | 1-2 hours |
| Weight Capacity | 30 kg |
| Material | Plastic |
| Gears | Forward and Reverse |
| Color Options | Red, Blue, Black |
| Brakes | Electric Brake |