Do you have a question about the Furinno 11048WH and is the answer not in the manual?
Attach the top panel using screws, dowels, and cam-lock screws/nuts as depicted.
Insert another back panel into the assembled unit.
Attach the right side panel to the assembled unit using screws and dowels.
Attach the back panel with screws and cover screw heads with stickers.
Details the maximum weight capacity per unit, specified in pounds.
Provides critical warnings regarding load limits, climbing, and item placement.
Information for product inquiries, replacement requests, and contact details.
Attach three shelf panels to the center panel using screws and dowels.
Attach two more shelf panels to the opposite side of the center panel.
Attach bottom panel, back panel, and left side panel using hardware.
Lists all necessary hardware and parts with quantities for assembly.
Provides essential tips for a smooth and safe assembly process.
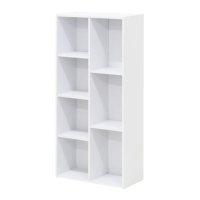
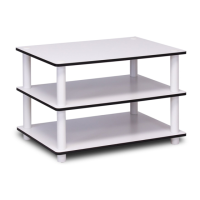
The Furinno 7-Cube Open Shelf is a versatile and practical furniture piece designed to help you organize your living space efficiently. This open shelf unit, identified by model number 11048WH, is engineered for easy assembly and offers a stylish solution for storing and displaying various items. Its design, encapsulated by the slogan "Fits Space. Fits Budget," emphasizes both its adaptability to different room layouts and its affordability.
The primary function of this unit is to provide storage and display space through its seven open cubes. These cubes are ideal for holding books, decorative items, storage bins, photos, and other personal belongings, helping to keep your space tidy and clutter-free. The open design allows for easy access to items and contributes to an airy, modern aesthetic that can complement a variety of interior décor styles. Whether placed in a living room, bedroom, home office, or hallway, the Furinno 7-Cube Open Shelf serves as a functional and attractive addition to any room.
Assembly of the Furinno 7-Cube Open Shelf is designed to be straightforward, with an estimated completion time of approximately 30 minutes. The manual recommends that two people work together for assembly to ensure ease and safety, although it can likely be managed by one person with careful attention to the instructions. A basic tool, likely a screwdriver, is required and is typically included or commonly available. The assembly process involves connecting various panels using screws, dowels, and cam-lock screw/nuts.
The assembly begins by attaching three shelf panels (E) to a center panel (C) using screws (1) and dowels (2). This forms the initial vertical structure of the unit. Following this, two more shelf panels (E) are attached to the other side of the center panel (C) using the same hardware, further building out the shelving structure. Next, the bottom panel (D) is secured to the center panel (C) using dowels (2) and cam-lock screw/nuts (5), providing a stable base for the unit. A back panel (F) and a left side panel (A) are then inserted into the assembled unit, using screws (1) and dowels (2) to complete the main frame.
The subsequent steps involve attaching the top panel (D) to the unit using screws (1), dowels (2), and cam-lock screw/nuts (5), which caps off the structure and adds to its stability. Another back panel (F) is then inserted into the assembled unit, further enclosing the back of the shelves. Finally, back panels (F) are attached to the back of the assembled unit using L-supports/screws (3), and screw heads are covered with stickers (4) for a clean, finished look. This systematic approach ensures that each component is securely fastened, resulting in a sturdy and reliable storage unit.
The usage features of the Furinno 7-Cube Open Shelf are centered around its open design and modular appearance. The individual cubes offer flexibility in how items are arranged and displayed. Users can utilize decorative bins or baskets within the cubes to conceal clutter, or leave them open to showcase books, collectibles, or plants. The unit's relatively compact footprint makes it suitable for smaller spaces where maximizing vertical storage is essential. Its neutral aesthetic allows it to blend seamlessly with existing furniture and décor, providing a functional solution without overwhelming the room.
The manual includes important warnings regarding the unit's load capacity. It explicitly states that the unit has been designed to support specific maximum loads, and exceeding these limits could lead to sagging, instability, product collapse, or serious injury. This highlights the importance of distributing weight evenly and adhering to the recommended maximum weight for each shelf. A visual guide indicates that each shelf is designed to hold up to 10 pounds, with the total unit capable of supporting a substantial amount of weight when properly loaded. To ensure safety and longevity, it is advised to place heavier items on the lower shelves, which contributes to the unit's overall stability. Another crucial safety warning is to prevent children from climbing on the unit, as this could cause it to tip over and result in injury.
Maintenance of the Furinno 7-Cube Open Shelf is simple and straightforward, aimed at preserving its appearance and structural integrity over time. The manual recommends cleaning the product with a mild cleanser and a soft, damp cloth. It specifically advises against using harsh or abrasive cleansers, as these could damage the finish or material of the unit. Regular dusting and occasional wiping down with a damp cloth will help keep the shelves looking new and free from dirt and grime.
Beyond cleaning, proper assembly and adherence to the weight guidelines are key aspects of maintenance. Ensuring that all screws and fasteners are tightened correctly during assembly, and periodically checking them to make sure they haven't loosened, will help maintain the unit's stability. Following the "Useful Hints Before You Start" section in the manual is crucial for a successful assembly and long-term use. These hints include reading each step carefully, performing steps in the correct order, identifying and counting all parts before assembly, and assembling the furniture on packaging cardboard to prevent scratches or damage. The manual also warns against using incompatible hardware, as this could cause damage to the product.
In summary, the Furinno 7-Cube Open Shelf is a practical, easy-to-assemble, and aesthetically pleasing storage solution. Its open design offers flexibility for display and organization, while clear instructions and safety warnings ensure a secure and durable product. With minimal maintenance requirements and a focus on functionality and affordability, it serves as an excellent choice for anyone looking to enhance their home organization.
| Product Name | Furinno 11048WH |
|---|---|
| Category | Indoor Furnishing |
| Color | White |
| Assembly Required | Yes |
| Dimensions | 23.6 x 23.6 x 47.2 inches |
| Style | Modern |
| Material | Engineered Wood |