EasyManua.ls Logo

Furinno 11181 User Manual

Furinno 11181
2 pages
To Next Page IconTo Next Page
Page #1 background imageLoading...
Page #1 background image
Assembly Instruction
Customer Service
Tel/Fax: 281.500.9372
Toll Free: 773.299.8111 (Mon - Fri 9am - 5pm)
Email: support@furinno.com
WARNING:
>This unit has been designed to support the
maximum loads shown. Exceeding these
load limits could cause sagging, instability,
product collapse, and/or serious injury.
>DO NOT allow children to climb on unit.
>Put heavier items on lower shelves.
its Space. its Budget
www.furinno.com
Fix the side unit to table using Screw(1).
Tighten Cam-Lock Nut(12)uisng screwdriver.
STEP 10
Install Insert Cap(8)to Panel(D)using hammer.
Fix Cam-Lock Screw(11)into pre-drilled holes.
STEP 7
Tighten Leg(10)to Panel(E)using Top Cap(9).
STEP 8
Tighten Pole(6),(7)and Leg(10)to Panel(D)(E)(F).
STEP 9
Recommended Maximum Weight
Furinno Compact Computer Desk
1118120140430
MODEL :
11181
39”(W) x 33.6”(H) x 15.6”(D)DIMENSION :
20
*Unit in Pound(lbs)
10
10
10
Tools RequiredNo Tools Required
Recomm. 1 Person
(11)x4pcs
(8)x1pcs
unfinished surface
unfinished surface
(6)x1pcs
(10)x1pcs
(7)x1pcs
(9)x2pcs
(10)x2pcs
(1)x6pcs
Recomm. 2 Person
Approx. 5 minutesApprox. 10 minutesApprox. 15 minutesApprox. 30 minutes
Question and Answer IconNeed help?

Do you have a question about the Furinno 11181 and is the answer not in the manual?

Furinno 11181 Specifications

General IconGeneral
BrandFurinno
Model11181
CategoryIndoor Furnishing
LanguageEnglish

Summary

Assembly Instruction

STEP 7: Install Insert Cap and Cam-Lock Screw

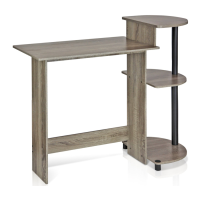
Instructions for installing caps and cam-lock screws into panels using a hammer.

STEP 8: Tighten Leg to Panel

Instructions for tightening the leg to the panel using top caps.

STEP 9: Tighten Pole and Leg

Instructions for securing the pole and leg to the main panels.

STEP 10: Fix Side Unit to Table

Instructions for attaching the side unit to the table and tightening cam-lock nuts.

Recommended Maximum Weight

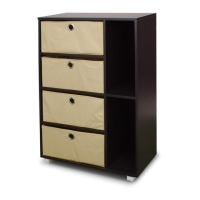
Specifies the maximum weight capacity for the unit and its components.

WARNING

Safety warnings regarding load limits, child climbing, and item placement.

Assembly Steps - Initial

STEP 1: Insert Dowel and Cam-Lock Nut

Install dowels and cam-lock nuts into specific panels, noting arrow orientation.

STEP 2: Install L-Bracket

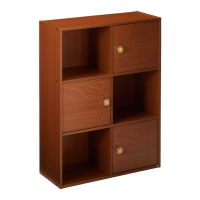
Instructions for installing L-brackets onto a panel using screws.

STEP 3: Attach Panels

Instructions for attaching panels using screws and identifying finished edges.

STEP 4: Screw Cam-Lock Screw

Screw cam-lock screws into pre-drilled holes on the top panel.

STEP 5: Attach Assembled Unit

Attach the assembled unit to the top panel and secure with cam-lock nuts and brackets.

STEP 6: Install Nail Leg

Install nail legs to the bottom of specific panels using a hammer.
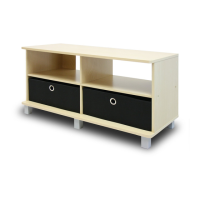
Useful Hints Before You Start

Customer Service Information

Related product manuals