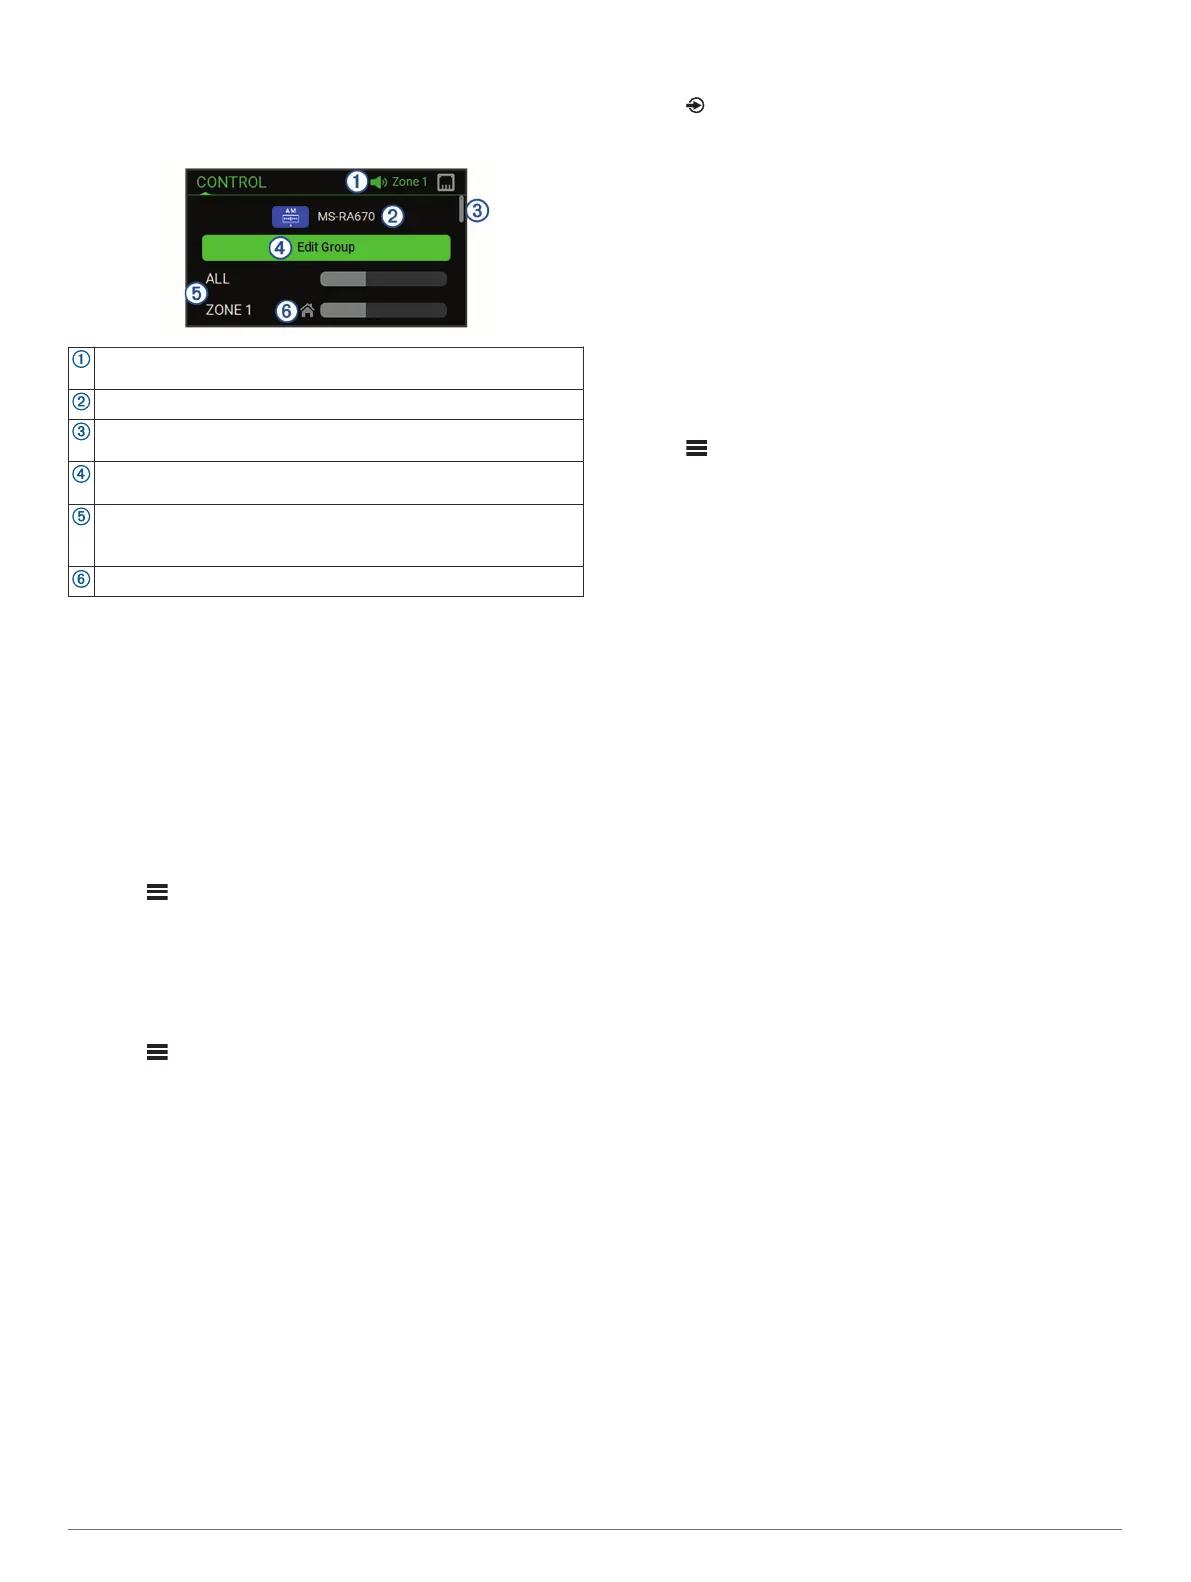
Control Screen
From the CONTROL screen, you can adjust the volume of any
zone on the network, create and edit stereo groups, and choose
a stereo to control.
Name of the stereo or zone on the network currently being
controlled by this device
Name and active source of a stereo on the network
Indicates that additional zones or stereos can be seen when you
scroll through the list
Select to add or remove stereos from a group (Creating a Group,
page 9)
Available speaker zones for network stereos
If you scroll down, additional zones are shown under the names of
other stereos on the network
Home zone indicator (Setting the Home Zone, page 2)
Naming the Device
You should enter a unique name for this device so you can
easily identify it when viewing devices on the Fusion PartyBus
™
network.
NOTE: You should provide unique names to all of the devices
and zones on the network to avoid confusion when grouping,
controlling, and setting up stereos and zones. You should also
turn off zones that are not in use (Speaker Zone Settings,
page 10).
For further customization, you can provide unique names for the
sources on each stereo and turn off unused sources (General
Settings, page 10).
1
Select > SETTINGS.
2
Select DEVICE NAME, and enter a unique name for the
device.
Setting the Home Zone
The home zone is the speaker zone that you adjust by default
when you turn the dial.
1
Select > SETTINGS.
2
Select ZONE > ASSIGN HOME ZONE.
3
Select a zone.
Temporarily Selecting a Stereo to Control
If you have more than one compatible stereo on the Fusion
PartyBus network, you can temporarily select one of them to
control using this stereo.
NOTE: You can also combine compatible stereos on the
network into groups for synchronized playback (Creating a
Group, page 9).
1
Press the dial to open the CONTROL screen.
2
Turn the dial, and select the stereo or zone you want to
control using this device.
The name of the stereo or zone appears on the status bar,
and you can change sources, settings, and adjust the volume
for the selected stereo or zone.
After about 30 seconds of inactivity, the stereo reverts to
local control or to the stereo associated with the home zone.
Selecting a Source
1
Select .
2
Turn the dial to highlight a source.
NOTE: If the is device part of a group on the Fusion PartyBus
network, continue turning the dial to access the sources on
other devices in group (Creating a Group, page 9).
A zone stereo, such as the Apollo SRX400, can create or join
a group to control and play sources from other stereos, but it
cannot share its sources with the group.
3
Press the dial to select the source.
Adjusting the Backlight and Dial Brightness
NOTE: If you connected the dim wire on the wiring harness to
the boat's illumination wire, the backlight and dial dim
automatically when the boat lights are on. This may affect how
you adjust the brightness setting.
1
Select > SETTINGS > BRIGHTNESS.
2
Adjust the brightness level.
Temporarily Selecting a Stereo to Control
If you have more than one compatible stereo on the Fusion
PartyBus network, you can temporarily select one of them to
control using this stereo.
NOTE: You can also combine compatible stereos on the
network into groups for synchronized playback (Creating a
Group, page 9).
1
Press the dial to open the CONTROL screen.
2
Turn the dial, and select the stereo or zone you want to
control using this device.
The name of the stereo or zone appears on the status bar,
and you can change sources, settings, and adjust the volume
for the selected stereo or zone.
After about 30 seconds of inactivity, the stereo reverts to
local control or to the stereo associated with the home zone.
Creating or Editing a Group
Before you can create a group, you must connect multiple
compatible stereos to the Fusion PartyBus network. See the
installation instructions provided with your stereo for installing
and configuring the network.
You can combine compatible stereos on the network into
groups. Grouped stereos can share available sources and
control media playback on all of the stereos in the group, which
allows for a synchronized audio experience across the vessel.
You can quickly create, edit, and break up groups as needed
from any compatible stereo or remote control on the network.
NOTE: You can adjust the volume of any zone on any
compatible stereo on the network, regardless of whether or not
those stereos are in the group.
A zone stereo, such as the Apollo SRX400, can create or join a
group to control and play sources from other stereos, but it
cannot share its sources with the group.
For additional considerations when sharing sources, see the
owner's manual.
1
Press the dial to open the CONTROL screen.
2
Turn the dial, and select EDIT GROUP under the name of the
stereo you want to be the primary stereo in the group or
under the name of an existing group.
3
Select the stereos you want to add to or remove from the
group.
4
Select GROUP or UNGROUP.
2 Getting Started