18
GB
4. Set the day of the week using the ▲-▼ keys (e.g. FR Friday)
and confirm your entry by pressing the OK key.
The time and the day of the week have been set.
Watering Programs
Prerequisite: you must set the current time and day of the
week before you can set the watering programs.
To give you a better overview of your irrigation system and to make
it easier to enter the watering data, we recommend entering the
data for your valves on the watering plan included in the appendix
of these operating instructions. A maximum of 6 channels can be
open at the same time.
You can save 4 watering programs for each channel (a maxi-
mum of 4 programs x 12 channels = 48 programs).
If programs overlap, the channel status display flashes to indicate
this and
ERROR
(but the programs are still performed).
v Make sure no programs overlap.
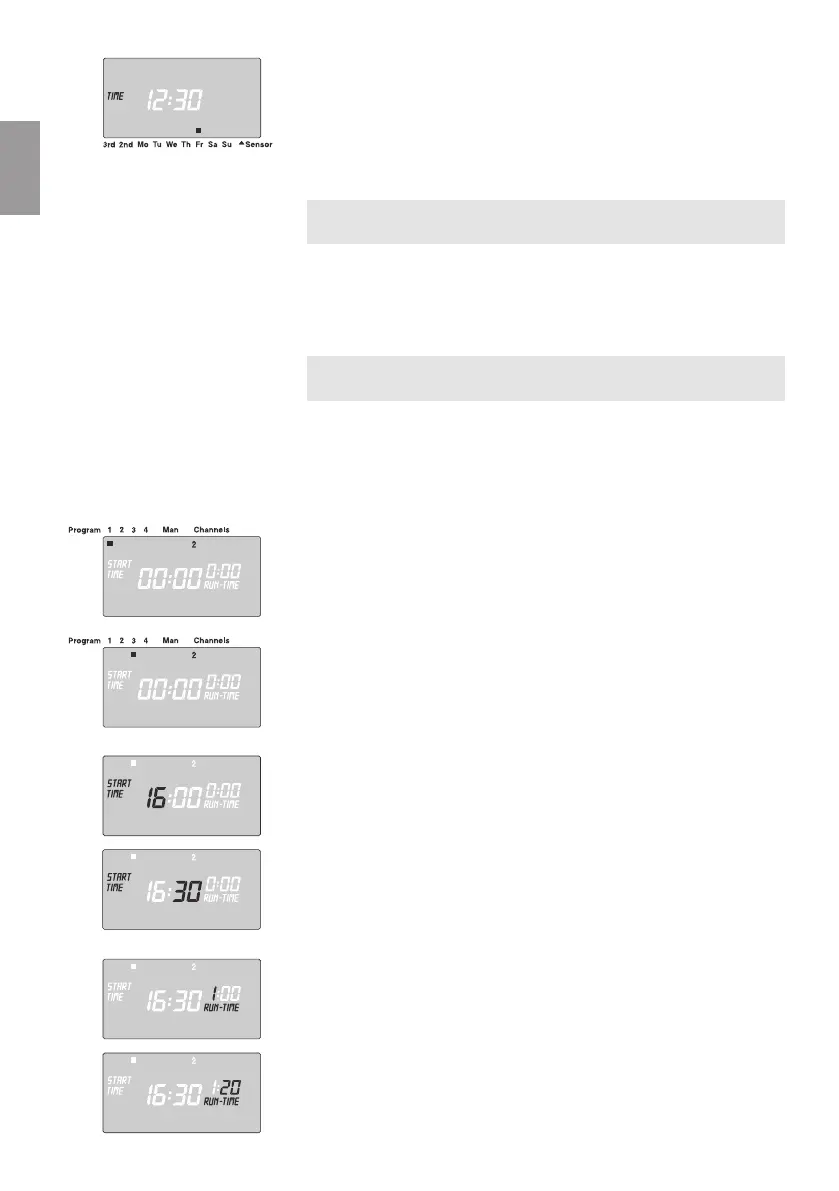
Selecting the Channel and Program Memory Location:
1. Press the Channel key for the relevant channel (e.g.Channel 2).
Channels (e.g.
2
) appears in the display and
program 1
flashes.
2. Select the program memory location using the ▲-▼ keys
(e.g. program memory location 3) and confirm your selection
by pressing the OK key.
START TIME
and the hours flash on the display.
Setting the Watering Start Time:
3. Set the hours for the watering start time using the ▲-▼ keys
(e.g.
16
hours) and confirm your entry by pressing the OK key.
START TIME
and the minutes flash on the display.
4. Set the minutes for the watering start time using the ▲-▼ keys
(e.g.
30
minutes) and confirm your entry by pressing the OK key.
RUN TIME
and hours flash on the display.
Setting the Watering Duration:
5. Set the hours for watering duration using the ▲-▼ keys
(e.g.
1
hour) and confirm you entry by pressing the OK key.
RUN TIME
and minutes flash on the display.
6. Set the minutes for watering duration using the ▲-▼ keys (e.g.
20
minutes) and confirm your entry by pressing the OK key.
The arrow
ê
above the watering cycle flashes on the display.
4.
Setting the
watering programs:
1.
2.
3.
4.
5.
6.