3421
3
8
4
7
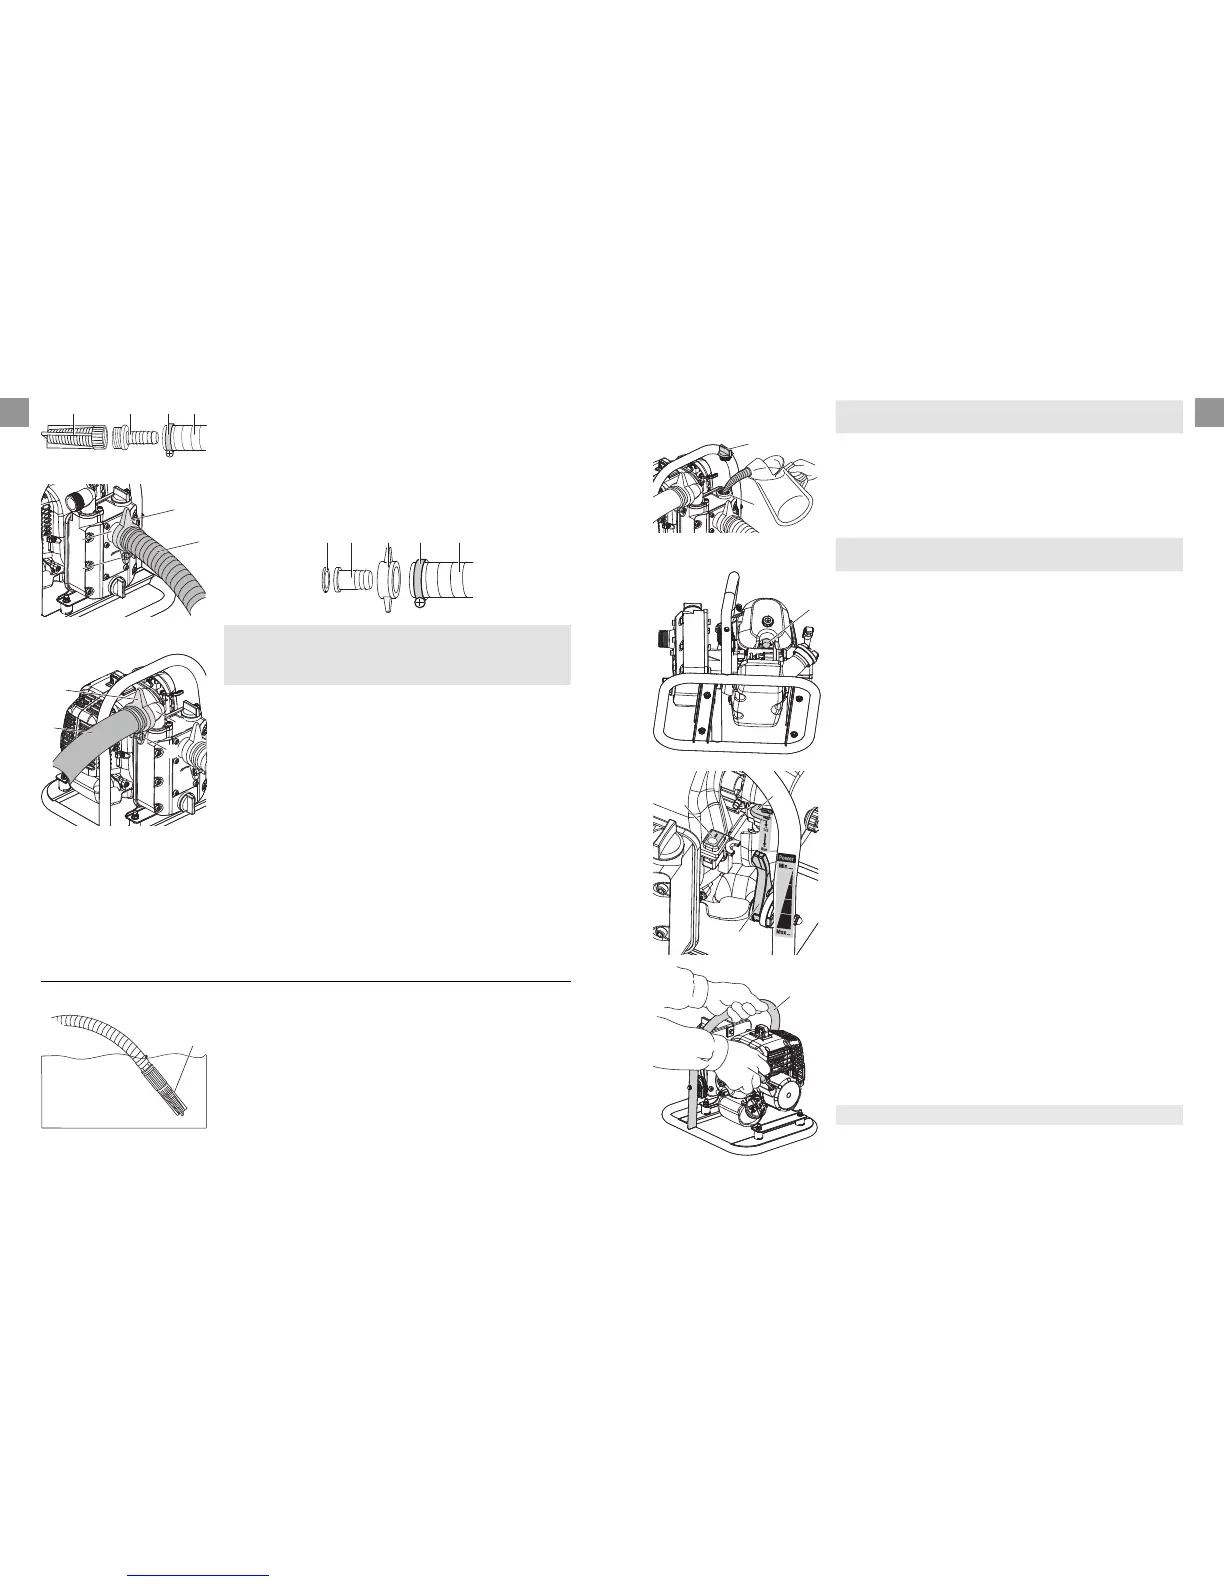
1. Screw extraction filter
1
onto the filter connection
2
.
2. Push the extraction tube provided
3
onto the filter
connection
2
and screw air-tight with the hose clip
4
.
3. Push universal adapter
5
with seal
6
through the threaded
nut
7
and screw onto the extraction-side connection
8
.
4. Push hose clip
4
onto the extraction hose
3
, push extraction
hose
3
onto the universal adapter
5
and screw air-tight with
the hose clip
4
.
6
5
7
4
3
Connect the delivery hose:
4
7
0
9
The delivery connection of the pump is fitted with a 33.3mm (G1)
thread to which you can connect 13mm (1/2"), 16mm (5/8") or
19mm (3/4") hoses using the GARDENA hose connection system
fittings.
1. Push universal adapter
5
with seal
6
d through the threaded
nut
7
and screw onto the pressure-side connection
9
.
2. Push hose clip
4
onto the pressure hose
0
, push pressure
hose
0
onto the universal adapter
5
s and screw air-tight with
the hose clip
4
.
For the best delivery capacity, connect 19mm (3/4") hoses
together with GARDENA “Profi” System Fittings (e.g. Art. 1752)
or 25mm (1") hoses together with GARDENA Brass Connection
Fittings (e.g. Art. 7142).
Connecting several pressure
hoses in parallel:
When connecting several hoses or accessories in parallel
we recommend using the GARDENA Twin-Tap Connector or
Four Channel Water Distributor Art. 8193 / 8194 / 940.
v Screw the Twin-Tap Connector or Four Channel Water
Distributor directly onto the thread of the delivery
connection
9
.
4. Operation
Prime pump:
1
1. Install the pump at a safe distance from the pumping
medium. Install the pump level with the ground when the
motor is switched off.
2. Check petrol level (2-stroke mixture 40 : 1)
(see 6. Maintenance).
3. Check the air filter (see 6. Maintenance).
4. Immerse extraction filter
1
in the pumping medium.
Fill the pump with the liquid
to be pumped:
Fill the pump with approx. 1.5 litres of the liquid to be pumped
before operating the pump.
!
B
1. Unscrew the cover
q
from the filler neck
w
for the liquid to be
pumped.
2. Completely fill the pump chamber with pumping fluid via the
filler nozzle
w
(approx. 1.5 l).
3. Replace the cover
q
on the filler neck
w
and screw tight by
hand.
Start the motor:
v Before starting, always prime the pump and fill the pump
with pumping fluid (see above).
D
S
TOP
E
C
F
H
G
Start cold motor:
1. Set ignition switch
e
to “I”
(on).
2. Press starter ball pump
r
10 x.
3. Set choke lever
t
to Start
position.
4. Set throttle control
z
to
Max position.
5. For optimum suction
capacity, fix pressure hose
for start 1 – 2 m high.
6. Press pump down firmly on
bow
u
and pull the starter
handle
i
until slight resist-
ance is felt. Then pull firmly
on the starter handle
i
.
7. Guide starter handle
i
back
slowly by hand so that the
starter is not damaged (do
not allow to spring back).
8. Repeat points 6 and 7
until the motor has briefly
started.
9. Set choke lever
t
to 1/2
position.
10. Repeat points 6 and 7 until
the motor has started.
11. Set throttle control
z
to 1/2.
12. After a warming-up period of
approx. 30 secs., set choke
lever
t
to Run position.
13. Set throttle control
z
to
required pumping rate
between Min and Max.
Start warm motor:
1. Set ignition switch
e
to “I”
(on).
2. Set choke lever
t
to
Run position.
3. Set throttle control
z
to
Min position.
4. For optimum suction
capacity, fix pressure hose
for start 1 – 2 m high.
5. Press pump down firmly on
bow
u
and pull the starter
handle
i
until slight resist-
ance is felt. Then pull firmly
on the starter handle
i
.
6. Guide starter handle
i
back
slowly by hand so that the
starter is not damaged (do
not allow to spring back).
7. Repeat points 5 and 6 until
the motor has started.
8. Set throttle control
z
to
required pumping rate
between Min and Max.
v If the motor does not start, see 7. Troubleshooting.
Running the motor in:
The motor only reaches its maximum output 5 – 8 hours after
initial start-up. During this time, the motor must not be operated
at full speed. This could damage the motor.
14
GB
15
GB