10
GB
Clean control panels:
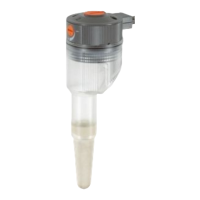
Replace batteries of the
Soil Moisture Sensor:
N
M
O
P
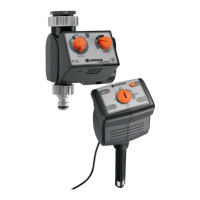
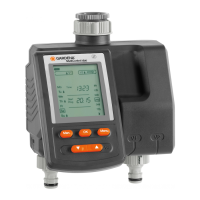
7. Maintenance
The Water Timer may be operated only with a 9 V alkaline
battery type IEC 6LR61.
1. Press unlock button
1
and
remove control panel
2
from
the Water Timer.
2. Insert battery
L
in the battery
compartment.
When doing so ensure
correct polarity
(+/
-
)
.
3. Plug control panel
2
onto the
Water Timer again.
Test new battery:
1. Open the tap.
2. Turn Run-Time button
G
to ON.
Valve opens.
3. Turn Run-Time button
G
to OFF.
Valve closes.
To prevent damage caused by water flowing out, ensure proper
draining at the Water Timer (connect hose, place a bucket
below, etc.).
1. Unlock battery cover
M
with a coin (or large screwdriver) by
turning clockwise.
2. Remove battery cover
M
(using a screwdriver if necessary).
3. Remove battery holder
N
and insert 2 batteries (round cells
1.5 V alkaline type IEC LR14). When doing so, ensure
correct polarity (+ /
-
).
4. Insert battery holder
N
in Soil Moisture Sensor. When doing
so, make sure that cables are not trapped.
5. Insert catch lug
O
of battery cover
M
in housing slot
P
and
press down battery cover
M
. When doing so, make sure that
O-ring is positioned correctly.
6. Relock battery cover
M
with a coin (or large screwdriver) by
turning anticlockwise.
The control panels should be cleaned when soiled (particularly
the Light Sensor).
No caustic / abrasive cleaning agents should be used.
v Clean control panel with a damp cloth (do not use solvent).
Replace battery of the
Water Timer:
L
1
G 2
1835-29.960.02_12.03.2007.qxd 15.03.2007 15:52 Seite 10