6
3. ASSEMBLY
DANGER!
Risk of injury.
Risk of injury if the product starts unintentionally.
→ Disconnect the product from the power
supply before installing the product.
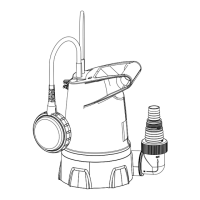
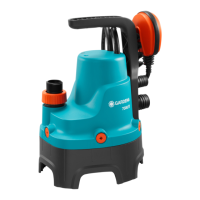
3.1 Fitting the elbow union [Fig. 1]
DANGER!
Risk of injury!
Risk of cuts from the impeller.
→ Only operate the pump with the elbow
union
.
→ Screw the elbow union
clockwise into the
pump
as far as it will go.
→ If you are laying the hose horizontally, unscrew the
elbow union
counterclockwise by up to half a
turn.
3.2 Fitting the hose
To achieve the best possible delivery capacity, select
a hose with the largest possible hose diameter
of 38 mm (1 1/2").
We recommend that you do not use a hose with a
diameter smaller than 19 mm (3/4"), otherwise the
delivery capacity will be reduced.
Hose diameter Ø 38 mm (1
1/2")
Ø 25 mm
(1")
Ø 19 mm
(3/4")
Delivery capacity High Medium Low
GARDENA
hose clamp
Art. 7195 Art. 7193 –
GARDENA pump connec-
tion set
– – Art. 1752
Disconnect the
hose connector
–
At
At
3.2.1 Fit the hose with Ø 38 mm [Fig. 3a–5a]
1. Disconnect the hose connector at position
.
2. Screw the hose connector
clockwise into the
elbow union
.
3. Push the hose
onto the hose connector
.
4. Secure the hose
with the GARDENA hose
clamp
.
3.2.2 Fit the hose with Ø 25 mm [Fig. 3b–5b]
1. Screw the hose connector
clockwise into the
elbow union
.
2. Push the hose
onto the hose connector
.
3. Secure the hose
with the GARDENA hose
clamp
.
3.2.3 Fit the hose with the plugin system
(Ø 19 mm) [Fig. 3c–5c]
To connect a hose with the GARDENA plugin system,
use the GARDENA pump connection set Art. 1752.
1. Disconnect the hose connector
at position
.
2. Screw the hose connector
clockwise into the
elbow union
.
3. Screw the tap connector
onto the screw con-
nection
4. Push the hose
with the hose section
onto the
hose connector
.
4. OPERATION
DANGER!
Risk of injury.
Risk of injury if the product starts unintentionally.
→ Disconnect the product from the power
supply before lowering the product into the
water.
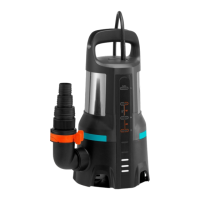
4.1 Setting up the pump
→ Select a level installation site to prevent the pump
from falling over.
→ Make sure that the suction openings on the suc-
tion foot are not completely or partially blocked by
impurities.
→ When using the pump in swimming pools with a
liner base (e.g. paddling pools), place the submer-
sible pump on a raised surface, so that it does not
suck in the liner.
→ When using the pump in a pond, place it on a
brick, for example.
→ To pump water, the water outlet/hose end must be
positioned lower than the maximum delivery head
of the pump.
→ To improve the delivery capacity, raise the pump
and ensure the water inlet is easily accessible.
4.2 Achieve optimum pumping capacity
→ Select a hose with the largest possible dia-
meter of 38 mm (1 1/2").
→ Regularly check that the pump is secure and level.
→ Check regularly that the oat switch can move
freely.
→ The less height the pumped liquid has to overco-
me, the higher the pumping capacity.
4.3 Pumping water
If the pump cannot be lowered using the handle, the
pump must always be lowered using a rope. Attach
the rope to the pump handle. For minimum immersion
depth during commissioning, see 8. TECHNICAL
DATA.
When priming close to the minimum water level during
commissioning, the priming process may take longer.
Note: This pump is equipped with a bleed valve,
which removes any air cushion in the pump. Depen-
ding on the function, a small amount of water may
escape from the side of the housing.
4.3.1 Starting the pump
1. Immerse the pump.
2. Connect the pump to the power supply.
Warning! The pump may start immediately depen-
ding on the oat switch setting.