7
AFTER SALES SUPPORT
Tel.: 1800 909 909
www.globalpowerbrands.com email: help@globalpowerbrands.com
KSI 2200
AUS
more persons, at the same time, the felling operation should be se-
parated from the bucking operation by a distance of at least twice
the height of the tree being felled. Trees should be felled in a manner
that would endanger any person, strike any utility line, the utility
company should be noti ed immediately.
The chainsaw operator should keep on the uphill side of the terrain as
the tree is likely to roll or slide downhill after it is felled.
A retreat path should be planned and cleared as necessary befor cuts
are started. The retreat path should extend back and diagonally to
the rear of the expected line of fall as illustrated in Figure 10.
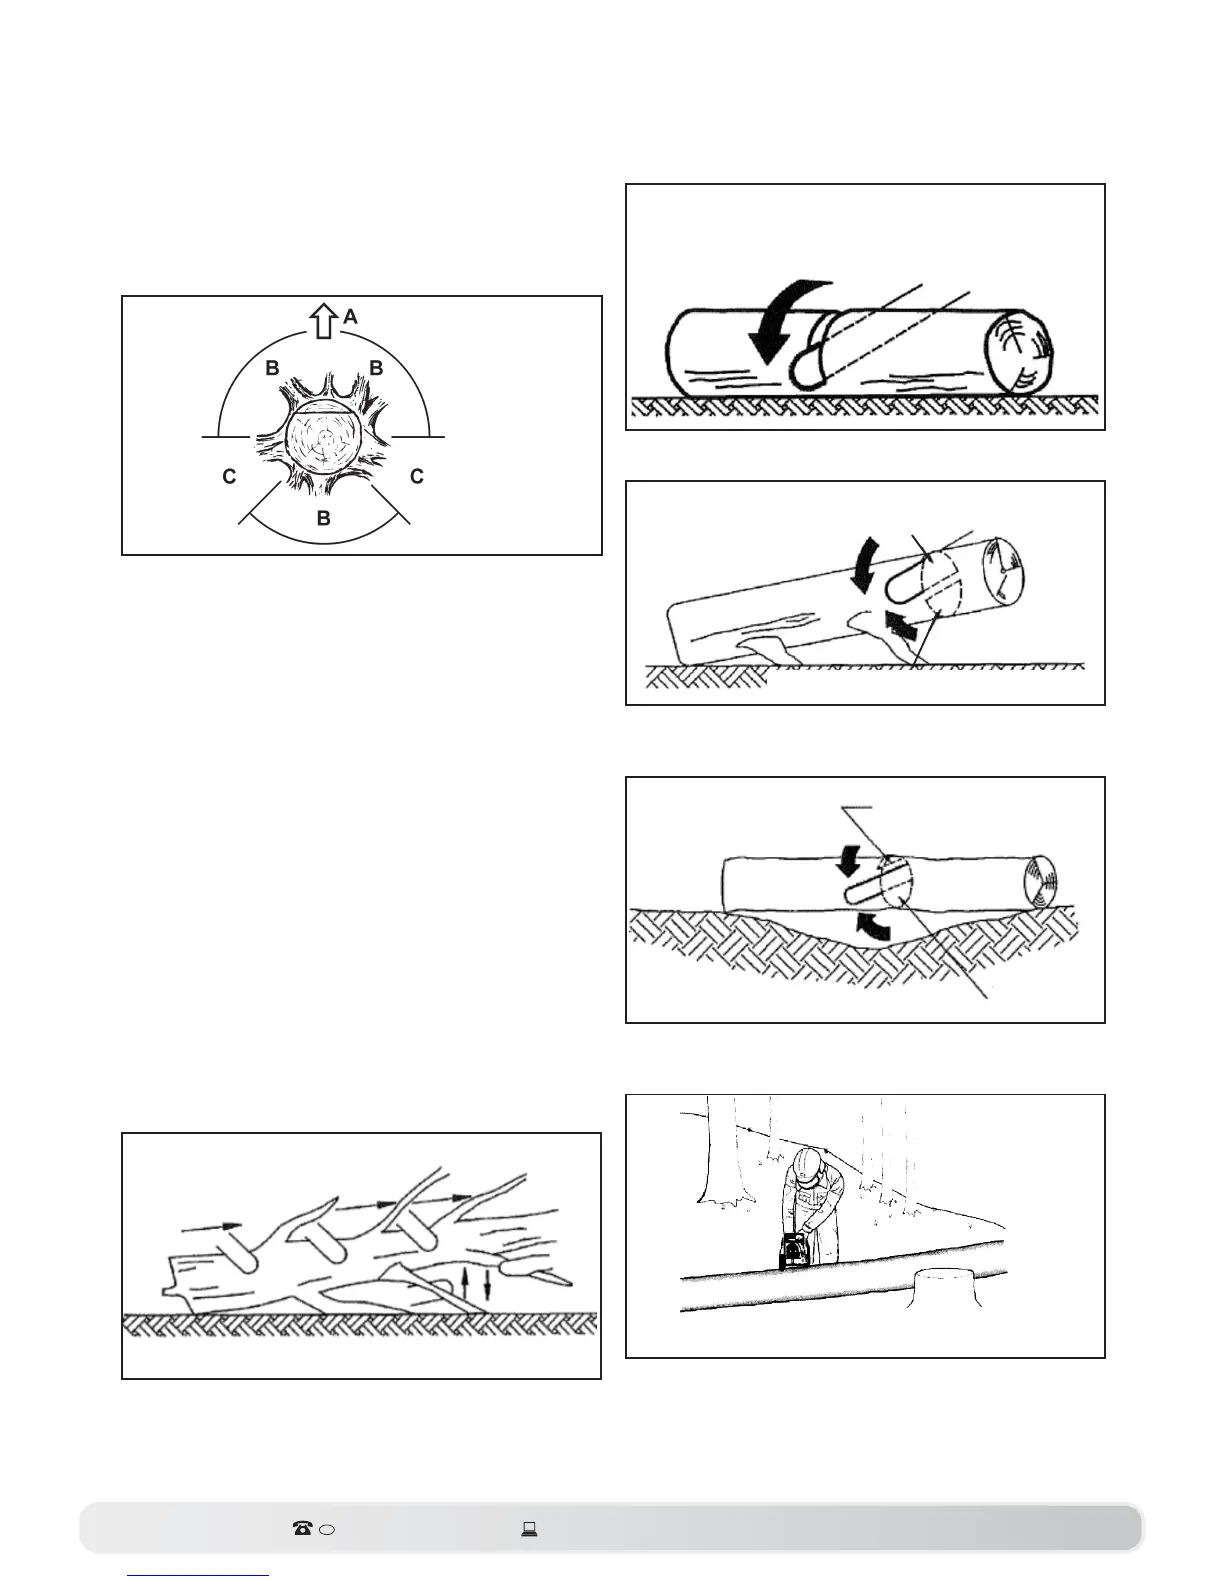
10
A Felling direction
B Danger area
C Escape area
Before felling is started, consider the natural lean of the tree, the location of
larger branches and the wind direction to judge which way the tree will fall.
Remove dirt, stones, loose bark, nails, staples, and wire from the tree
where felling cuts are to be made.
b) Notching Undercut
Make the notch 1/3 the diameter of the tree, perpendicular to the di-
rection of fall as illustrated in 9. Make the lower horiziontal notching
cut rst. This will help to avoid pinching of either the saw chain or the
guide bar when the second notch is being made.
c) Felling Back Cut
Make the felling back cut at least 2 inches (50.8 mm) higher than the
horizontal notching cut as illustrated in Figure 9. Keep the felling
back cut parallel to the horizontal notching cut. Make the felling back
cut so enough wood is left to act as a hinge. The hinge wood keeps
the tree from twisting and falling in the wrong direction. Do not cut
through the hinge.
As the felling cut gets close to the hinge the tree should begin to fall.
If there is any chance that the tree may not fall in the desired direction
or it may rock back and bind the saw chain, stop cutting before the
felling back cut is complete and use wedges of wood, plastic or alu-
minum to open the cut and drop the tree along the desired line of fall.
When the tree begins to fall remove the chainsaw from the cut, stop
the motor, put the chainsaw down, then use the retreat path planned.
Be alert for overhead limbs falling and watch your footing.
d) Limbing a Tree
LIMB CUT
KEEP WORK OFF GROUND LEAVE SUPPORT
LIMBS UNTIL LOG IS CUT
11
Limbing is removing the branches from a fallen tree. When limbing,
leave larger lower limbs to support the log o the ground. Remove the
small limbs in one cut as illustrated in Figure 11. Branches under tensi-
on should be cut from the bottom up to avoid binding the chainsaw.
e) Bucking a Log
Bucking is cutting a log into lengths. It is important to make sure
your footing is m and your weigth is evenly distributed on both feet.
When possible, the log should be raised and supported by the use of
limbs, logs or chocks. Follow the simple directions for easy cutting.
CUT FROM TOP (OVERBUCK)
AVOID CUTTING EARTH
12
When the log is supported along its entire length as illustrated in Fi-
gure 12, it is cut from the top (over-buck).
13
1st CUT UNDERBUCK (1/3 DIAMETER) TO AVOID
SPLINTERING
2nd CUT OVERBUCK (2/3 DIAMETER) TO MEET 1st CUT (TO
AVOID PINCHING)
When the log is supported on one end, as illustrated in Figure 13,
cut 1/3 the diameter from the underside (underbuck). Then make the
nished cut by overbucking to meet the rst cut.
14
1st CUT OVERBUCK (1/3 DIAMETER)
TO AVOID SPLINTERING
2nd CUT UNDERBUCK (2/3 DIAMETER) TO MEET 1st
CUT (TO AVOID PINCHING)
When the log is supported on both ends, as illustrated in Figure 14,
cut 1/3 of that diameter from the top overbruck. Then make the nis-
hed cut by underbucking to meet the rst cut.
15
STAND ON UPHILL SIDE WHEN CUTTING BECAUSE
LOG MAY ROLL
When bucking on a slope always stand on the uphill side of the log,
as illustrated in Figure 15. When “cutting through”, to maintain com-
plete control release the cutting pressure near the end of the cut wi-
thout relaxing your grip on the chainsaw handles. Don’t let the chain
contact the ground. After completing the cut, wait for the saw chain