EasyManua.ls Logo

Garmin GRF 10 User Manual

Garmin GRF 10
70 pages
To Next Page IconTo Next Page
Page #1 background imageLoading...
Page #1 background image
GRF
10
Garmin
®
and the Garmin logo are trademarks of Garmin Ltd. or its subsidiaries, registered in the USA and other countries. These trademarks may not be used
without the express permission of Garmin.
El número de registro COFETEL/IFETEL puede ser revisado en el manual a través de la siguiente página de internet.
Installation Instructions ...................2
Instructions d'installation.................7
Istruzioni di installazione ...............13
Installationsanweisungen ..............19
Instrucciones de instalación ..........25
Instruções de instalação................31
Installatie-instructies.....................37
Installationsvejledning...................43
Asennusohjeet ..............................49
Installeringsinstruksjoner...............54
Installationsinstruktioner ...............60
Instrukcja instalacji .......................65
GUID-B42FCBBC-BDA7-4573-AFF2-701A45D8A8DD v2September 2022
Question and Answer IconNeed help?

Do you have a question about the Garmin GRF 10 and is the answer not in the manual?

Garmin GRF 10 Specifications

General IconGeneral
BrandGarmin
ModelGRF 10
CategoryAccessories
LanguageEnglish

Summary

Installation Preparation

Package Contents

Tools Needed

Mounting Considerations

Sensor Parallel to Tiller Arm

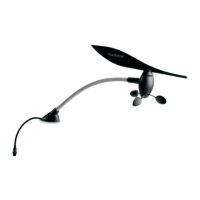
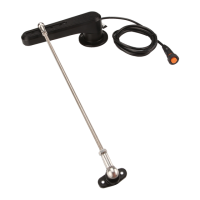
Ensure sensor is parallel to tiller arm with rudder amidships.

Ball-Joint Assembly Distance Alignment

Align tiller and sensor ball-joint assembly distances for proper function.

Sensor and Rudder Rotation Axis Alignment

Ensure sensor and rudder rotation axes are properly aligned.

Rudder Travel Range Limit

Limit rudder travel to 140 degrees to prevent sensor damage.

Connecting Rod Length Adjustment

The connecting rod is 300mm long; it can be shortened if needed.

Rod Leveling for Operation

Install the rod level (+/- 5 degrees) for correct sensor operation.

Connection Considerations

Installation Procedures

Installing the Sensor

Steps for physically installing the rudder sensor onto the boat.

Cutting the Threaded Rod

Instructions on how to cut the threaded rod to the correct length.

Connecting to Autopilot System

Routing the cable and connecting the sensor to the autopilot ECU.

Configuring the Rudder Sensor

Steps to configure the sensor with the Garmin autopilot system.

Specifications

Related product manuals