Do you have a question about the Garmin LIVESCOPE PLUS LVS34 and is the answer not in the manual?
See the Important Safety and Product Information guide for product warnings and other important information.
Failure to install and maintain equipment correctly can result in damage or injury.
Check opposite side when drilling or cutting to avoid damaging the vessel.
This equipment should be installed by a qualified marine installer.
Sonar is for situational awareness only; remain aware of surroundings for safe operation.
Avoid shallow or unknown water to prevent damage to the transducer, bracket, or transom.
Update the Garmin chartplotter software when installing this device.
View online videos for installation assistance with the device.
List of required tools for installation, including drill bits, wrenches, and sealant.
Considerations for transducer placement, avoiding propellers and obstructions.
Use a countersink bit on fiberglass for gel-coat integrity when drilling pilot holes.
Ensure all five mounting holes are used to prevent bracket damage at high speeds.
Secure the transducer to the bracket using the included bolt and washer.
Position the assembled transducer and arms against the bracket attached to the transom.
Attach bracket arms using bolts, nuts, washers and tighten to specified torque.
Route cable through transom or over top, avoiding electrical interference.
Align transducer element parallel with the waterline for optimal performance.
Adjust bracket height for submersion and tighten screws securing the bracket.
Test transducer angle and depth, making any necessary adjustments.
This document outlines the installation and operational considerations for the Garmin LiveScope™ Plus LVS34 Transom Mount Kit, a device designed to enhance marine navigation and fishing by providing advanced sonar capabilities. The kit facilitates the mounting of a transducer to the transom of a vessel, allowing for real-time, high-resolution sonar imaging of underwater environments.
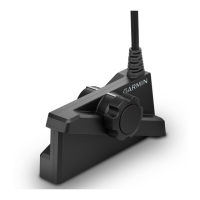
The Garmin LiveScope Plus LVS34 Transom Mount Kit is primarily a mounting solution for the LVS34 transducer, which is a key component of Garmin's LiveScope sonar system. The LVS34 transducer, when properly installed with this kit, provides live, real-time sonar images of fish and underwater structures. This allows users to see what is below and around their boat with exceptional clarity, aiding in fishing and navigation. The system is designed to offer situational awareness, displaying sonar information that helps users understand their immediate underwater surroundings. The transom mount bracket securely holds the transducer in place, ensuring stable performance during vessel operation. The kit's design focuses on enabling the transducer to effectively transmit and receive sonar signals, which are then processed by a connected Garmin chartplotter to generate detailed visual representations of the underwater world.
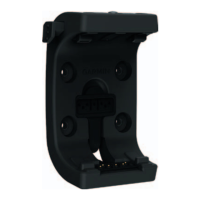
The installation process for the transom mount kit is detailed, beginning with selecting an appropriate mounting location on the transom. This involves using a template to mark pilot holes and then drilling them. For fiberglass vessels, a countersink bit is recommended to prevent gel-coat cracking. The spray guard is positioned against the back of the transom-mount bracket, aligning with the mounting holes, and then both are loosely attached to the transom using marine sealant and screws. This initial loose attachment allows for adjustments later.
Assembling the transom-mount hardware involves placing the arms of the bracket against both sides of the transducer. The arms are then loosely attached to the transducer using a bolt and washer. While a knob is included for securing the transducer, the bolt is recommended for its stability, as the transom mount is not designed for frequent changes in viewing mode during use. The assembled transducer and arms are then placed against the bracket already attached to the transom.
The final steps in assembly involve attaching the arms to the bracket using bolts, nuts, and washers. A torque wrench is specified for tightening these bolts to a precise 20 N-m (15 lb-ft.) to ensure secure fastening. The design of the bracket base incorporates features to hold the nuts in place during tightening, simplifying the process.
Routing the transducer cable is another critical aspect of installation. Users are advised to choose a pilot-hole location well above the waterline if the cable needs to pass through the transom. A 32 mm (1 1/4 in.) hole saw is used for this purpose. Alternatively, if not routing through the transom, the cable can be routed up and over the top of the transom. It is crucial to avoid routing the cable near electrical wires or other sources of electrical interference to prevent signal degradation.
Adjusting and securing the transducer and mount are essential for optimal performance. After connecting the transducer to the mount and the mount to the transom, the angle and depth must be set. The transducer element should be adjusted to be parallel with the waterline. An M5 hex wrench is used to tighten the screw that secures the transducer to the mount. The height of the transducer bracket on the transom is then adjusted to ensure the transducer is submerged when the boat is in the water. Finally, the five screws securing the bracket to the transom are tightened using a #2 Phillips screwdriver. After these adjustments, the angle and depth of the transducer should be tested, and further adjustments made as needed to achieve the best sonar performance.
While the document does not explicitly detail ongoing maintenance, it emphasizes proper installation as a key factor in the longevity and performance of the device. The use of marine sealant during installation helps protect against water intrusion and corrosion, which are common issues in marine environments. The recommendation to install screws in all five mounting holes is a crucial maintenance-related instruction, especially for high-speed vessels, as it prevents bending or breaking of the bracket and dislodging of the transducer due to stress. This proactive approach to installation minimizes the need for corrective maintenance later.
The document also provides important operational considerations that indirectly contribute to maintenance. Users are advised to operate their boat slowly in shallow water or areas with unknown depths and underwater obstructions to avoid damaging the transducer, bracket, and transom. The transom mount bracket is not designed to break away upon impact, meaning that striking an underwater object can cause significant damage not covered under warranty. This highlights the importance of careful operation to prevent physical damage and the associated need for repairs or replacement.
Furthermore, the document notes that operating at speeds greater than 19 km/hr (12 mph) limits the transducer's performance, diminishes bottom return, and may affect the accuracy of depth information and alarms. At higher speeds, the transducer may also cause noticeable effects on boat operation, such as reduced top speed, steering pull, or transom lift. While these are performance characteristics rather than maintenance items, understanding them helps users operate the device within its optimal parameters, potentially reducing wear and tear on both the transducer and the vessel.
The requirement to update the Garmin chartplotter software when installing this device is a critical maintenance-related instruction. Software updates often include performance enhancements, bug fixes, and compatibility improvements that ensure the transducer operates effectively with the chartplotter, contributing to the overall reliability and longevity of the system.
In summary, the Garmin LiveScope Plus LVS34 Transom Mount Kit is a robust mounting solution designed for the LVS34 transducer, enabling advanced sonar capabilities for marine vessels. Its usage features focus on a detailed installation process that ensures secure and optimal positioning of the transducer. While explicit maintenance steps are not provided, the emphasis on correct installation, careful operation, and software updates serves as a comprehensive guide for ensuring the device's long-term performance and minimizing potential issues.
| Category | Racks & Stands |
|---|---|
| Frequency | 530 - 1, 100 kHz |
| Power Output | 500 W |
| Depth Capability | 200 ft |
| Mounting Type | Transom mount |
| Cable Length | 20 ft |