53
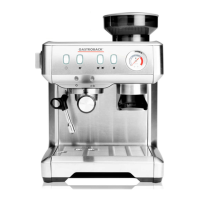
6. Remove the locking button of the upper burr by turning the handle clockwise.
R
E
L
E
A
S
E
L
O
C
K
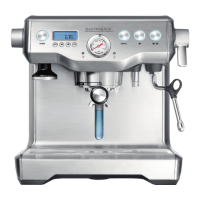
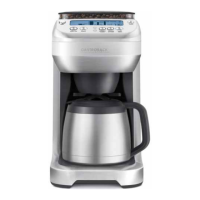
7. Using the provided cleaning brush, thoroughly remove any build-up of coffee grinds that
have formed around the grinding burrs and coffee grinds chute. Ensure the grinds catcher is
in place to catch the loose grinds, then remove and empty the catcher.
CLEAN THE
GRINDING
BURRS
CLEAN THE
COFFEE
GRINDS CHUTE
8. Wipe the coffee grinds chute disc (the entire stainless steel part) to remove any build-up
of coffee grinds that have accumulated on the surface. Dry thoroughly.
9. Replace the upper burr by aligning the three notches around the upper burr with the
three notches in the grinding chamber. The upper burr should sit flush. Turn the handle
counter-clockwise until it clicks into position.
10. Replace the bean hopper and lock into position.
11. Replace the coffee basket onto the swing-out door and close. The coffee grinds chute
will rotate back to the closed position. You may hear a winding noise, this is normal.
12. The LCD screen will no longer display ‘CLEAN COFFEE CHUTE’. The machine is now
ready to use.
Cleaning the Grinds Catcher and Drip Tray
Press the OPEN button to open the swing-out door. Remove the grinds catcher located
under the coffee grinds chute and the 2-part drip tray at the base of the machine. Wash in
warm, soapy water. Do not use abrasive cleansers, pads or cloths which can scratch the
surface. Rinse and dry thoroughly.