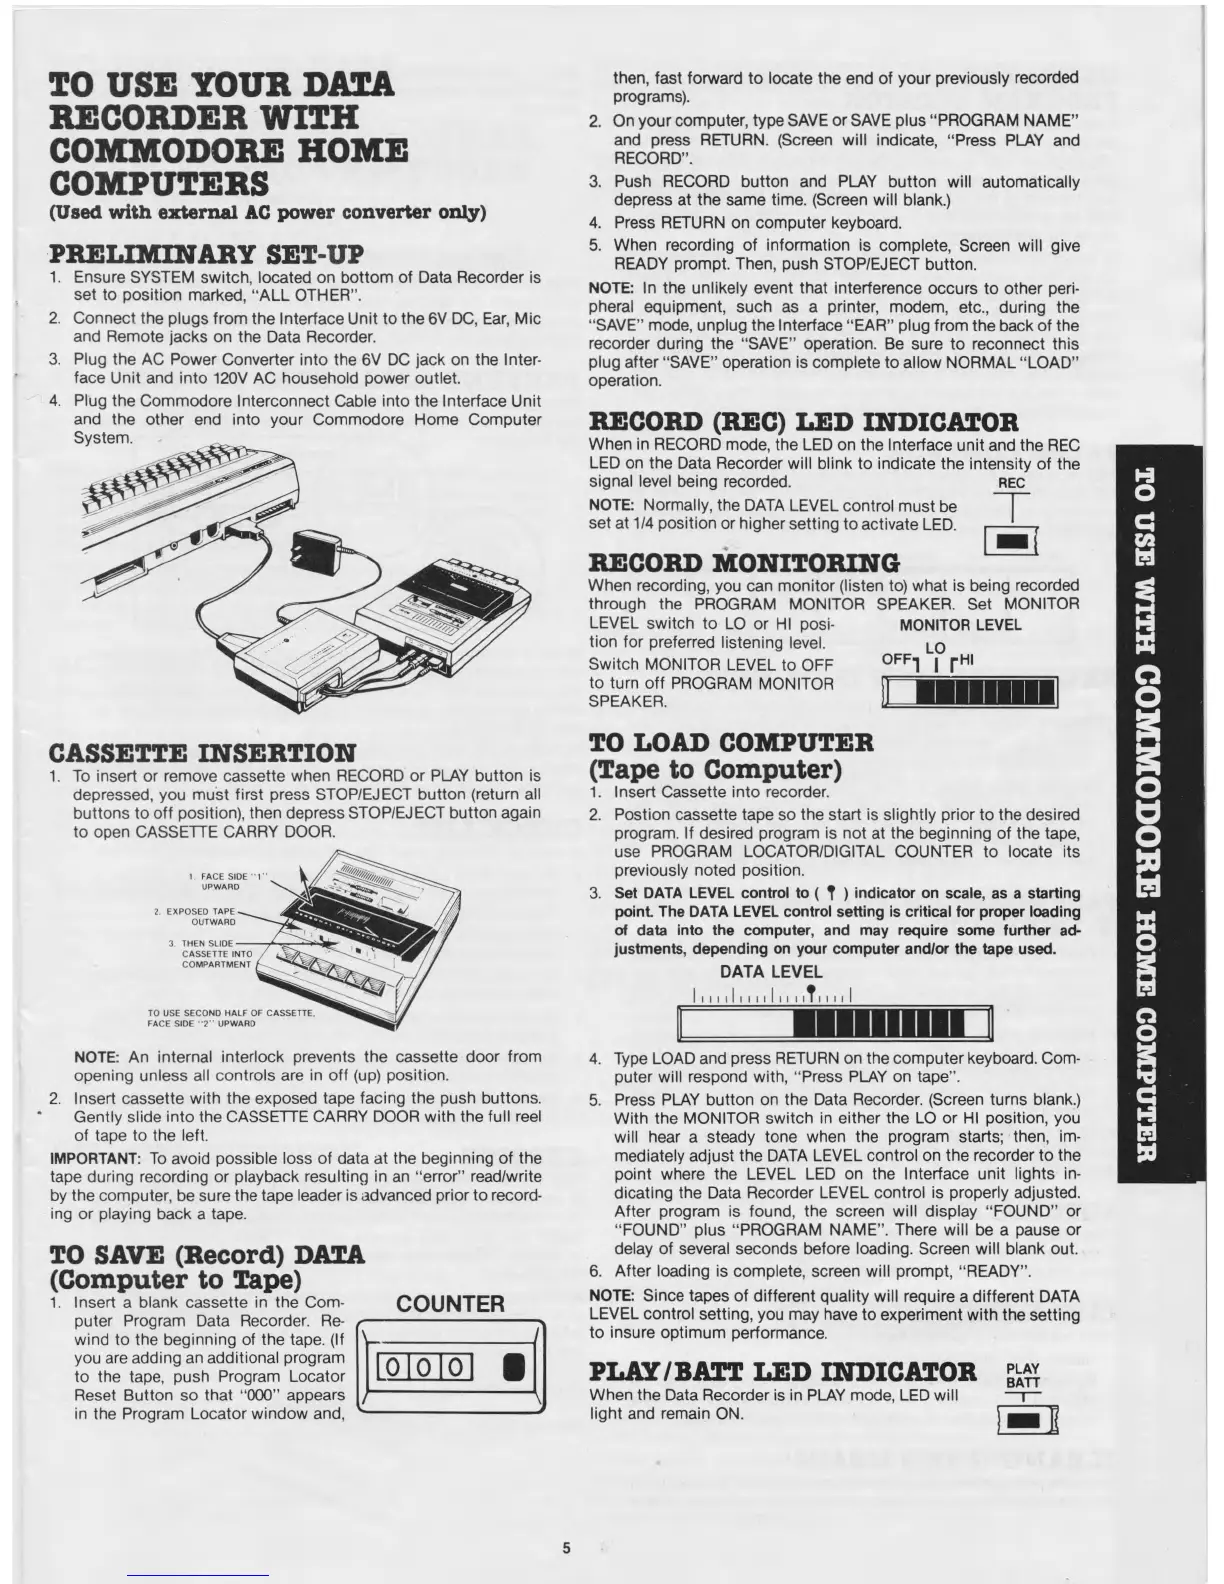
TO USE YOUR DATA
RECORDER WITH
COMMODORE HOME
COMPUTERS
(Used with external AC power converter only)
PRELIMINARY SET-UP
1. Ensure SYSTEM switch, located on bottom of Data Recorder is
set to position marked, “ALL OTHER".
2. Connect the plugs from the Interface Unit to the 6V DC, Ear, Mic
and Remote jacks on the Data Recorder.
3. Plug the AC Power Converter into the 6V DC jack on the Inter
face Unit and into 120V AC household power outlet.
4. Plug the Commodore Interconnect Cable into the Interface Unit
and the other end into your Commodore Home Computer
System.
CASSETTE INSERTION
1. To insert or remove cassette when RECORD or PLAY button is
depressed, you must first press STOP/EJECT button (return all
buttons to off position), then depress STOP/EJECT button again
to open CASSETTE CARRY DOOR.
2.
NOTE: An internal interlock prevents the cassette door from
opening unless all controls are in off (up) position.
Insert cassette with the exposed tape facing the push buttons.
Gently slide into the CASSETTE CARRY DOOR with the full reel
of tape to the left.
IMPORTANT: To avoid possible loss of data at the beginning of the
tape during recording or playback resulting in an “ error” read/write
by the computer, be sure the tape leader is advanced prior to record
ing or playing back a tape.
TO SAVE (Record) DATA
(Computer to Tape)
1. Insert a blank cassette in the Com
puter Program Data Recorder. Re
wind to the beginning of the tape. (If
you are adding an additional program
to the tape, push Program Locator
Reset Button so that “000” appears
in the Program Locator window and,
COUNTER
then, fast forward to locate the end of your previously recorded
programs).
2. On your computer, type SAVE or SAVE plus “ PROGRAM NAME”
and press RETURN. (Screen will indicate, “ Press PLAY and
RECORD” .
3. Push RECORD button and PLAY button will automatically
depress at the same time. (Screen will blank.)
4. Press RETURN on computer keyboard.
5. When recording of information is complete, Screen will give
READY prompt. Then, push STOP/EJECT button.
NOTE: In the unlikely event that interference occurs to other peri
pheral equipment, such as a printer, modem, etc., during the
“SAVE” mode, unplug the Interface “ EAR” plug from the back of the
recorder during the “SAVE” operation. Be sure to reconnect this
plug after “ SAVE” operation is complete to allow NORMAL “ LOAD”
operation.
RECORD (REC) LED INDICATOR
When in RECORD mode, the LED on the Interface unit and the REC
LED on the Data Recorder will blink to indicate the intensity of the
signal level being recorded. r e c
NOTE: Normally, the DATA LEVEL control must be
set at 1/4 position or higher setting to activate LED.
RECORD MONITORING
When recording, you can monitor (listen to) what is being recorded
through the PROGRAM MONITOR SPEAKER. Set MONITOR
LEVEL switch to LO or HI posi
tion for preferred listening level.
Switch MONITOR LEVEL to OFF
to turn off PROGRAM MONITOR
SPEAKER.
TO LOAD COMPUTER
(Tape to Computer)
MONITOR LEVEL
OFF^ ^ fHI
Insert Cassette into recorder.
Postion cassette tape so the start is slightly prior to the desired
program. If desired program is not at the beginning of the tape,
use PROGRAM LOCATOR/DIGITAL COUNTER to locate its
previously noted position.
Set DATA LEVEL control to ( T ) indicator on scale, as a starting
point The DATA LEVEL control setting is critical for proper loading
of data into the computer, and may require some further ad
justments, depending on your computer and/or the tape used.
DATA LEVEL
I I I II I M I I I I I I iTl I I I I
■ ■ ■ ■ m m i
4.
5.
Type LOAD and press RETURN on the computer keyboard. Com
puter will respond with, “ Press PLAY on tape” .
Press PLAY button on the Data Recorder. (Screen turns blank.)
With the MONITOR switch in either the LO or HI position, you
will hear a steady tone when the program starts; then, im
mediately adjust the DATA LEVEL control on the recorder to the
point where the LEVEL LED on the Interface unit lights in
dicating the Data Recorder LEVEL control is properly adjusted.
After program is found, the screen will display “ FOUND” or
“ FOUND” plus “ PROGRAM NAME” . There will be a pause or
delay of several seconds before loading. Screen will blank out.
6. After loading is complete, screen will prompt, “ READY” .
NOTE: Since tapes of different quality will require a different DATA
LEVEL control setting, you may have to experiment with the setting
to insure optimum performance.
PLAY/BATT LED INDICATOR
When the Data Recorder is in PLAY mode, LED will
light and remain ON.
PLAY
BATT
S
TO USE WITH COMMODORE HOME co m pu ter