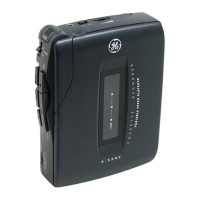
TO USE YOUR DATA
RECORDER WITH
HOME COMPUTERS OTHER
THAN ATARI/COMMODORE
(Interface unit not required)
BATTERY OPERATION
1. Remove battery compartment door (located on cabinet bottom)
by pressing it inward in direction of arrow and slide off cabinet
bottom.
2. Insert 4 “ AA” -size batteries (not included) into battery compart
ment. Be sure the (+) or cap end of each battery is installed as
shown inside the battery compartment.
3. Replace battery door.
AA -SIZE
BATTERIES
IMPORTANT: Be sure to remove the batteries when storing the set
for more than a few weeks at a time. Leaky batteries can badly
damage the recorder. Always push STOP/EJECT button before stor
ing. This will relieve pressure on certain parts in the recorder that
might deform after long periods of time.
NOTE: If the recorder develops problems reading or loading data,
or if the tape reels turn very slowly or not at all, check with a new set
of batteries use AC power or try another cassette before seeking
service.
AC POWER CONVERTER —
No. 5-107S
You can extend the life of the batteries substantially by using them
only when portable operation is required. Any tim e AC household
electrical power is available, you can use the AC Power Converter to
operate your recorder instead of using batteries. The batteries may
remain in the recorder when using the AC Power Converter.
The AC Power Converter plugs into the 6V DC PWR JACK on the
recorder (which automatically disconnects the batteries), and plugs
into 120-volt AC household power.
PRELIMINARY SET UP
Interconnect cables are required to hook up your Data Recorder
with your home computer. If you do not already have the required
ca|?le, check with your computer dealer or refer to your computer
handbook for recommended cable to use with your computer.
1. Plug in the recorder’s AC converter as described under "AC
Power Converter".
2. Plug interconnect cable to the Ear, Mic and Remote jacks on the
side of the Data Recorder and the other end to your home compu
ter. (Refer to computer handbook to ensure proper connection.)
3. Ensure SYSTEM switch, located on bottom of Data Recorder is
set, to position marked "ALL OTHER”.
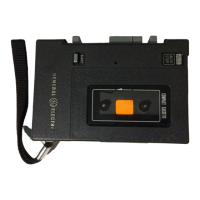
CASSETTE INSERTION
1. To insert or remove cassette when RECORD or PLAY button is
depressed, you must first press STOP/EJECT button (return all
buttons to off position), then depress STOP/EJECT button again
to open CASSETTE CARRY DOOR.
NOTE: An internal interlock prevents the cassette door from
opening unless all controls are in off (u d ) position.
2. Insert cassette with the exposed tape facing the push buttons.
Gently slide into the CASSETTE CARRY DOOR w ith the full reel
of tape to the left.
1 FACE SIDE -1
UPWARD
2. EXPOSED TAPE
OUTWARD
3. THEN SLIDE
CASSETTE INTO
COMPARTMENT
TO USE SECOND HALF OF CASSETTE,
FACE SIDE "2 UPWARD
e :
TOP + ^
4 AA SIZE BATTERIES
TOP — |
L =
+ r
IMPORTANT: To avoid possible loss of data at the beginning of the
tape during recording or playback resulting in an “ error” read/write
by the computer, be sure the tape leader is advanced prior to record
ing or playing back a tape.
TO SAVE (Record) DATA
(Computer to Tape)
1. Follow your computer instructions for programming data.
2. Insert a blank cassette in the Com
puter Program Data Recorder. Re
wind to the beginning of the tape. (If
you are adding an additional program
to the tape, push Program Locator
Reset Button so that “OCX)” appears
in the Program Locator window and,
then, fast forward to locate the end of your previously recorded
programs).
3. On your computer, insert the appropriate instruction for Saving
Data.
4. Push RECORD button. (PLAY button will automatically depress
at the same time.)
5. Insert appropriate computer keyboard instruction to start the
recording.
6. When recording of information is complete, push the STOP/
EJECT button o f the recorder.
NOTE: The Automatic Level Control (ALC) will set the record level
for optimum recording regardless of DATA LEVEL control setting.
RECORD (REC) LED INDICATOR
When in RECORD mode, the LED on the Interface Unit and the REC
LED on the Data Recorder will blink to indicate the intensity of the
signal level being recorded. REC
NOTE: Normally, the DATA LEVEL control must be
set at 1/4 position or higher setting to activate LED. r— —
RECORD MONITORING
When recording, you can monitor (listen to) what is being recorded
through the PROGRAM MONITOR SPEAKER. Set MONITOR
LEVEL switch to LO or HI posi- MONITOR LEVEL
tion for preferred listening level.
Switch MONITOR LEVEL to OFF
to turn off PROGRAM MONITOR
SPEAKER.
TO LOAD COMPUTER
(Tape to Computer)
1. Refer to computer handbook for instructions regarding data
retrieval.
2. Insert Cassette into recorder.
3. Position cassette tape so the start is slightly prior to the desired
program. If desired program is not at the beginning of the tape,
use PROGRAM LOCATOR/DIGITAL COUNTER to locate its
previously noted position.
4. Set DATA LEVEL control to ( T ) indicator on scale, as a starting
point. The DATA LEVEL control setting is critical for proper loading
of data into the computer, and may require some further ad
justments, depending on your computer and/or the tape used.
DATA LEVEL
5. Press PLAY button and insert appropriate computer keyboard
command for loading the computer.
6. With the MONITOR switch in either the LO or HI position, you
will hear a steady tone when the program starts.
7. After loading is complete, push the STOP/EJECT button.
NOTE: Since tapes of different quality will require a different DATA
LEVEL control setting, you may have to experiment with the setting
to insure optimum performance.
OFF-j | |-HI
COUNTER
o o o 0
7
TO USE WITH ALL OTHER HOME co m puters
 Loading...