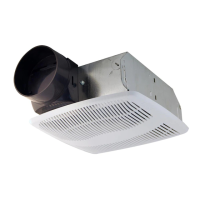
EasyManua.ls Logo

GE BFL85ADW User Manual

GE BFL85ADW
8 pages
To Next Page IconTo Next Page
Page #1 background imageLoading...
Page #1 background image
a
BFL85ADW
e
Bath Fan with Light User’s Guide
210572107 Rev. C 1-08
Item Stock Number(s): BFL85ADW
READ AND SAVE THESE INSTRUCTIONS
READ CAREFULLY BEFORE ATTEMPTING TO ASSEMBLE, INSTALL, OPERATE OR MAINTAIN THE PRODUCT DESCRIBED.
PROTECT YOURSELF AND OTHERS BY OBSERVING ALL SAFETY INFORMATION. FAILURE TO COMPLY WITH
INSTRUCTIONS COULD RESULT IN PERSONAL INJURY AND/OR PROPERTY DAMAGE!
RETAIN INSTRUCTIONS FOR FUTURE REFERENCE.
GENERAL SAFETY INFORMATION
When using electrical appliances, basic precautions should always be followed to reduce
the risk of fire, electric shock and injury to person, including the following:
1. Read all instructions before installing or using
exhaust fan.
2. Use this unit only in the manner intended by the
manufacturer. If you have questions, contact the
manufacturer.
3. Before servicing or cleaning the unit, switch power
off at service panel and lock the service disconnecting
means to prevent power from being switched on
SAVE THESE INSTRUCTIONS
IMPORTANT INSTRUCTIONS -
OPERATING MANUAL
accidentally. When the service disconnecting means
cannot be locked, securely fasten a prominent warning
device, such as a tag, to the service panel.
4. Installation work and electrical wiring must be done
by qualified person(s) in accordance with all applicable
codes and standards, including fire-related construction.
5. Sufficient air is needed for proper combustion and
exhausting of gases through the flue (chimney) of
1 of 8
www.geelectrical.com

Questions and Answers:

GE BFL85ADW Specifications

General IconGeneral
BrandGE
ModelBFL85ADW
TypeCeiling Fan
Blade Size52 inches
Speeds3
Voltage120V
ColorWhite

Summary

GENERAL SAFETY INFORMATION

SECTION 2 New Construction

Mounting Rail Installation

Install housing rails, position next to joist, align with finished ceiling, and secure.

Mounting Tab Installation

Position housing against joist, align with finished ceiling, and secure using mounting tabs.

SECTION 3 Existing Construction

Mounting Rail Installation

Trace ceiling, cut opening, install housing rails, and secure rails to joists.

Mounting Tab Installation

Trace ceiling, cut opening, position housing against joist, and secure housing to joist.

SECTION 4 Ducting

SECTION 5 Wiring

External Wire Compartment

Access wiring via external compartment cover by removing a screw.

Internal Wire Compartment

Remove blower assembly to access internal wiring compartment for connections.

Wiring Fan/Light Independently

Connect house wiring to fan and light receptacles separately for independent control.

Wiring Fan/Light together

Connect house wiring to fan and light receptacles together for simultaneous control.

SECTION 6 Completing the Installation

SECTION 7 Use and Care

Cleaning the Grill

Remove grill and lens, clean with mild detergent, and dry thoroughly.

Cleaning the Fan Assembly

Wipe fan parts with dry cloth or vacuum; never immerse electrical parts.

Changing the Light Bulb

Replace light bulb after cooling, following lens removal and reinstallation.

WARRANTY

What is Covered?

Covers five-year parts warranty for manufacturing defects in material or workmanship.

What is Not Covered?

Excludes installation, labor, misuse, accidental damage, and commercial use.

REPLACEMENT PARTS DIAGRAM

Related product manuals