7
Customer ServiceTroubleshooting Tips
Operating Instructions
Safety Instructions
Installation Instructions
Sanitizing the Reverse Osmosis System
Sanitize upon installation of the Reverse Osmosis
system and after servicing inner parts, including
replacement of prefilter, postfilter and the
Reverse Osmosis cartridge.
Be sure you clean your
hands with anti-bacterial soap before handling inner
parts of the system.
CAUTION:
Before sanitizing, be sure to remove
all cartridges as follows.
Chlorine will destroy
the Reverse Osmosis cartridge.
Be sure the water supply valve to the Reverse
Osmosis system is turned off (turn
clockwise), and the RO water is faucet open.
Allow the system to drain completely (this
takes several minutes).
Pull the Reverse Osmosis system out away
from cabinet. Leave tubing connected. Place
a dry towel under the Reverse Osmosis unit.
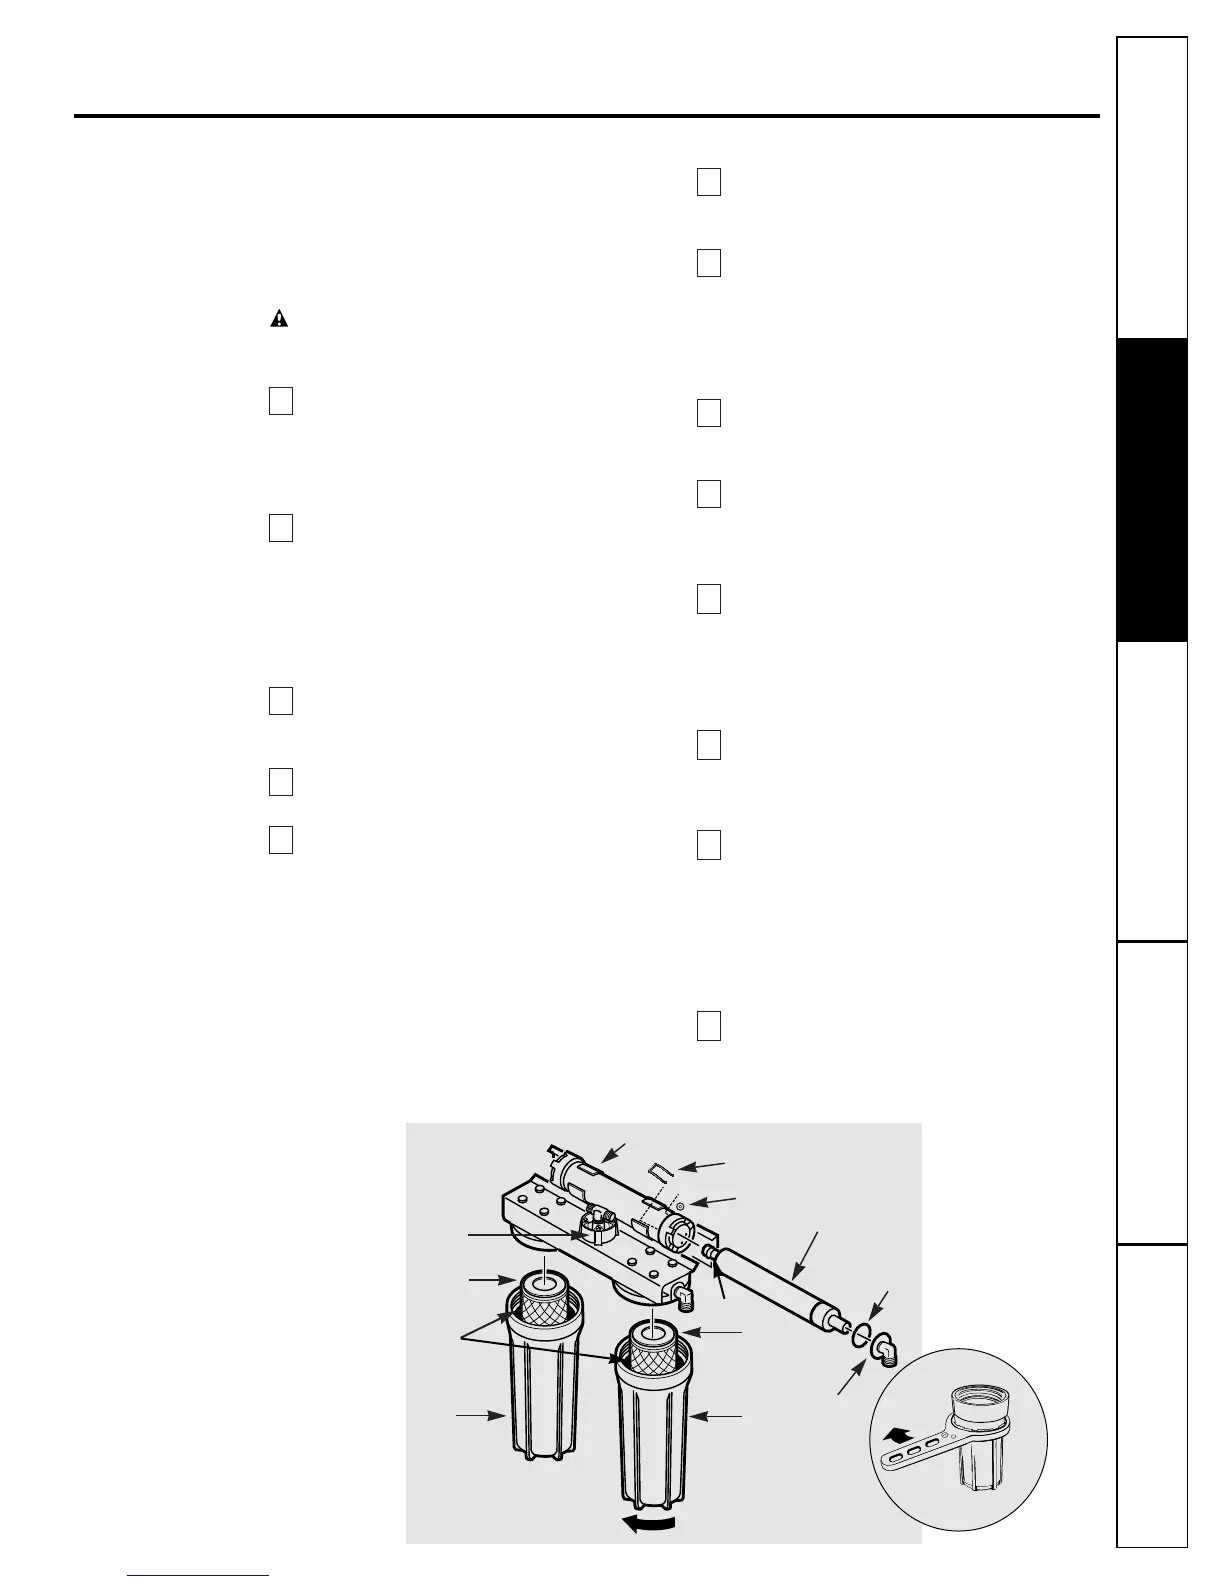
Using pliers remove the lock washer, pull the
u-pin clip and remove the
Reverse Osmosis
housing inlet cover. Save the lock washer for
final assembly.
Remove (using pliers) the Reverse Osmosis
cartridge from the housing. Place the
cartridge in a clean plastic bag.
Replace the inlet cover and u-pin, making
sure the o-ring is in place.
Remove the POSTFILTER sump by turning
it to the left using the sump wrench tool
provided. Be careful, the sump is full of water.
Dispose of water in the sump. Remove the
cartridge from the sump and place in a clean
plastic bag. Make sure the o-ring is seated in
the top of the sump. With the o-ring seal in
position, replace the sump and tighten
securely by hand.
Remove the PREFILTER sump and cartridge.
Dispose of water in the sump. Place this
cartridge in a clean plastic bag.
Fill the prefilter sump with cold water to
about 1
″
from the o-ring. Add 1 ounce (2
tablespoons)
of ordinary 5.25% household
chlorine bleach and mix into the water.
Do
not add chlorine first. Concentrated chlorine
may damage plastic.
Carefully replace the sump (make sure the
o-ring valve seal is in place) on the prefilter
head and tighten securely by hand.
Close the RO water faucet. Open the water
supply valve (turn counterclockwise) to the
Reverse Osmosis system. Allow system to fill
for one minute.
Open the RO water faucet and allow water
to flow for 10 minutes through the Reverse
Osmosis system. Close RO water faucet for
one minute and then open faucet and allow
water to flow (approximately 10 minutes)
until bleach odor is gone.
Turn off the water supply valve (turn
clockwise) to the Reverse Osmosis system.
After water flow stops, leave the RO water
faucet open.
Be sure hands have been cleaned with
anti-bacterial soap.
Repeat steps 1–6 and 8;
however, reinstall the cartridges instead of
removing them.
NOTE:
The Reverse Osmosis cartridge o-ring
end is notched and may need to be rotated
during reinstallation for proper fit.
After installing/reinstalling cartridges, close
RO water faucet and open water
supply valve
(turn counterclockwise). Check for leaks.
13
12
11
10
9
8
7
6
5
4
3
2
1
Sump
Sump
Postfilter
cartridge
O-ring end
Prefilter
cartridge
Inlet cover
O-ring
Reverse Osmosis cartridge
Reverse Osmosis housing
Turn sump this way to remove
O-ring
inside
sump
Automatic
shutoff
assembly
U-pin
Lock washer
Sump Wrench
Loosen
 Loading...