EasyManua.ls Logo

GE JCS830 - User Manual

GE JCS830
28 pages
Print Icon
To Next Page IconTo Next Page
Loading...
GE is a trademark of the General Electric Company. Manufactured under trademark license.
Question and Answer IconNeed help?

Do you have a question about the GE JCS830 and is the answer not in the manual?

Overview

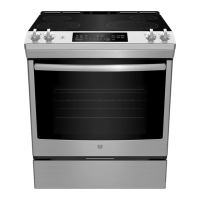
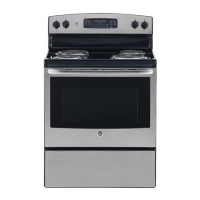
This document is an owner's manual for a GE Electric Radiant Slide-In Range, model JCS830. It provides comprehensive information on the range's functions, usage, and maintenance.

Function Description

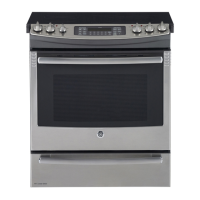
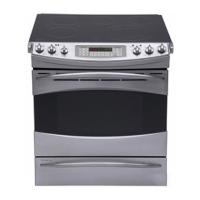
The GE Electric Radiant Slide-In Range is a cooking appliance designed for both surface cooking and oven baking/roasting. It features radiant surface units on a smooth glass cooktop and a multi-functional oven with various cooking modes. The range is equipped with an anti-tip device for safety and offers several special features to enhance the cooking experience.

Usage Features

Surface Units:

The range includes knob-controlled surface units. To operate, push the knob in and turn it to the desired setting. A surface ON indicator light glows when any unit is active. For glass cooktop surfaces, a HOT COOKTOP indicator light illuminates when the unit is hot to the touch and remains on until the unit cools to approximately 150°F. The manual advises against leaving surface units unattended at medium or high heat settings to prevent fire hazards.

Some models feature Dual and Triple Surface Units, allowing users to select between 2 or 3 cooking sizes to match cookware.

Warming Zone:

Located in the back center of the glass surface, the Warming Zone is designed to keep hot, cooked food at serving temperature. It should only be used with hot food and not for heating cold food, nor for more than 2 hours, to prevent foodborne illness. For best results, food in the Warming Zone should be covered with a lid or aluminum foil. Pastries or breads should have their covers vented to allow moisture to escape. The surface warmer does not glow red like the cooking elements.

Radiant Glass Cooktop:

The cooktop features heating units beneath a smooth glass surface. A slight odor is normal during initial use. The cooking zones may change color when hot or cooling down, which is temporary. The surface units cycle on and off to maintain the selected control setting. Hot cookware can be placed on the cool glass surface. After use, the cooktop retains heat, so pans should be removed once food is cooked to prevent overcooking. Water stains and iridescent films are removable with ceramic cooktop cleaner or white vinegar. Heavy items should not be stored above the cooktop, and it should not be used as a cutting board. A temperature limiter protects the glass cooktop from overheating, cycling units off if a pan boils dry, is off-center, has a non-flat bottom, or if there is no pan on the unit.

Cookware for Glass Cooktop:

The manual provides guidelines for selecting cookware. Stainless steel and heavy-weight aluminum are recommended. Copper-bottom pans are recommended but should not boil dry as overheated metal can bond to the glass. Porcelain enamel on cast iron is recommended if the bottom is coated. Porcelain enamel on steel, glass-ceramic, stoneware, and cast iron (unless specifically designed for glass cooktops) are not recommended due to poor performance or potential damage to the cooktop. Flat-bottomed woks are recommended over those with support rings.

Oven Controls:

The oven offers several cooking modes:

  • Traditional Cooking Modes: Bake, Broil (Hi/Lo), and Warm.
  • Convection Cooking Modes (on some models): Convection Bake and Convection Roast, which use increased air circulation for improved performance.
  • Air Fry (on some models): A no-preheat mode designed for crispier exteriors. It recommends using broil-safe, dark sheet pans and placing a sheet pan on the rack below baking baskets to catch drippings. Food should be arranged in a single layer.
  • Clean Modes: Self Clean and Steam Clean.
  • Start: Initiates any cooking, cleaning, or timed function.
  • Cancel/Off: Cancels all oven operations except the clock and timer.
  • Timer: A countdown timer that can be set in hours and minutes.
  • Cook Time: Counts down cooking time and turns off the oven when complete. Can be used with Bake, Convection Bake, Convection Roast, Warm, and Air Fry.
  • Delay Time: Sets a time for the oven to start a cooking mode. Not recommended for easily perishable foods left for more than 1 hour.
  • WiFi Connect (on some models): Allows remote control of the oven.
  • Lock Controls: Deactivates control pads, except Cancel/Off.
  • Oven Light: Turns the oven light on or off.
  • Set Clock: Sets the oven clock time.

Special Features:

The range includes several adjustable features accessible through a special features menu (activated by holding Bake + Broil):

  • Adjust Oven Temperature (OFSt): Allows adjustment of oven baking temperature up to 35 degrees hotter or cooler (affects all modes except broil).
  • End of Timer Signals (End tonE): Sets timer signal to continuous (Cont) or single (bEEp).
  • Fahrenheit or Celsius Temperature Display (dEg Unit): Switches temperature display between Fahrenheit and Celsius.
  • Clock Display (CLoc diSP): Toggles the time of day display on or off.
  • Clock Configuration (Cloc cFg): Selects between 12-hour or 24-hour military time display.
  • Sound Volume (Snd): Adjusts oven tone volume.
  • Auto Recipe Conversion (On/Off): Automatically adjusts programmed recipe temperature in Convection Multi-Bake mode (does not convert baking time or adjust for Convection Roast).
  • Remote Enable (App ENbl) (on some models): Enables/disables remote control of the oven.
  • 12-Hour Auto Shut Off (12H Shut): Turns off the oven after 12 hours of continuous operation.

Sabbath Mode - Standard:

This mode disables tones, oven lights, and introduces delays for temperature changes. Only continuous or timed baking is allowed. To activate, navigate through the special features menu. Once activated, a single left opening bracket appears. To start a continuous bake, press Bake and then Start (or select a preset temperature). A second bracket "] [" indicates baking. For timed baking, select a cooking time. No tone sounds when the cook time expires. To exit, press Cancel/Off, then navigate through the special features menu to turn Sabbath mode off. If a power outage occurs in Sabbath Mode, the oven returns to Sabbath Mode when power is restored but will be off even if it was baking.

Oven Racks:

Recommended rack positions are provided in the Cooking Guide. Adjusting rack position can impact cooking results (e.g., for darker tops, move food higher). When baking with multiple pans, ensure at least 1.5 inches between pans for airflow. Racks should be placed in the desired position before turning the oven on.

Aluminum Foil and Oven Liners:

Do not use foil or oven liners to cover the oven bottom, as this can trap heat, melt, and damage the product, posing a risk of shock, smoke, or fire. Foil can be used on a lower rack to catch spills, several inches below the food, but should not completely cover the rack or be closer than 1.5 inches from oven walls to ensure proper heat circulation.

Cooking Guide:

Provides recommended cooking modes, rack positions, and additional suggestions for various food types, including baked goods, beef & pork, poultry, fish, casseroles, and frozen convenience foods. Emphasizes cooking food thoroughly to safe internal temperatures, with resources like IsItDoneYet.gov.

Maintenance Features

Cleaning the Range - Exterior:

All controls should be off and surfaces cool before cleaning.

  • Control Lockout: Touch pads can be deactivated for cleaning.
  • Control Panel: Wipe with mild soap and water or vinegar and water, rinse, and polish dry with a soft cloth. Avoid abrasive cleansers, strong liquid cleansers, plastic scouring pads, or oven cleaners.
  • Oven Exterior: Clean with mild soap and water or vinegar and water solution. Rinse and dry with a soft cloth. Do not use oven cleaners, abrasive cleansers, strong liquid cleansers, steel wool, plastic scouring pads, or cleaning powders. Wipe up spills of marinades, fruit juices, and tomato sauces immediately.
  • Painted Surfaces: Clean with soap and water or a vinegar and water solution.
  • Stainless Steel (excluding Black Stainless Steel): Do not use steel wool. Clean with warm sudsy water or a stainless steel cleaner/polish, wiping in the direction of the grain.

Cleaning the Range - Interior:

The oven interior can be cleaned manually, with Steam Clean, or Self Clean. Spills of marinades, fruit juices, and basting liquids should be wiped up immediately after surfaces cool.

  • Manual Cleaning: Do not use oven cleaners, abrasive cleansers, strong liquid cleansers, steel wool, scouring pads, or cleaning powders. Clean with mild soap and water or vinegar and water solution, rinse, and dry.
  • Steam Clean Mode: For small spills. Wipe grease and soils, pour one cup of water into the oven bottom, close the door, select Steam, and press Start/Enter. The door locks during the 30-minute cycle. Wipe out excess water and soil after unlocking.
  • Self Clean Mode: Uses very high temperatures. Remove all items except enameled (dark color) racks. Wipe grease and soils before starting. Close the door, select Self Clean, and set a time (3-5 hours recommended for heavily soiled ovens). The oven turns off automatically and the door unlocks after cooling. Vent the kitchen during the first self-clean cycle. Do not clean the door gasket. Do not use oven cleaners.
  • Racks: All racks can be washed with warm, soapy water. Enameled racks can be left in the oven during self-clean. If racks are difficult to slide after self-clean, apply vegetable oil to the edges.
  • Oven Heating Elements: Do not clean bake or broil elements; soil will burn off. Clean the oven floor with warm, soapy water.

Cleaning the Glass Cooktop:

  • Normal Daily Use Cleaning: Use CERAMA BRYTE® Ceramic Cooktop Cleaner. Apply a few drops, clean the surface with a paper towel or cleaning pad, and remove residue with a dry cloth. Do not heat the cooktop until thoroughly cleaned.
  • Burned-On Residue: Allow cooktop to cool. Apply CERAMA BRYTE® Ceramic Cooktop Cleaner and rub with a cleaning pad. Repeat if necessary. Polish with cleaner and a paper towel.
  • Heavy, Burned-On Residue: Allow cooktop to cool. Use a single-edge razor blade scraper at a 45° angle to scrape soil. Apply CERAMA BRYTE® Ceramic Cooktop Cleaner and rub with a cleaning pad. Polish with cleaner and a paper towel. Do not use a dull or nicked blade.
  • Metal Marks and Scratches: Avoid sliding pots and pans. Metal marks are removable with CERAMA BRYTE® Ceramic Cooktop Cleaner and cleaning pad. Black discoloration from aluminum or copper boiling dry should be removed immediately.
  • Damage from Sugary Spills and Melted Plastic: These can cause permanent pitting if not removed while hot. Turn off units, remove hot pans, and wearing an oven mitt, use a razor blade scraper to move the spill to a cool area and remove with paper towels. Any remaining spillover should be left until the cooktop cools. Do not use surface units until all residue is removed.

Oven Light:

To replace the 40-watt appliance bulb, disconnect power, turn the glass cover counterclockwise 1/4 turn, and remove the bulb. Replace with a new bulb, turn clockwise, and reattach the glass cover. Clean the glass cover frequently with a wet cloth when cool.

Oven Door:

The oven door is heavy. To remove, fully open the door, pull hinge locks down, grasp both sides of the door, close to the removal position (approx. 3" open), and lift up and out. To replace, seat the hinge arm indentations into the bottom edge of the hinge slots, fully open the door, and push hinge locks up.

GE JCS830 Specifications

General IconGeneral
TypeSlide-In
Fuel TypeElectric
Oven Capacity5.3 cu. ft.
Number of Burners4
Self-CleaningYes
Wi-Fi ConnectivityNo
ColorStainless Steel
Oven TypeSingle
Burner TypeRadiant
Ignition TypeElectronic
BroilerYes
ConvectionYes
Width30 inches
Warranty1 Year

Related product manuals