Installation Instructions
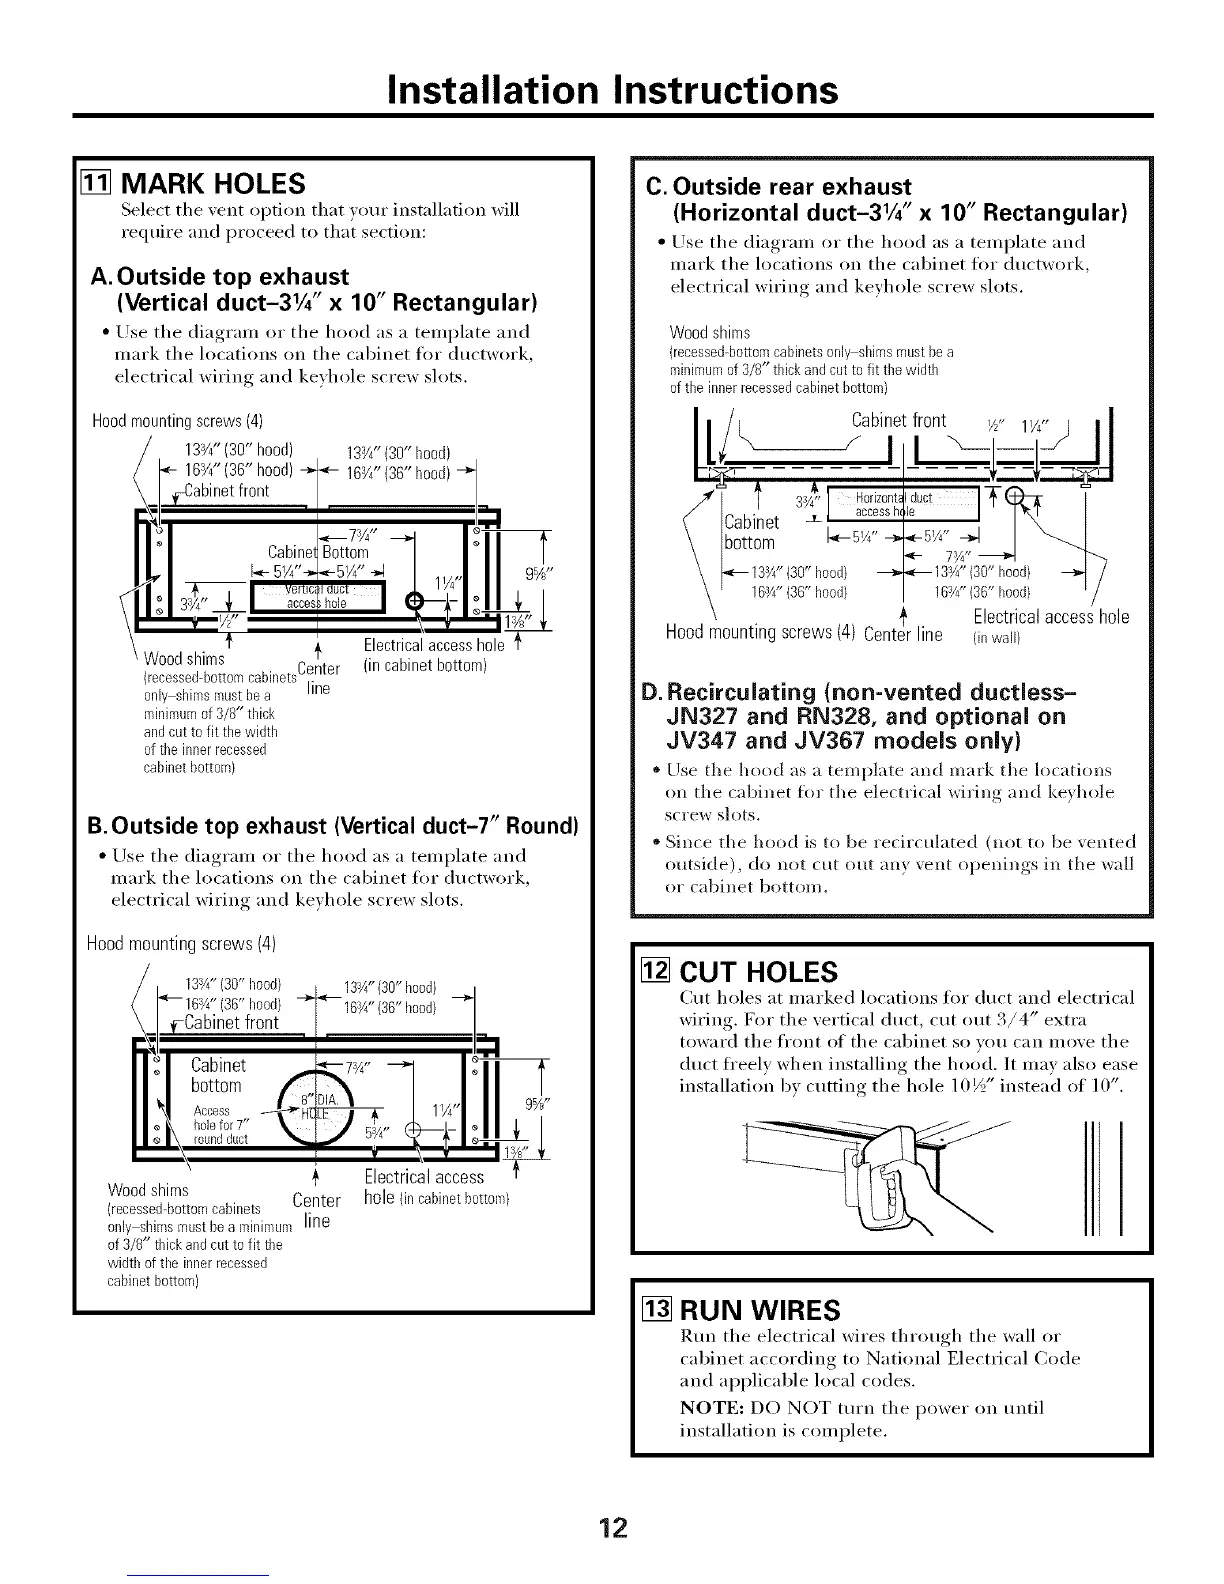
[] MARK HOLES
Select the _ent option that _our installation will
require and proceed to that section:
A. Outside top exhaust
(Vertical duct-31/4" x 10" Rectangular)
• Use the diagrmn or the hood as a template and
mark tile locations on tile cabinet for ductwork,
electrical wiring and keyhole screw slots.
Hoodmountingscrews(4)
133/4"(30" hood)
16W' (36" hood)
133/4" (30"hood)
163/4'' (36"hood)
Wood shims
recessed-bottomcabinetsCenter
only shimsmustbea ne
minimumof 3/0" thick
andcut to fit tile width
ofthe innerrecessed
cabinetbottom}
Electricalaccesshole
(incabinetbottom)
B.Outside top exhaust (Vertical duct-T' Round)
• Use tile diagram or tile hood as a template and
mark tile locations on tile cabinet for ductwork,
electrical wirin(* and kexhole screw slots.
Hoodmountingscrews(4)
133/4"(30" hood) 13¾"(30" hood)
hood) hood)
front
"_ Cabinet _-- 7v¢' --"
bottom
Access _ 11/4"
\ roundduct -- o
\ T ¥
Electricalaccess
hole(in cabinetbottme/
+
Wood shims
(recessed-bottomcabinets Center
only shirosmust bea mioiroum line
of3/8" thickand cut to fit the
width of the inner recessed
cabinet bottom)
C. Outside rear exhaust
(Horizontal duct-31A" x 10" Rectangular)
• Use tile diagram or tile hood as a template and
mark tile locations on tile cabinet for ductwork,
electrical wiring and keyhole screw slots.
Wood shims
(recessed-bottomcabinetsonIwshims mustbea
miniroumof 3/0" thick andcut to fit the width
of the inner recessedcabinet bottme)
[__abinet front I/zU 11A- , II
/_'l _* 3gt" Hodzonta,duct T(_)-
/ I . __j accessh _le ] 1_.
rCaNnet , I "
\ [bottom 1_-51/4" -,-,-6'/_"_ I
<- 7Y4"
\ _-- 13¾" (30" hoed) --) <-_ 133A"(30" hood)
-- 163/4" (36" hood) 163/4" (36" hood)
Electricalaccesshole
Hoodmountingscrews(4) Centerline (inwall)
D.Recirculating (non-vented ductless-
JN327 and RN328, and optional on
JV347 and JV367 models only)
" Use the hood as a template and mark tile locations
on tile cabinet fl)r the electrical wiring and keyhole
screw slots.
, Since tile hood is to be recirculated (not to be vented
outside), do not cut out am vent ol)enings, in tile wall
or cabinet bottoln.
[] CUT HOLES
Cut holes at marked locations for duct and electrical
wiring. For the vertical duct, ('/it ()/it 3/4" extra
toward tile fl'ont of tile cabinet so you can move tile
duct fl'eely when installing the hood. It may also ease
installation by cutting the hole 10½" instead of 10".
[] RUN WIRES
Rtm tile electrical wires through tile wall or
cabinet according to National Electrical Code
and applicable local codes.
NOTE: DO NOT turn tile power on until
installation is complete.
12