Power Break
®
Circuit Breakers
List of Figures and Tables
iii
Figures
1. Circuit breaker with lifting straps in place. ............................................................................................... 1
2. Location of mounting bolt inserts on 800 A frame breakers ....................................................................... 1
3. Location of mounting bolt inserts on 1600–2000 A frame breakers............................................................. 2
4. Manually charged breaker. ..................................................................................................................... 3
5. Motor operator-charged breaker. ............................................................................................................ 3
6. Motor operator charged breaker with the top cover removed..................................................................... 3
7. Bell alarm wiring to prevent continuous cycling of the automatic charging mechanism. .............................. 5
8. Wiring for optional bell alarm lockout applications................................................................................... 5
9. Tap changer cards. ................................................................................................................................6
10. Cover and trip unit removed from the breaker ......................................................................................... 7
11. Neutral CT connection for four-wire ground fault..................................................................................... 7
12. Wiring diagram for MicroVersaTrip and MicroVersaTrip RMS-9 trip units with ground fault on a
top-fed four-wire load. ............................................................................................................................ 8
13. Wiring diagram for MicroVersaTrip and MicroVersaTrip RMS-9 trip units with ground fault on a
bottom-fed four-wire load. ...................................................................................................................... 8
14. Releasing the trip unit interlock to remove or install the trip unit............................................................... 8
15. Aligning the trip unit to the mounting plate. ........................................................................................... 9
16. Adjusting the settings on a MagneTrip trip unit........................................................................................ 9
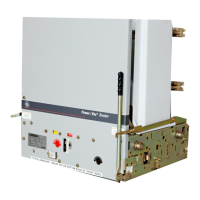
17. 800 A frame electrically operated breaker................................................................................................10
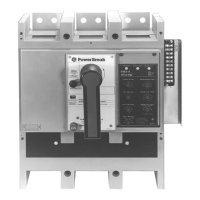
18. 1600–2000 A frame electrically operated breaker. ....................................................................................11
19. 1600–2000 A frame electrically operated breaker with the outer cover removed..........................................11
20. Wire ties on the accessory leads and mounring plate insulator. .................................................................11
21. Crossbar hook engaging the drive hook. .................................................................................................11
22. Shunt trip device with cut-off switch........................................................................................................12
23. Shunt trip wiring diagram. ....................................................................................................................12
24. Locations of the mounting plate retaining screws, isolation barrier, and molded drive crank.......................12
25. Shunt trip coil position with no blown-fuse trip device..............................................................................13
26. Shunt trip coil position with blown-fuse trip device. .................................................................................13
27. Attaching the switch bracket to the arm stop. ..........................................................................................13
28. Undervoltage release device...................................................................................................................14
29. Dropping resistor supplied with 240–600 V UVRs.....................................................................................14
30. UVR wiring diagram. ............................................................................................................................14
31. Slide reset lever and spring on the mounting plate...................................................................................15
32. Positioning the UVR assembly on the mounting plate..............................................................................15
33. Installing the UVR mounting screw. .......................................................................................................15
34. Blown-fuse trip device accessory..............................................................................................................15
35. Blown-fuse trip device wiring diagram.....................................................................................................16
36. Auxiliary switch. ...................................................................................................................................16
37. Auxiliary switch wiring diagram. ............................................................................................................17