EasyManua.ls Logo

Geckodrive G201 User Manual

Geckodrive G201
6 pages
To Next Page IconTo Next Page
Page #1 background imageLoading...
Page #1 background image
1
G201 STEP MOTOR DRIVE
REV 16: August 6, 2009
Thank you for purchasing the G201 drive. The G201 microstep drive is warranted to be free of manufacturing defects for 1 year
from the date of purchase. Also anyone who is dissatisfied with it or is unable to make it work will be cheerfully refunded the
purchase price if the G201 is returned within 15 days of the purchase date.
PLEASE READ FIRST BEFORE USING THE G201
Before beginning, be sure to have a suitable step motor, a DC power supply suitable for the motor and a current set resistor. The
motor’s rated phase current must be between 0.3 Amp and 7 Amps. The power supply voltage must be between 4 times and 20
times the motor’s rated voltage. The current set resistor may be a 1/4 Watt, 5% part. Finally have a STEP and DIRECTION pulse
source available.
G201 TERMINAL WIRING
The G201 uses a 2-piece modular main connector. The connector is split in two pieces; terminals 1 through 6 (power supply and
motor leads) and terminals 7 through 12 (control interface). Each can be removed separately by pulling the connector body
upwards and off of the mating header pins on the G201. The connectors must initially be removed to mount the G201 to a
heatsink or chassis.
TERMINAL 1 Power Ground
Connect the negative (black) lead of your power supply to this terminal.
TERMINAL 2 Power (+)
Connect the positive (red) lead of your power supply to this terminal. It must be between +18VDC to
+80VDC.
TERMINAL 3 Motor Phase A
Connect one end of your “Phase A” motor winding here.
TERMINAL 4 Motor Phase /A
Connect the other end of your “Phase A” motor winding here.
TERMINAL 5 Motor Phase B
Connect one end of your “Phase B” motor winding here.
TERMINAL 6 Motor Phase /B
Connect the other end of your “Phase B” motor winding here.
TERMINAL 7 Disable
This terminal will force the winding currents to zero when shorted to ground (TERMINAL 12).
TERMINAL 8 Direction
Connect the DIRECTION signal to this terminal.
TERMINAL 9 Step
Connect the STEP signal to this terminal.
TERMINAL 10 Common
Connect the controller’s +5VDC supply to this terminal.
TERMINAL 11 Current Set
Connect one end of your current set resistor to this terminal.
TERMINAL 12 Current Set
Connect the other end of your current set resistor to this terminal.
POWER SUPPLY WIRING
TERMINAL 1 Power Ground
Connect the power supply ground to term.1
TERMINAL 2 Power (+)
Connect the power supply “+” to this terminal
Question and Answer IconNeed help?

Do you have a question about the Geckodrive G201 and is the answer not in the manual?

Geckodrive G201 Specifications

General IconGeneral
BrandGeckodrive
ModelG201
CategoryControl Unit
LanguageEnglish

Summary

G201 Pre-Use Checklist and Wiring

Important Pre-Use Information

Key requirements and checks before operating the G201 step motor drive.

G201 Terminal Connections

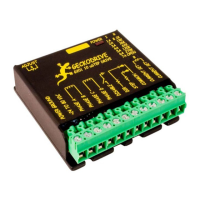
Detailed instructions for connecting power, motor, and control signals to G201 terminals.

Motor and Disable Pin Connections

Motor Phase Wiring

Instructions for connecting motor phase windings to terminals 3 through 6.

Disable Pin Functionality

Description of the Disable terminal (7) and its effect on winding currents.

Step and Direction Inputs

Connection details for STEP and DIRECTION signals to terminals 8 and 9.

Control Signal and Current Setting

Common and Input Signal Connections

Connecting the common terminal (10) and input signals for step/direction.

Current Set Resistor Calculation

Details on calculating and selecting the current set resistor for motor current.

Heatsinking and Option Jumper Block

Heatsinking Requirements

Guidelines for heatsinking the G201 for operation above 3 Amps.

Option Jumper Block Settings

Description of jumper block options for drive configuration.

Drive Configuration and Conversion

Drive Option Settings

Explanation of options like Reduced Current Range and NEMA-42 Motor.

Adjusting Motor Performance

Using the ADJUST trimpot for smooth low-speed motor operation.

Converting G201 to G210

Procedure for converting the G201 to a G210 using the G901 board.

Cover Removal and Replacement

Step-by-step guide for safely removing and replacing the G201 drive cover.

Factory Defaults and Disclaimer

Restoring Factory Defaults

Instructions to reset the G201 to its factory default settings.

Product Use Disclaimer

Important disclaimer regarding the use of GECKODRIVE products in critical applications.

G201A Specifications

Drive Physical and Electrical Specs

Summary of G201A drive specifications including voltage, current, and dimensions.