EasyManua.ls Logo

Genie Universal 4-Button - User Manual

Genie Universal 4-Button
7 pages
Print Icon
To Next Page IconTo Next Page
Loading...
Page 1
ALTERNATE INSTRUCTIONS
UNIVERSAL 4-BUTTON REMOTE
General Notes - This document contains alternate instructions for:
Fixed Code/Dip Switch programming in remotes with software REVs v1.1.4 and higher
o Another way to tell if you have software REV v1.1.4 or higher Press and hold down
button #1. While still holding down button #1, press button #4 on the remote four
times, then release both buttons. If the white LED flashes then your software is v1.1.4
or higher.
The Quick Start Method of programming for any software REV
TEACH & PAIR programming method in software REVs v1.1.8 and lower. The software REV
of your remote can be found on etched on the back
o Another way to tell if you have software REV v1.1.8 or lower if you hold press and
hold down button #1 while still holding down button #1, press button #2 on the
remote four times, then release both buttons. If the white LED flashes slowly, then
your software is v1.1.8 or lower.
Information on programming to Marantec openers with the TEACH & PAIR method
Page 1: General Notes
Page 2-3: Fixed Code/Dip Switch Programming
Page 4: Quick Start Method Using the Pre-Programmed Remote Settings
Page 5-6: TEACH & PAIR Programming Method
Page 7: TEACH & PAIR Programming Method with Marantec® openers
Question and Answer IconNeed help?

Do you have a question about the Genie Universal 4-Button and is the answer not in the manual?

Summary

DIP SWITCH; FIXED CODE PROGRAMMING

Record Switch Positions

Instructions to record switch positions by writing numbers 1, 2, or 4 based on remote, opener, or receiver settings.

Determine Specifications

Guidance to find and record device specifications, including brand, frequency, and switch count, from Chart B.

Programming

Detailed steps for entering learn mode, entering dip switches, and selecting the desired remote button.

QUICK START METHOD

TEACH & PAIR PROGRAMMING METHOD

TEACH & PAIR PROGRAMMING METHOD for all openers EXCEPT ID#4 Yellow Learn Button

Procedure for programming remotes using the TEACH & PAIR method for most opener types.

TEACH & PAIR PROGRAMMING METHOD for ID#4 Chamberlain;LiftMaster;CraftsmanYellow Learn Button ONLY

Specific TEACH & PAIR programming steps for Chamberlain, LiftMaster, and Craftsman remotes with Yellow Learn Buttons.

MARANTEC and TEACH & PAIR PROGRAMMING

How to program a Marantec opener using the TEACH & PAIR method

Instructions for programming Marantec openers by using the TEACH & PAIR method to listen and repeat existing transmissions.

Overview

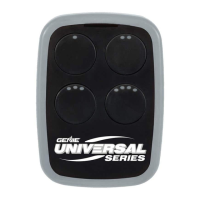
This document provides alternate instructions for programming a universal 4-button remote, covering various scenarios and opener types. It's designed to guide users through different programming methods, ensuring compatibility with a wide range of garage door openers.

Function Description

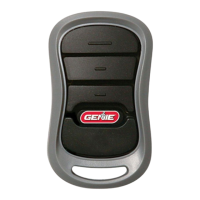
The universal 4-button remote is designed to operate garage door openers, offering a versatile solution for users with different opener brands and technologies. It supports both fixed code/DIP switch programming and more advanced "TEACH & PAIR" methods, accommodating various software revisions of the remote itself. The remote's primary function is to transmit a signal to a compatible garage door opener, initiating actions such as opening or closing the garage door. With four distinct buttons, it allows for the programming of multiple openers or different functions on a single opener, providing flexibility for multi-door garages or households with multiple users. The remote is equipped with LED indicators (white and blue) that provide visual feedback during the programming process, guiding the user through each step and confirming successful transmissions or mode entries.

Usage Features

The remote offers several programming methods to ensure broad compatibility:

  • Fixed Code/DIP Switch Programming: This method is specifically for remotes with software REVs v1.1.4 and higher and is used for openers that utilize DIP switches (either 3-position "TRINARY" or 2-position "BINARY").

    • Recording Switch Positions: Users first identify and record the switch positions (UP, MIDDLE, DOWN, or +,-,0) from their existing remote or opener. These positions correspond to specific button presses (1, 2, or 4) on the universal remote.
    • Determining Specifications: A "Chart B" is provided to help users identify their opener's brand, frequency, number of switches, and possible positions. This chart also indicates the number of times a specific button needs to be pressed during the programming sequence.
    • Entering Learn Mode: The process begins by entering a "LEARN MODE" on the universal remote, typically by pressing and holding button #1, then pressing button #4 four times, followed by releasing both buttons. A quick flash of the white LED confirms entry into this mode.
    • Entering DIP Switches: Users then input the recorded DIP switch positions by pressing buttons 1, 2, or 4 on the universal remote in the correct sequence. The LED lights with each button press, and a quick flash of the blue LED indicates the end of this entry.
    • Button Selection Mode: The remote then enters a "BUTTON SELECTION MODE," initiated by holding button #2, pressing button #3 four times, and releasing both. The blue LED will flash, prompting the user to select their desired button and press it the number of times specified in Chart B. A long blink of the blue LED confirms completion.
  • Quick Start Method: Available for remotes with any software REV, this method utilizes pre-programmed manufacturer specifications.

    • Pre-set Buttons: The remote has four pre-set buttons corresponding to common opener types: Button 1 for Genie Intellicode I or Overhead Door CodeDodger I, Button 2 for Chamberlain with a PURPLE LEARN Button, Button 3 for Chamberlain with an ORANGE/RED LEARN Button, and Button 4 for Chamberlain with a YELLOW LEARN Button.
    • Programming Buttons 1, 2, or 3: For these buttons, the user presses the LEARN button on the garage door opener for 2-3 seconds. Then, on the universal remote, the user repeatedly presses and releases the corresponding pre-set button every 2 seconds until the garage door opener operates. The tip emphasizes waiting for the LED light on the universal transmitter to stop flashing before each press.
    • Programming Button 4 (YELLOW LEARN Button): This method involves holding down button #4 on the universal remote for 5 seconds (releasing after 3 white LED blinks). A special step (1a) is included for users who manually changed their Yellow Learn Button opener to 390MHz due to interference. The process then involves pressing the LEARN/PROGRAM button on the opener, pressing the chosen remote button once (opener clicks), pressing LEARN/PROGRAM again, and pressing the remote button once more (opener clicks again). The next button press should operate the opener.
  • TEACH & PAIR Programming Method: This method is available for remotes with software REVs v1.1.8 and lower and also supports FAAC receiver compatibility.

    • Entering Teach & Pair Mode: This mode is entered by holding button #1, pressing button #2 four times, and releasing both. The white LED will flash slowly.
    • Learning from Existing Remote: The existing, operational remote and the universal remote are placed within 4 inches of each other. The operational button on the original remote is held down until the universal remote's blinks change from slow white to rapid blue (within 20 seconds). A tip suggests trying different distances if the transmission isn't recognized.
    • Selecting Universal Remote Button: Once the blue LED blinks rapidly, the user presses their chosen button on the universal remote once. The blue LED will turn solid and then go out.
    • Pairing with Opener: The LEARN/PROGRAM button on the opener is pressed for 2-3 seconds. The user then presses and releases the newly programmed button on the universal remote once every 2 seconds until the garage door opener operates. A final test confirms programming completion.
    • Special Instructions for ID#4 Yellow Learn Button: A separate section details the TEACH & PAIR method specifically for Chamberlain/LiftMaster/Craftsman Yellow Learn Button openers. This process is similar but includes an additional step (7a) for 390MHz frequency changes and a specific sequence of pressing the remote button until the white LED blinks 3 times and goes out.
  • Marantec® Opener Programming: This section provides specific instructions for Marantec openers using the TEACH & PAIR method, emphasizing that Marantec openers only allow "one" set of code.

    • Avoiding Code Overwrite: It highlights that using the LEARN method with a Marantec opener will generate a NEW code, causing existing transmitters/keypads to stop working. Therefore, the TEACH & PAIR method is crucial to integrate the universal remote into the existing code family.
    • Marantec Opener Steps: After completing STEP 6 of the general TEACH & PAIR instructions, the user proceeds with specific steps on the Marantec opener. This involves pressing and holding the "P" button on the control panel until the display timer reaches 5, then releasing it. The blinking open door icon appears, and the user presses the "+" button until the transmission icon blinks, indicating readiness to recognize the universal remote.
    • Finalizing Marantec Pairing: The user presses the prepared button on the universal remote once, causing the transmission icon to become solid. Finally, the "P" button is pressed to save the entry, and the remote button is pressed once to run the opener, with the display showing "P on" upon completion.

Maintenance Features

The document primarily focuses on programming and usage, with limited explicit maintenance features. However, implicit maintenance aspects can be inferred:

  • Battery Replacement: While not explicitly detailed, the need for programming implies that the remote is a battery-operated device. If the remote fails to operate or its LED indicators behave erratically, a battery replacement would be the primary maintenance step.
  • Troubleshooting Tips: The document includes several "TIP" sections that serve as troubleshooting guides during programming:
    • "Allow the LED light on the universal transmitter to stop flashing before your next button press." This helps prevent miscommunications during programming sequences.
    • "If the universal remote does not recognize the transmission, try different distances between 0”-4” away from the side of the universal remote closest to button numbers 1 and 3." This addresses potential signal strength or interference issues during the TEACH & PAIR process.
  • Software Revision Awareness: The instructions are categorized by software revisions (REVs v1.1.4 and higher, REVs v1.1.8 and lower, or any software REV). Users are guided on how to identify their remote's software REV (e.g., by pressing button #1 and #4, or #1 and #2) to ensure they follow the correct programming method. This awareness helps in selecting the appropriate instructions, preventing incorrect programming attempts that might be perceived as a device malfunction.
  • Opener Compatibility: The detailed instructions for various opener brands and types (Genie, Overhead Door, Stanley, Chamberlain, LiftMaster, Craftsman, Marantec) and specific learn button colors (Purple, Orange/Red, Yellow) ensure that users can correctly configure their remote for their specific opener. This reduces the likelihood of compatibility issues that might otherwise require "maintenance" in the form of seeking technical support.
  • Avoiding Code Overwrite (Marantec): The specific warning for Marantec openers about using the TEACH & PAIR method to avoid overwriting existing codes acts as a preventative maintenance measure for the overall garage door system, ensuring that all existing remotes and keypads continue to function.

In summary, the universal 4-button remote is a versatile tool for garage door operation, offering multiple programming paths to accommodate a wide array of existing systems. Its design incorporates visual feedback through LEDs and provides clear, step-by-step instructions, along with helpful tips, to facilitate a smooth programming experience. While direct maintenance instructions are minimal, the comprehensive programming guide itself serves as a preventative measure against common operational issues.

Genie Universal 4-Button Specifications

General IconGeneral
TypeUniversal Remote Control
Number of Buttons4
CompatibilityMost major garage door opener brands
Battery TypeCR2032
BrandGenie
ModelUniversal 4-Button
Power SourceBattery
Frequency315/390 MHz

Related product manuals