EasyManua.ls Logo

Gigabyte GM-M7600 - User Manual

Gigabyte GM-M7600
4 pages
Print Icon
To Next Page IconTo Next Page
Loading...
All specifications and figures are subject to change without notice.
All trademarks and logos are the properties of their respective holders.
Question and Answer IconNeed help?

Do you have a question about the Gigabyte GM-M7600 and is the answer not in the manual?

Overview

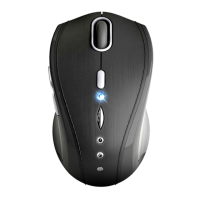
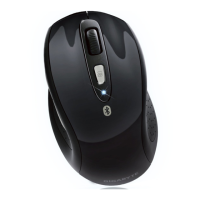
This document describes the GIGABYTE GM-M7600 2.4G Wireless Optical Notebook Mouse, a peripheral designed for enhanced productivity and comfort.

Function Description:

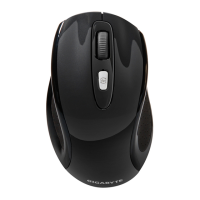
The GM-M7600 is a wireless optical mouse that utilizes 2.4GHz RF technology for communication with a computer. It is designed for notebook use, offering high tracking speed and sensitivity, even on challenging surfaces like polished or wood-grain finishes. The mouse aims to provide a reliable and comfortable user experience through its advanced features and ergonomic design. It operates by transmitting signals to a small nano receiver connected to the computer's USB port. The device supports both automatic and manual linking between the mouse and receiver, ensuring a stable connection.

Important Technical Specifications:

  • Wireless Technology: 2.4GHz RF with a range of 6-8 meters.
  • Channels/ID: 16 Channels/4096 ID, supporting auto-link functionality.
  • Tracking Technology: State-of-art optical technology with high tracking speed and sensitivity.
  • Receiver Type: Nano receiver.
  • Resolution (DPI): Switchable between 800 and 1600 dpi via a dedicated button.
  • Power Source: 2 AAA Alkaline batteries (included).
  • Battery Life: Designed for longer battery life with power-saving features.
  • Connectivity: USB port for the receiver.
  • Compatibility: Plug and Play, no channel ID setup required for auto-link mode.
  • FCC Compliance: Class B digital device, Part 15 of FCC Rules. Equipment generates and radiates radio frequency energy. Requires a minimum separation distance of 20 centimeters between the radiator and the user's body.

Usage Features:

  • Ergonomic Design: Features rubber side grips and finger grooves for comfortable handling.
  • DPI Switchable Button: Allows users to easily switch between 800 and 1600 dpi settings to adjust cursor sensitivity. An LED on the wheel bar flashes to indicate successful DPI switching.
  • Auto-Link Functionality: The mouse and receiver automatically establish a connection upon power-on, simplifying setup.
  • Plug and Play: No driver installation is typically required for basic functionality.
  • Wheel Button: Standard scroll wheel with clickable functionality.
  • Receiver Release Button: Located on the receiver for easy removal from the USB port.
  • Power On/Off Switch: Located on the bottom of the mouse, this switch helps conserve battery power during periods of non-usage.
  • Sleeping Mode: The mouse enters a sleeping mode to save power. To wake it up, any mouse button must be clicked.
  • Manual Linking (if needed): If the automatic communication channel is not stable, users can download a software connection tool from the GIGABYTE website to manually re-connect the mouse and receiver and reset the channel ID. This process involves ensuring the mouse is powered on, connecting the receiver to the PC, and executing the ID connection software, then pressing the ID reset button on the receiver.
  • Channel Selection (Wireless): The manual explains that wireless channels set the radio frequency for communication. Access Points use a fixed channel, and users can select a channel that provides the least interference. In the USA and Canada, 11 channels are available. For multiple Access Points, using different channels for adjacent Access Points is recommended to reduce interference. In "infrastructure" mode, Wireless Stations scan all channels for an Access Point, using the one with the strongest signal. In "Ad-hoc" mode, all Wireless stations should use the same channel, though most will still scan all channels for existing "Ad-hoc" groups.

Maintenance Features:

  • Battery Installation:
    1. Remove the battery compartment cover on the bottom of the mouse.
    2. Insert two AAA batteries according to the diagram inside the battery cabinet.
    3. Close the battery compartment cover.
    4. Ensure the Power On/Off switch on the bottom of the mouse is ON.
    5. The Low Power LED on the wheel bar will blink for 3 seconds if the mouse power is on, indicating successful power-up.
  • Low Power Indicator: A red LED on the scroll wheel serves as a low battery power indicator, signaling when the batteries need to be replaced.
  • Battery Use Reminders:
    • Remove worn-out batteries immediately and dispose of them promptly.
    • Keep all batteries (used or new) out of reach of children.
    • Regularly check batteries and replace them if the mouse is not used for a long time.
    • Never dispose of batteries in fire, as they can explode.
    • Always replace all batteries at the same time. Mixing old and new batteries or different types (e.g., alkaline with zinc carbon, Ni MH, NiCd) can reduce performance and cause leakage or rupture.
    • Remove batteries from the device if it will not be used for a long time.
    • Replace batteries when performance decreases substantially.
  • Troubleshooting Guide: Provides steps to resolve common issues:
    • Verify the receiver is correctly connected to the computer's USB port.
    • Position the receiver away from other electrical devices (computer, monitor, external storage drives) for best performance.
    • Ensure communication is established between the receiver and the mouse (refer to the "Communication: The mouse & the receiver" section).
    • If communication is poor, use the software connection tool to reset the channel ID.
    • Check for conflicts with other system devices' IRQ/address settings.
    • Avoid using the mouse on glossy or reflective surfaces.

Gigabyte GM-M7600 Specifications

General IconGeneral
BrandGigabyte
ModelGM-M7600
CategoryMouse
LanguageEnglish

Related product manuals