MDE-5183C Passport® PX60 Express Ordering Kiosk Installation Guide · May 2018 Page 7
Installing Express Ordering Kiosk
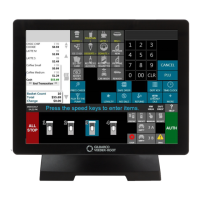
4 Connect the printer communication cable.
To connect the printer communication cable from the kiosk to
the printer without the dongle:
• Red: M11247B050 connected to printer.
• Connect the CAT5 cable to COM port 5 on the kiosk.
After the setup is complete, USB keyboard and mous
e (temporarily installed) can be removed
and retained for reuse.
Figure 1: Connections
Printer Power
LAN2 DMZ Connection to
Passport Secure Router
(Main Kiosk ONLY)
LAN1
Store/Corporate
Connection
Keyboard and Mouse
Printer
Kiosk Power
Connection
Printer Data
5 Apply power to the unit and enter BIOS setup. (Turn on secondary NIC for KIOSK001.)
a When the logo shown in Figure 2 is displayed, press Delete on keyboard to enter BIOS.
Figure 2: Logo Display
b Once prompted, enter the BIOS password PASSASC.
Figure 3: Entering BIOS Password
 Loading...