EasyManua.ls Logo

Glacier bay MANDOURI HD67513W-6501 User Manual

Glacier bay MANDOURI HD67513W-6501
22 pages
To Next Page IconTo Next Page
Page #1 background imageLoading...
Page #1 background image
THANK YOU
INSTALLATION AND CARE GUIDE
Questions, problems, missing parts?
Before returning to the store, call Glacier Bay Customer Service
8 a.m. - 7 p.m., EST, Monday - Friday
9 a.m. - 6 p.m., EST, Saturday
1-855-HD-GLACIER (1-855-434-5224)
HOMEDEPOT.COM/GLACIERBAY
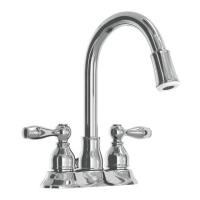
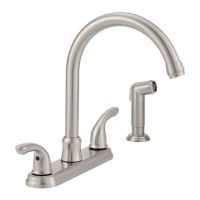
MANDOURI 4 IN. CENTERSET 2-HANDLE
LED HIGH-ARC BATHROOM FAUCET
We appreciate the trust and condence you have placed in Glacier Bay through the purchase of this lavatory
faucet. We strive to continually create quality products designed to enhance your home. Visit us online to see
our full line of products available for your home improvement needs. Thank you for choosing Glacier Bay!
3/2019 REV.01THD
Model#
HD67513W-6501
HD67513W-6504
HD67513W-6B27H2
SKU#
1001700852
1001376006
304368024

Questions and Answers:

Glacier bay MANDOURI HD67513W-6501 Specifications

General IconGeneral
BrandGlacier Bay
ModelMANDOURI HD67513W-6501
CategoryPlumbing Product
Handle StyleLever
Flow Rate (gallons per minute)1.2
Mounting TypeDeck Mount
Number of Faucet Holes Required for Installation3
MaterialMetal
Valve TypeCeramic Disc
ADA CompliantYes
AeratorYes
WarrantyLimited Lifetime
Number of Handles2-Handle

Summary

Important Information

Warranty

Pre-Installation

Planning Installation

Ensure all parts are present and compare with the Package Contents list before installation.

Tools and Hardware Required

Lists the tools and hardware needed for faucet installation.

Package Contents

Details all parts included with the faucet assembly and drain assembly.

Installation

Installing the Faucet Assembly

Instructions for mounting the faucet to the sink, including securing it with nuts.

Preparing the Pop-Up Assembly

Steps to prepare the drain body by removing stopper and flange.

Installing the Drain Body

Guidance on applying sealant and attaching the drain body to the drain flange.

Installing the Stopper and Horizontal Rod

Steps for inserting the stopper and connecting the horizontal rod to the drain body.

Installing the Lift Rod

Instructions for sliding the lift rod into the lift rod strap until it clicks.

Attaching the Horizontal Rod and Strap

Details on adjusting and securing the lift rod strap to the horizontal rod.

Adjusting the Lift Rod Strap (Optional)

Optional step to cut the lift rod strap shorter if it interferes with installation.

Checking the Pop-Up Operation

Verify the stopper opens and closes correctly by operating the lift rod.

Making Water Supply Connections

Connects the faucet to the water supply lines, advising on tightening.

Operation

Flushing and Checking for Leaks

Instructions to flush the lines, check for leaks, and reinstall the aerator.

Care and Cleaning

Troubleshooting

Service Parts

Related product manuals