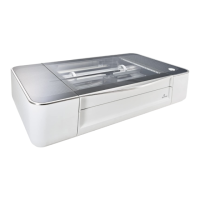
Remove Red Strips
Push the laser tube back gently, then lift
off the two red silicone strips.
Glowforge Pro Only: Removing your Pro
Shields (optional)
Your two Pro Shields arrive installed inside your Glowforge Pro. They finger-screw right into the
front and back passthrough slots of your Glowforge Pro to ensure that nothing - material or laser
light - comes in or out when the slot is not in use.
The Pro Shields should always be installed except while the passthrough slot is in use. The Laser
Safety Officer (LSO) training provided to Pro customers has important information about the Pro
Shields. Please re-read it before removing them.
Should you need to remove them, follow these instructions:
Turn off your Glowforge
Turn off your Glowforge using the power switch on the back. The lights and button should be off.
Lower the front door and remove the crumb tray
Lift the lid, then lower the front door. Lift the crumb tray slightly and slide it towards you to
remove it. Be careful not to tilt the crumb tray up, or it will knock into the laser arm and rails.
Leave the front door open.
Remove the front Pro Shield from the front door of your Glowforge
With the front door opened, turn the black finger screws on either end of the Pro Shield
counterclockwise to unscrew them, then lift the shield away from the front door.
Copyright Glowforge, Inc. 2020 27