CAUTION
: When using the range burners o
r
oven, open a window or vent
. DO NOT us
e
range and/or oven to heat the interior of you
r
unit
. Failure to heed these cautions coul
d
result in asphyxiation
.
BROILER — Your oven is equipped with
a
broiler
. To use it, light the oven and set the contro
l
knob to "B"
. Place the broiler pan in the area belo
w
the oven burner
. Do not place meat too close to th
e
flame, because the fat may ignite
. Use foil only a
s
recommended
: Never cover the holes in the broile
r
pan or the air openings in the oven bottom with foil
.
Always remove the broiler pan as soon as you hav
e
finished broiling
. If the pan is not removed and th
e
oven is used, the grease may bake onto the surface
s
or it may ignite
.
RANGE HOOD — Your unit will have a 12-vol
t
power range hood
. The power range hood has a fa
n
and a light, each controlled by a switch on th
e
bottom of the hood
. Turn fan ON to draw smok
e
and cooking fumes out of the unit
.
CARE OF RANGE AND OVEN — Allow th
e
range top to cool, then clean it with hot, soap
y
water
. Use a damp cloth to clean chrome surfaces
.
Grease splatters, which may bake onto the surfaces
,
should be wiped off before they have time to harden
.
Use chrome polish to remove stubborn stains
. Use
a
toothpick to clean clogged burner orifices
. DO NO
T
use metal objects, such as an ice pick or wire t
o
unclog burners
. They may distort the opening an
d
adversely affect burner operation
.
Clean the oven with commercial cleaner afte
r
each trip, or as necessary
. DO NOT apply cleane
r
to aluminum gas tubing, thermostat sensing bul
b
or electrical components
.
CARE OF RANGE HOOD — For metal surfaces
,
use the same procedure as for the range top
. Clea
n
the plastic light cover by removing and washing it
.
To clean the filter, push slot located in center fron
t
of screen and pull down
. If not greasy, simply ta
p
the filter to shake out the dirt
. If the filter is greasy
,
run hot, soapy water over it until grease dissolves
.
Allow the filter to drain and dry then replace b
y
positioning the flanges and push into place
. Clea
n
fan and motor surfaces frequently to remove grease
.
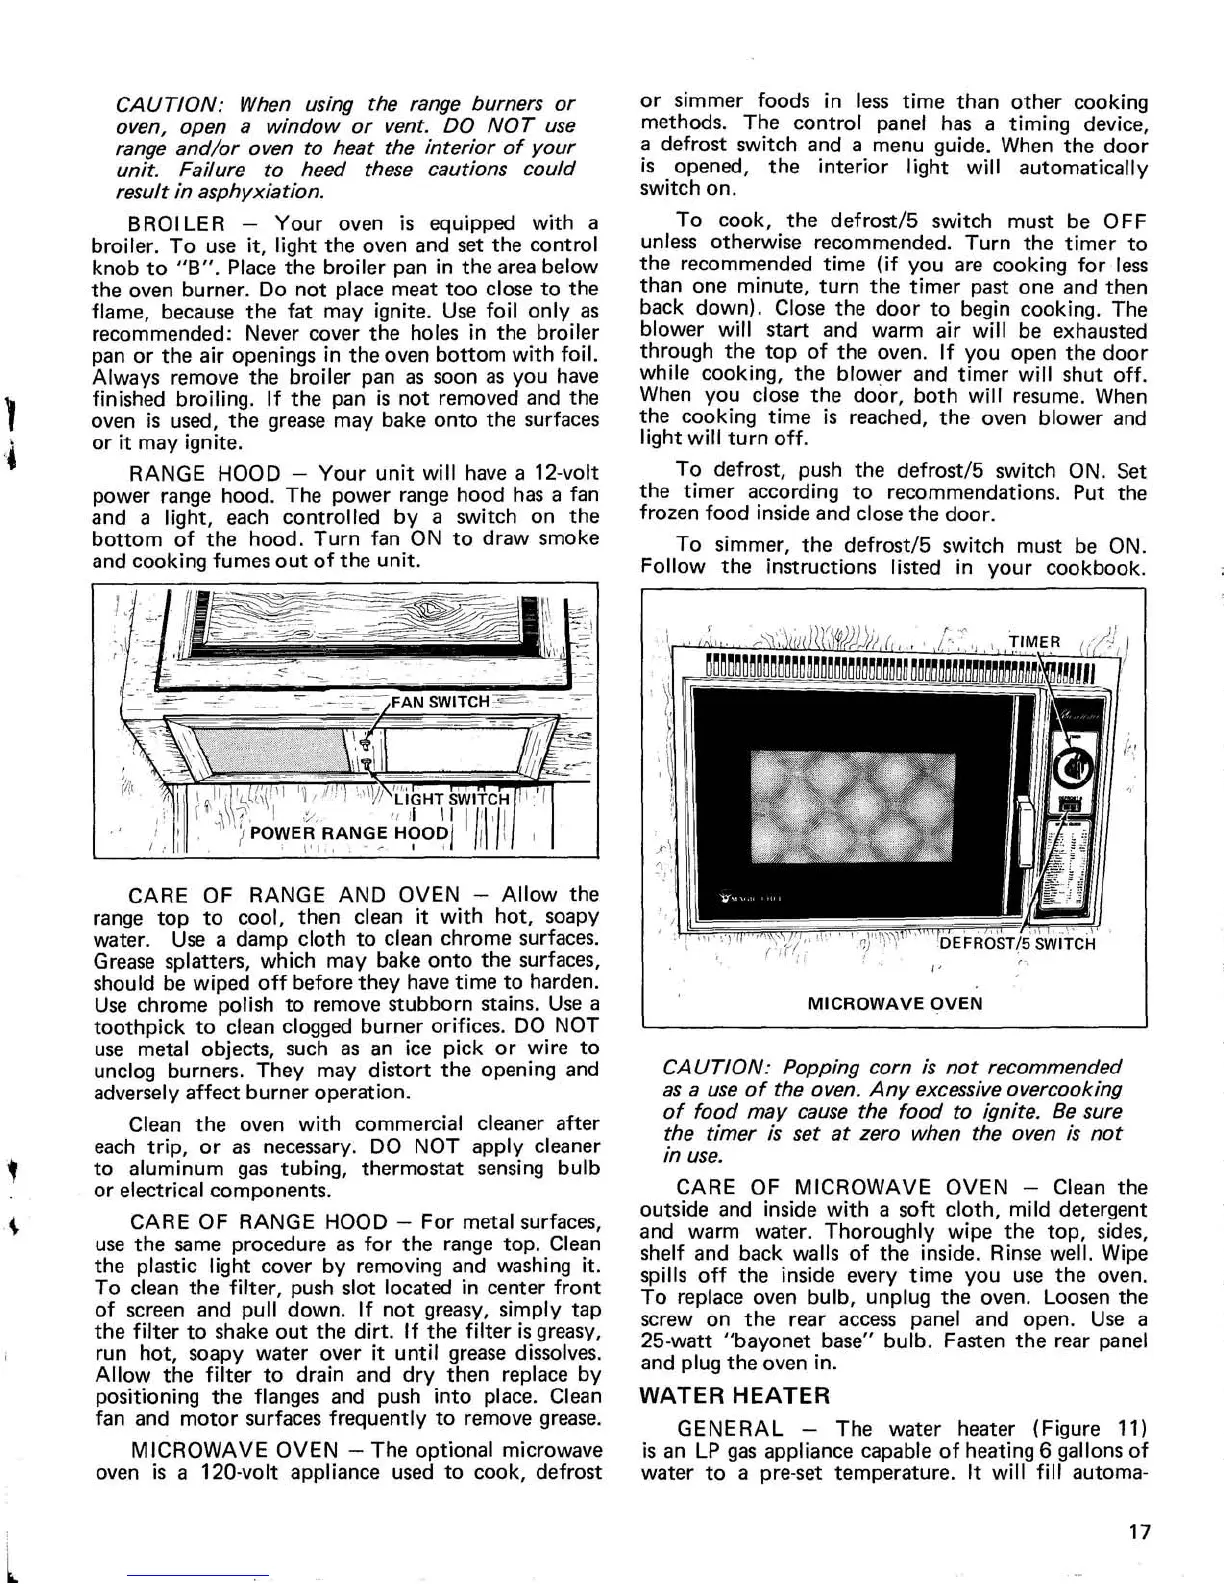
MICROWAVE OVEN — The optional microwav
e
oven is a 120-volt appliance used to cook, defrost
or simmer foods in less time than other cookin
g
methods
. The control panel has a timing device
,
a defrost switch and a menu guide
. When the doo
r
is opened, the interior light will automaticall
y
switch on
.
To cook, the defrost/5 switch must be OF
F
unless otherwise recommended
. Turn the timer t
o
the recommended time (if you are cooking for les
s
than one minute, turn the timer past one and the
n
back down)
. Close the door to begin cooking
. Th
e
blower will start and warm air will be exhauste
d
through the top of the oven. If you open the doo
r
while cooking, the blower and timer will shut off
.
When you close the door, both will resume
. Whe
n
the cooking time is reached, the oven blower an
d
light will turn off
.
To defrost, push the defrost/5 switch ON
. Se
t
the timer according to recommendations
. Put th
e
frozen food inside and close the door
.
To simmer, the defrost/5 switch must be ON
.
Follow the instructions listed in your cookbook
.
CAUTION
: Popping corn is not recommende
d
as a use of the oven
. Any excessive overcooking
of food may cause the food to ignite
. Be sur
e
the timer is set at zero when the oven is no
t
in use
.
CARE OF MICROWAVE OVEN — Clean th
e
outside and inside with a soft cloth, mild detergen
t
and warm water
. Thoroughly wipe the top, sides
,
shelf and back walls of the inside
. Rinse well
. Wip
e
spills off the inside every time you use the oven
.
To replace oven bulb, unplug the oven
. Loosen th
e
screw on the rear access panel and open
. Use
a
25-watt "bayonet base" bulb
. Fasten the rear pane
l
and plug the oven in
.
WATER HEATE
R
GENERAL — The water heater (Figure 11
)
is an LP gas appliance capable of heating 6 gallons o
f
water to a pre-set temperature
. It will
fill
automa
-
17