EasyManua.ls Logo

GoPro HD HERO Naked User Manual

GoPro HD HERO Naked
3 pages
To Next Page IconTo Next Page
Page #1 background imageLoading...
Page #1 background image
Consultez gopro.com pour une
traduction des instructions.
翻訳された取扱説明書は
gopro.com から入手できま
す。
Übersetzte Anweisungen sind
unter gopro.com zu finden.
Visita gopro.com para las instrucciones
traducidas.
Per le istruzioni tradotte in
altre lingue visitare il sito
gopro.com.
Visite gopro.com para a tradução
das instruçðes.
1 - Status LCD Screen
5 - USB Port
9 - Shutter/Select Button
2 - Power/Mode Button
6 - Combo TV/Audio Out
10 - SD Card Slot
3 - LED Light
7 - HERO Bus™ Port
4 - HDTV Out Port
8 - Battery Door
Basics of Using your Camera
You must insert an SD card into the camera to record and save photos and video.
Free downloadable camera updates may be available at gopro.com.
POWER/MODE BUTTON - Front of Camera
POWER/MODE button turns camera on and off and works as a mode switching button once camera is on.
SHUTTER BUTTON - Top of Camera
Shutter button starts and stops video recording and photo capture. When in the SET menu of options the
shutter button acts as a toggle button for changing settings. See the SETTINGS MENU section of these
instructions for more information.
Turn Camera On
Quickly press the POWER/MODE button and camera will turn on.
Camera will beep 3 times, indicating the camera is powering on.
Turn Camera Off
Press and hold the POWER/MODE button for 2 seconds. Camera
will beep 7 times, indicating the camera is shutting off.
Changing Modes
Once camera is on, quickly pressing the POWER/MODE button will
change modes from video mode to self-timer, to photo mode, etc.
The Battery ships partially charged. NO damage will occur to battery if used prior to
fully charging. See charging section for more information.
STATUS LCD ICONS
Video Mode
10 Second Timer Mode
Battery Meter
Spot Meter Exposure ON
SD Card Not Inserted
TO SHOOT VIDEO
Turn on camera by pressing POWER/MODE button.
The camera will power on in VIDEO mode as the default mode.
Default resolution is 960p (1280x960). See Settings Menu section to learn about resolutions.
Press shutter button to begin recording video. Camera will beep once.
Red LED light on front of the camera will blink while video is recording.
Press shutter button to stop recording or camera will automatically stop recording when your SD card is full
or your battery dies (approx 2.25 hours of battery life on a full charge). Camera will beep 3 times when
recording stops and file is saved.
USING 10 SECOND TIMER
Press the POWER/MODE button until you see the 10 SECOND TIMER icon.
Press the SHUTTER button and the camera will automatically shoot a photo in 10 seconds.
A series of beeps and flashing red LED light will indicate when the photo has been taken.
(blinking icon)
TO SHOOT PHOTOS EVERY “X” SECONDS TIME LAPSE MODE
Press POWER/MODE button until you see the blinking camera icon.
The default timing is to shoot a PHOTO EVERY “2” SECONDS, automatically.
Press the shutter button to start taking photos. Press the shutter again to stop.
To change the timing to shoot a photo every 2, 5, 10, 30, or 60 seconds, see the SETTINGS MENU section
of these instructions.
TO SHOOT SINGLE SHOT PHOTOS
Press the POWER/MODE button repeatedly until you see the solid, non blinking camera icon.
Press SHUTTER button to take a photo.
A beep will sound and red LED will flash to indicate a photo has been taken.
TO SHOOT TRIPLE SHOT SEQUENCE PHOTOS
Press POWER/MODE button until you see the triple shot icon on the front LCD status screen. Press the
shutter button to shoot 3x photo-sequence in 2 seconds.
SETTINGS MENU
ADVANCED FEATURES
ENTERING THE SETTINGS MENU
Press the POWER/MODE button repeatedly until you see the SEt icon (above).
Press the SHUTTER button to enter settings menu.
Press the POWER/MODE button to cycle through options once in settings menu.
CHOOSING ONE BUTTON MODE ON / OFF
“One Button Mode On” forces the camera to automatically begin recording video or photos once the camera
is turned on, depending on which default power up mode the camera is set to (see next instructions). In
“One Button Mode On” the camera is either “on and recording”, or powered off. This simplifies camera
operation when loaning the camera to friends or when you know you only want to shoot in one mode.
The shutter button is disabled in “One Button Mode” and will not start or stop the recording while the
camera is on.
Symbol on LCD Screen
Function
onF (default setting)
One Button Mode Off
onO
One Button Mode On
To turn “One Button Mode” ‘ON’:
1) Enter the SET MENU and notice that One Button Mode OFF (onF) option is the first setting
available. Press the shutter button to toggle the screen to say onO (One Button Mode On).
2) With onO (One Button Mode On) showing on the screen, press the POWER/MODE button to
save whichever setting is showing on the screen and continue to the next feature option.
3) Turn your camera off and then on again and the camera will begin recording in whatever the
default power on setting and resolution is set to.
4) Press and hold the power button for 3 seconds to stop recording and turn the camera off
To turn “One Button Mode” ‘OFF’:
1) Turn the camera on
2) While the camera is on (and recording), press and hold the shutter button for 3 seconds. Let go.
3) The camera’s SET menu will appear
4) Press the shutter button to enter the SET menu
5) When onO (One Button Mode On) appears, press the shutter button to toggle the setting to onF
(One Button Mode Off)
6) Turn the camera off
7) When you turn the camera on again the One Button Mode feature will be turned off
CHOOSING DEFAULT MODE AT POWER UP
You can program your camera to turn on in either Video mode, Photo mode, Triple Shot Sequence mode, or
Photo Every "X" Seconds mode:
Symbol on LCD Screen
Function
F (default setting)
Video Mode (F means “Filming”)
P
Single Shot Photo Mode
3
Triple Shot Photo Mode
PES
Photo Every “X” Seconds Mode
Press the SHUTTER button to toggle between choices.
Press the POWER/MODE button to save whichever setting is showing on the screen and continue to the
next feature option.
CHOOSING VIDEO RESOLUTION
Your HD HERO camera shoots the following video resolutions:
Symbol on LCD
Screen
Description
Resolution
Frames per
Second
Suggested Use
r1
Wide Angle
Standard Definition
16:9
WVGA
(848x480)
60 NTSC
50 PAL
when smaller file size is
desired
r2
Widest HD Video
16:9 @ 30 fps
720p
(1280 x 720)
30 NTSC
25 PAL
when mounting on vehicles or
gear, when a very wide angle
is desired but vertical viewing
area is not as important
r3
Widest HD Video
16:9 @ 60 fps
720p
(1280 x 720)
60 NTSC
50 PAL
same as r2 but with ultra slow
motion playback
r4
(default
resolution)
Tallest HD Video
Max Overall View
4:3
960p
(1280 x 960)
30 NTSC
25 PAL
when mounting on your body,
helmet, surfboard or chest
harness, this mode offers the
most vertical viewing area of all
resolutions
r5
Full HD
Highest Resolution
16:9
1080p
(1920x1080)
30 NTSC
25 PAL
when vehicle or gear mounted,
best choice for highest quality
in-car filming. 25% narrower
field of view (127º) compared
to 170º view of other
resolutions
NOTE: Above r1, r2, r3, r4, and r5 settings in the SET menu appear as 1, 2, 3, 4, and 5 (no “r”) on the
bottom left corner of LCD screen when not in the SET menu. See previous “STATUS LCD ICONS” drawing
for an example of this.
Press the SHUTTER button to toggle between choices.
Press the POWER/MODE button to save whichever setting is showing on the screen and continue to the
next feature option.
CHOOSING EXPOSURE SETTING
Choose between Spot Meter and Center Weighted Average Meter exposure settings depending on the
lighting of your environment:
Symbol on LCD Screen
Function
Cnt
(default setting)
Center weighted average meter is best for normal outdoor and indoor
lighting conditions.
SPt
This icon
appears on LCD when spot
meter is active
Spot meter is primarily for shooting from inside of a car or other dark space
looking out into a brighter outside setting. Spot meter adjusts the exposure
for the absolute center of the scene, for example the road ahead instead of
the interior of the car.
If you are wanting optimum exposure of the inside of the car, filming mainly
the driver for example, choose Cnt center weighted average to expose for
the inside of the car.
Press the SHUTTER button to toggle between choices.
Press the POWER/MODE button to save whichever setting is showing on the screen and continue to the
next feature option.
Question and Answer IconNeed help?

Do you have a question about the GoPro HD HERO Naked and is the answer not in the manual?

GoPro HD HERO Naked Specifications

General IconGeneral
Video resolutions848 x 480, 1280 x 720, 1280 x 960, 1920 x 1080 pixels
Maximum frame rate60 fps
Supported video modes1080p, 720p, 960p
Video formats supportedH.264, MP4, MPEG4
Maximum video resolution1920 x 1080 pixels
Analog signal format systemNTSC, PAL
Photo modeYes
Sensor typeCMOS
Total megapixels5 MP
Optical sensor size1/2.5 \
Image formats supportedJPG
USB 2.0 ports quantity1
Compatible memory cardsSDHC
Maximum memory card size32 GB
GPS (satellite)No
Product colorSilver
Cables includedComponent, Composite, USB
Underwater case waterproof up to60 m
Mac operating systems supportedMac OS X 10.4 Tiger, Mac OS X 10.5 Leopard, Mac OS X 10.6 Snow Leopard, Mac OS X 10.7 Lion
Windows operating systems supportedWindows 7 Home Basic, Windows 7 Home Basic x64, Windows 7 Home Premium, Windows 7 Home Premium x64, Windows 7 Professional, Windows 7 Professional x64, Windows 7 Starter, Windows 7 Starter x64, Windows 7 Ultimate, Windows 7 Ultimate x64, Windows Vista Business, Windows Vista Business x64, Windows Vista Enterprise, Windows Vista Enterprise x64, Windows Vista Home Basic, Windows Vista Home Basic x64, Windows Vista Home Premium, Windows Vista Home Premium x64, Windows Vista Ultimate, Windows Vista Ultimate x64
Battery capacity1100 mAh
Battery life (max)2.5 h
White balanceAuto
Fixed aperture2.8 mm
Field of view (FOV) angle170 °
Weight and Dimensions IconWeight and Dimensions
Depth30 mm
Width60 mm
Height42 mm
Weight94 g

Summary

Settings Menu Overview

Entering the Settings Menu

Instructions on how to access the camera's settings menu by using the POWER/MODE button.

Choosing One Button Mode

Configure the camera to automatically record video or photos upon power-up.

Choosing Default Power-Up Mode

Set the camera to start in Video, Photo, Triple Shot, or Time Lapse mode by default.

Choosing Video Resolution

Select from various video resolutions and frame rates for recording.

Shooting Mode Selection

Options to select between shooting video, single photos, time-lapse photos, or using a 10-second timer.

Choosing Exposure Setting

Select between Spot Meter and Center Weighted Average Meter for optimal exposure.

Upside Down Image Capture

Configure camera to save images and videos right-side up when mounted upside down.

Setting Video Live Feed

Enable or disable the live video feed output to a TV or wireless transmitter.

On Screen Display Control

Turn the on-screen display of icons (battery, recording status) on or off.

Delete All Files and Format SD Card

Instructions to erase all data and format the SD card for new use.

Auto Power Off Setting

Set the camera to automatically turn off after a specified period of inactivity.

Setting Time and Date

Configure the camera's internal clock and date settings.

Photo Timing Interval

Set the interval for shooting photos in the time-lapse mode (2, 5, 10, 30, 60 seconds).

LED Blinking Setting

Control whether the camera's status LED blinks during operation or remains off.

Beeping Sound Control

Enable or disable the audible beeps the camera makes during operation.

NTSC/PAL Video Standard

Select the appropriate video standard (NTSC or PAL) for your region.

Delete Last Saved File

Option to delete only the most recently recorded file from the SD card.

Exiting the Settings Menu

Instructions on how to exit the settings menu and return to camera operation.

Camera Basics and Operation

Camera Buttons and Functions

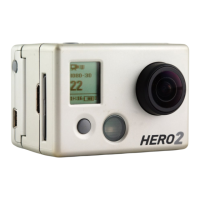
Description of the POWER/MODE and SHUTTER buttons and their primary functions.

Status LCD Icons Explained

Explanation of the various icons displayed on the camera's status LCD screen.

Shooting Modes

How to operate the camera for video recording, photos, time-lapse, and timer modes.

Connectivity and Battery Management

System Requirements

Details on the operating systems and hardware required for camera compatibility.

Using SD Cards

Information on compatible SD and SDHC card types and insertion.

Transferring Files to Computer

Step-by-step guide for transferring photos and videos to a PC or Mac.

Charging the Battery

Methods and time required to charge the camera's battery via USB or charger.

Removing the Battery

Instructions on how to safely remove the camera's battery.

Connecting Camera to TV/HDTV

Guidance on connecting the camera to a television for playback.

Reviewing Content on TV/HDTV

Steps to navigate and play back photos and videos on a connected TV.

Troubleshooting Common Issues

SOS Message on LCD Screen

Explanation and solution for the 'SOS' message indicating file corruption.

HOT Message on LCD Screen

Guidance on what to do when the camera displays a 'HOT' message.

Related product manuals