EasyManua.ls Logo

Graco Argos User Manual

Graco Argos
3 pages
To Next Page IconTo Next Page
Page #1 background imageLoading...
Page #1 background image
To Remove Existing Harness Tongues and Buckle and Attach Replacement Buckle
Argos ® Buckle Replacement Guide
©2014 Graco PD253499C 5/14
5
Remove chest clip.
DO NOT DISCARD the
chest clip.
7
6
Unbuckle harness by
tilting top of buckle
down, press top of red
button, and pull
tongues out of buckle.
Remove and discard
tongues.
Slide NEW buckle onto
harness straps. MAKE
sure not to twist straps.
Re-attach chest clip.
MAKE sure not to
twist straps.
Re-insert straps
through slots
in seat pad and seat
back.
Turn page over to
¿QLVKWKHUHVWRI
the assembly
Steps 11 to 20
for the buckle
replacement.
Route harness
straps OVER
metal bar and
re-insert straps
back onto
splitter plate.
4
8
9
10
2
Remove harness
strap loops from
splitter plate.
Pull harness straps
through seat back
and seat pad.
To loosen straps, lift lever
and pull harness straps.
1 3
You will receive ONE of
these Graco approved
replacement buckles.
Follow instructions for
proper installation.
Question and Answer IconNeed help?

Do you have a question about the Graco Argos and is the answer not in the manual?

Graco Argos Specifications

General IconGeneral
Harness Maximum Weight65 lbs
Forward-Facing Weight Range22-65 lbs
Headrest Positions10
Side Impact ProtectionYes
Harness Type5-point
Rear-Facing Weight Range5-40 lbs
Height RangeUp to 57 inches
Warranty1 year
Installation TypeLATCH

Summary

Graco Argos Buckle Replacement Guide

Remove Existing Harness Components

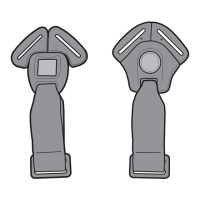
Loosen straps, remove strap loops, unbuckle, and remove chest clip and tongues.

Step 1: Loosen Harness Straps

Lift lever and pull harness straps to loosen them.

Step 2: Remove Strap Loops

Remove harness strap loops from the splitter plate.

Step 3: Unbuckle Harness

Tilt buckle down, press red button, and pull tongues out.

Step 4: Remove Chest Clip

Remove the chest clip; do not discard it.

Step 5: Remove Harness Tongues

Remove and discard the harness tongues.

Step 6: Pull Harness Straps Through Seat

Pull harness straps through the seat back and seat pad.

Attach Replacement Buckle

Slide new buckle onto straps, re-attach chest clip, and route straps.

Step 7: Slide New Buckle Onto Straps

Slide the new buckle onto the harness straps, ensuring no twists.

Step 8: Re-attach Chest Clip

Re-attach the chest clip, ensuring no twists in the straps.

Step 9: Re-insert Straps Through Slots

Re-insert straps through the seat pad and seat back slots.

Step 10: Route Harness Straps

Route harness straps over the metal bar and re-insert onto the splitter plate.

Continue Buckle Installation

Remove elastic loops, detach old buckle, and prepare new buckle.

Step 11: Remove Elastic Loops (Sides)

Remove elastic loops from the sides of the seat as shown.

Step 12: Remove Elastic Loops (Back)

Remove elastic loops from the back of the seat as shown.

Step 13: Remove Old Buckle

Pull seat pad forward, remove buckle from pad, push retainer up, and discard.

Step 14: Prepare New Buckle Tongues

Push button and remove tongues from the new buckle.

Step 15: Insert New Buckle Retainer

Insert the metal retainer from the new buckle into the crotch slot.

Step 16: Re-insert New Buckle

Re-insert buckle through seat pad slot and pull up to secure.

Step 17: Re-position Seat Pad

Push seat pad back until elastic straps exit, then re-attach hooks.

Step 18: Re-attach Elastic Loops

Re-attach the elastic loops on the sides of the seat.

Step 19: Insert New Buckle Tongues

Insert the new tongues into the buckle until they click.

Step 20: Final Check

Verify buckle security, strap twists, and chest clip threading.
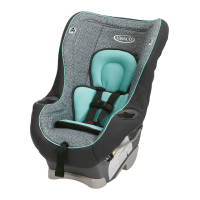
Related product manuals