Program execution
After the thermal stabilisation of the unit (when the set and current temperature readings
become the same)
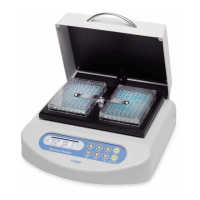
4.6 Microplate fixation:
PHMP: Place microplates on the platform and fix it with the special push-down clip by
pressing it against the plate covers.
PHMP-4: Unscrew the fixation screws. Place microplates on the platform and fix them by
tightening the fixation screws.
Caution! For model PHMP: Load only pairs of microplates for best fixing.
Caution! For model PHMP-4: The microplate fixation screws must always be tightened to
avoid damage. Tighten the fixation screws completely when microplates are removed from or
placed on the platform. Do not close the lid if the microplate fixation screws are not tightened
to avoid damage.
4.7 Press the RPM-RUN/STOP key (Fig. 1/x). The platform will start rotating and the timer
indicator will start counting up the time interval (with 1 min precision).
4.8 After finishing the program the platform motion will stop and the timer will show the flashing
reading STOP accompanied by the repetitive sound signal until the RPM-RUN/STOP key is
pressed.
4.9 If the working time is not set (or is reset) and the timer indicator in the upper line shows 00:00,
pressing the RPM-RUN/STOP key will start continuous operation of the Thermo-shaker
(timer indicator will start counting up the time interval in the lower line (Actual)) until the RPM-
RUN/STOP key is pressed again.
Please note! The platform temperature will be constantly maintained in accordance with the
set temperature. This allows the devise to be used again without pre-heating.
4.10 The timer can be reset during operation if required. Press the TIME-RUN/STOP key once
(Fig. 1/y) to stop the timer. Press the TIME-RUN/STOP key again to restart the timer.
4.11 The platform motion can be stopped at any time by pressing the RPM-RUN /STOP key. In this
case the program realisation run and the platform motion will stop and the timer will switch into
the STOP mode saving previously set time. Press the RPM-RUN/STOP key to repeat the
operation with the same time and speed.
Caution! At the end of the set time period the platform movement is stopped automatically,
but the heating can be stopped only by reducing the temperature using the q T(ºC)
key (Fig. 1/w lower key) till the OFF sign appears in the upper part of the display.
4.12 After finishing the operation set the power switch, located on the rear panel of the unit, in
position O (Off) and disconnect the external power supply from electric circuit.
Page 8
Thermo shaker PHMP/PHMP-4
Operating instructions
Correct loading
Wrong loading
PHMP PHMP-4
Version 3.01 - May 2015
 Loading...