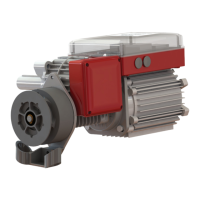
The Grifco E-Drive is a commercial roller door operator designed for safe and reliable service when installed, operated, maintained, and tested according to the instructions and warnings in its manual. It is suitable for MH and ML series doors and is compatible with Security+ 2.0® accessories and the Grifco myQ Internet Gateway.
Function Description:
The E-Drive opener is designed to lift spring-balanced roller doors. It features an Automatic Chain Engage Mechanism (ACEM) that allows manual operation of the door using a hand chain at all times, even in the event of a power failure or when the motor is not in use. The opener includes an Absolute Position Encoder (APE) for precise door positioning and limit setting. The Main Control Board (MCB) manages all operations, including motor control, accessory connections, and safety features. The controller, which serves as the user interface, has four buttons (UP, STOP, DOWN, SET) and three indicators (POWER, STATUS, LIMIT) to display the opener's status and facilitate setup.
Important Technical Specifications:
The E-Drive comes in various models with different power and load capacities, suitable for a range of commercial door sizes and masses.
- ML6053: 53 Nm rated load, 0.5 Hp, 10% duty rating, 3 phase, 18 m² door size, 0.55 kW, 1.6 Amp, 270 kg max door mass.
- ML6103: 140 Nm rated load, 1.0 Hp, 10% duty rating, 3 phase, 36 m² door size, 1.15 kW, 2.4 Amp, 540 kg max door mass.
- MH6103: 80 Nm rated load, 1.0 Hp, 30% duty rating, 3 phase, 30 m² door size, 0.99 kW, 2.0 Amp, 450 kg max door mass.
- ML6153: 190 Nm rated load, 1.5 Hp, 10% duty rating, 3 phase, 50 m² door size, 1.7 kW, 2.9 Amp, 890 kg max door mass.
- ML6051: 67 Nm rated load, 0.5 Hp, 10% duty rating, 1 phase, 18 m² door size, 0.37 kW, 3.5 Amp, 270 kg max door mass.
- ML6102: 85 Nm rated load, 1.0 Hp, 10% duty rating, 1 phase, 36 m² door size, 1.4 kW, 6.0 Amp, 480 kg max door mass.
- MH6102: 73 Nm rated load, 1.0 Hp, 30% duty rating, 1 phase, 30 m² door size, 0.84 kW, 4.4 Amp, 450 kg max door mass.
These specifications are based on a spring-balanced door, at least a 4:1 sprocket ratio, and a curtain load with a 200mm drum diameter. The E-Drive is not recommended for residential garage doors.
Installation Requirements:
- Minimum distance of 15mm between mounting plate and door drum sprocket.
- Minimum distance of 10mm between APE housing and imposing structure.
- Minimum overhead clearance of 150mm from the main control housing.
- The E-Drive is typically flag mounted below the door drum, with the opener shaft pointing toward the door opening. It is not designed to be installed upside down.
- The hand chain must be 5mm long link chain, hang free of obstructions, and not be twisted.
- Power connection types vary: 3 phase with neutral, 3 phase no neutral, single phase 3 wire, and single phase 4 wire. Wiring must comply with local building and electrical codes, and a suitable circuit breaker must disconnect all live conductors.
- The controller cable is 6 meters long with RJ45 ends; an extension kit (P/N EK01) is available if needed.
- The controller must be installed in a position where the door is visible, at a minimum height of 1.5 meters from the floor.
- Secure the opener with M12 x 40mm fasteners, applying a torque between 80-90Nm.
Usage Features:
- Door Direction: The door direction can be reversed if it is incorrect relative to the controller.
- Limit Setting: The E-Drive allows setting OPENED and CLOSED limits. A third, extended open limit can also be set for high doors that don't always need to be fully opened.
- Automated Positioning Routine: After a power outage, the opener "jogs" slightly downward by default to confirm door position. For rigid doors, this jog can be configured to be upward.
- Door Behaviour Modes: Configurable via DIP switches on the MCB.
- Latch up / Inch down (default): Latches up with a single press, inches down only when the button is held.
- Inch up / Inch down: Inches up and down only when buttons are held.
- Latch up and down: Latches up and down with a single press. This mode requires Entrapment Protection Devices and is necessary for myQ Operation.
- Entrapment Protection: Supports Infrared (IR) Beams and Safety Bump Edges (e.g., Grifco Protector System, Bump Edge) for safe automatic or latch closing. These devices must be learned by the opener.
- Access Control Options:
- Grifco Security +2.0 Transmitters (E960G, E943G, E138G) and Wireless Accessories.
- Swipe Card, Magnetic Key, or similar 2-wire voltage-free access control devices connected to the toggle input.
- The STAR1000EVO Transmitter Management Device allows managing up to 1000 identified users.
- Toggle Input (2-wire): Allows single-button operation (open-stop-close-stop-etc.). If Auto Close is set, it becomes "open only."
- Auto Close Feature: When enabled, the door will close automatically after a programmed delay. This feature requires Entrapment Protection Devices.
- Advanced Logic Functionality: Available with the Grifco® EB1 Expansion Board for relay status outputs, advanced door behaviour, and building management system integration.
- myQ Internet Gateway (G828AU): Enables smart control and monitoring of the door. Requires "Latch up and down" door behaviour mode and proper Entrapment Protection Devices.
Maintenance Features:
Regular maintenance is crucial for safe and reliable operation. Power must be turned off before any servicing or adjustments.
- Monthly Checks:
- Examine the installation for imbalance, wear, or damage to cables, springs, and mounting.
- Check chain alignment, tension, and condition.
- Check PE / IR beam/s and bump edge functionality.
- Quarterly Checks:
- Check tightness of fixing bolts and grub screws.
- Check correct electrical operation.
- Check manual operation via hand chain.
- Lubricate the drive chain.
- Check door balance.
- Conduct door maintenance according to manufacturer guidelines.
- Cycle Counter: The E-Drive records total cycles. To view, drive the door to the closed limit, press and hold CLOSE for 10 seconds, then press and release SET while still holding CLOSE. The STATUS LED will indicate the number of cycles performed.
- Error Reset: A procedure exists to reset severe errors indicated by specific STATUS light flashes (4, 5, 9, 10, 14, or 15 times). This involves holding the STOP button for 10 seconds, then pressing and releasing SET while still holding STOP. Persistent resetting may void the warranty.
Safety Instructions:
The manual emphasizes several critical safety warnings:
- Mechanical Warnings: Keep the commercial door balanced, repair sticking or binding doors immediately, and do not attempt to loosen, move, or adjust components under tension. Avoid wearing loose clothing, rings, or watches. Remove all ropes before installation. Ensure a final test of all functions and safety devices after installation. Keep other persons away when operating a biased-off switch. The operator cannot be used with a wicket door open unless it cannot be operated with the wicket door open. Ensure appropriate clearance and shielding to prevent contact with hot operator parts. Install wall controls where the door is visible and out of reach of children. Permanently fasten safety labels. Disengage all existing door locks. Activate the operator only when the door is in full view and free of obstructions. The actuating member of a biased-off switch must be within direct sight of the door, away from moving parts, and at a minimum height of 1500mm. Ensure mechanical stops prevent the bottom rail from passing through in the opening direction.
- Electrical Warnings: Replace damaged supply cords only with manufacturer-approved parts or by qualified persons. Installation and wiring must comply with local codes. Connect to properly earthed mains. Protect electronic components from moisture. Disconnect electric power before repairs or removing covers. The E-Drive must be connected via an approved electrical isolation device and a suitable circuit breaker. Do not leave control enclosures open.
- Cautionary Statements: Avoid unnecessary crowding and difficulty when making connections by using 1.5mm² (max.) wire size. Protect fixed wiring insulation from heat. Do not force the controller cable. Any access control must be user-operated and in line of sight with the door. Keep additional accessories away from children.
The Grifco E-Drive is a robust and versatile commercial door operator, designed with safety and functionality in mind, offering various configurations and accessory options to suit diverse commercial applications.


 To Next Page
 General