9
1 2 3 4 5 6 7 8 9
ECE
A23S 12V
ALKALINE BATTERY
+
0
–
LED
2. Set the transmitter DIP Switches
Therearenine(9)transmitterDIPswitches;eachcanbeplacedinthreedifferent
positions (+, 0, –). DO NOT set all the switches in the same position, such as all +,
all 0, or all –.OncetheDIPswitcheshavebeensettoapersonalcode,replacefront
cover.
WARNING: No other adjustments should be made inside the transmitter.
Setting Your Personal Transmitter Code
1. Remove the Transmitter Cover
On the back of the transmitter use a small phillips head screw driver to remove
the two screws on the sides of the visor clip and separate the front cover from the
transmitter.Withthefrontcoverremoved,thebatteryandtheDIPswitcheswill
be exposed. To set a new code, use a small screwdriver to move the switches.
All GTO transmitters are set to a standard code at the factory and are ready to operate your GTO PRO® Gate Opener
®
. For
your safety and security, however, we strongly recommend that you replace the factory setting with your own personal code.
Follow the directions below:
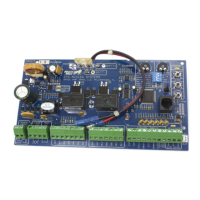
3. “Teach” the New Code to Control Board Memory
1 2 3 4
ON DIP
STAT US
LEARN RMT
LEARN
MAST LIMIT
LEARN
SLV LIMIT
S3
S4
S2
ART OFF
G OFF
PULL
EN DLY .
OFF
OFF
ON
ON
PUSH
SIMULT.
ON
ON
120 MINMAX
CLOSE TIME STALL FORCE
A.Pressandholdtransmitterbutton.
B.Pressandholdthe LEARN RMT (Learn Remote) button
on the control board until the buzzer sounds.
C. Release transmitter button. The new code
is stored in control board memory.
D. Release the LEARN RMT (Learn Remote) button.
 Loading...