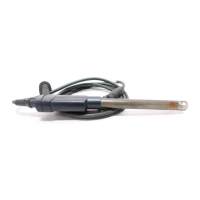
The Hach PHC725 is an intelligent pH probe designed for accurate and stable pH measurements in samples with low ionic strength (LIS). It uses Red Rod technology and a saturated KCl electrolyte for high performance. The probe is refillable and includes a built-in temperature sensor. A 59-mL bottle of reference electrolyte filling solution (saturated KCl solution) is supplied with the device.
Function Description
The PHC725 probe measures pH, providing a digital, combination electrode that delivers fast, stable, and accurate measurements. Its design is particularly suited for samples with low ionic strength. The built-in temperature sensor allows for temperature-compensated pH readings.
Important Technical Specifications
Probe type: Digital combination glass pH probe with refillable electrolyte and built-in temperature sensor
pH range: 0 to 14 pH
pH accuracy: ±0.01 pH
Reference type: Red Rod (Ag/AgCl in protective tubes)
Reference junction: Annular porous ring
Slope: -59 mV/pH (85 to 115% at 25 °C (77 °F) per Nernstian theoretical value)
Isopotential point: 6.00 pH
Sodium (alkalinity) error: <0.3 pH at pH 13 in 0.1 M NaOH
Temperature accuracy: ±0.3 °C (±0.54 °F)
Temperature sensor type: 30 kΩ NTC thermistor
Operating temperature: -10 to 100 °C (14 to 212 °F)
Storage temperature: 5 to 40 °C (41 to 104 °F)
Minimum immersion depth: 14 mm (0.55 in.)
Body material: Glass
Electrolyte filling solution: Saturated KCl
Storage solution: Saturated KCl
Cable connection: M12 digital output and connector
Dimensions:
- Diameter: 12 mm (0.47 in.)
- Length: 200 mm (7.9 in.) total; 103 mm (4.1 in.) below head
- Cable length: 1 m (3.3 ft)
Weight (includes cable): ~0.4 kg (0.9 lb)
Warranty: 1 year on the probe. This warranty covers manufacturing defects, but not improper use or wear.
Certifications: CE, FCC/ISED
Usage Features
Intended Use: The PHC725 is intended for use by individuals who measure water quality parameters in the laboratory. It is not intended for medical treatment or after-water applications.
Safety Information:
- DANGER: Indicates a potentially or imminently hazardous situation which, if not avoided, will result in death or serious injury.
- WARNING: Indicates a potentially or imminently hazardous situation which, if not avoided, could result in death or serious injury.
- CAUTION: Indicates a potentially hazardous situation that may result in minor or moderate injury.
- NOTICE: Indicates a situation which, if not avoided, may cause damage to the instrument. Information that requires special emphasis.
- Precautionary Labels: Electrical equipment marked with the crossed-out wheeled bin symbol must not be disposed of in European domestic or public disposal systems. Return old or end-of-life equipment to the manufacturer for disposal at no charge to the user.
- Product Hazards:
- Chemical exposure hazard: Always wear personal protective equipment appropriate to the chemicals handled. Refer to current safety data sheets (MSDS/SDS) for safety protocols.
- Disposal of chemicals and wastes: Dispose of chemicals and wastes in accordance with local, regional, and national regulations.
- Personal injury hazard: Glass components can break. Handle with care to prevent cuts.
Preparation for Use:
- Ensure the protective tape from the filling hole is removed. A probe with a blocked filling hole will not operate correctly.
- New probes are filled with electrolyte filling solution and have a soaker bottle that contains storage solution to keep the glass bulb and reference junction hydrated. Prepare the probe for calibration and measurement as follows:
- Remove the protective tape from the filling hole.
- Rinse the soaker bottle on the soaker bottle holder when not in use.
- Rinse the reference junction and glass bulb with deionized water. Blot dry with a lint-free cloth.
- If the inner filling solution is low, add more filling solution.
- If the level of KCl crystals in the probe is less than approximately 0.5 cm (0.2 in.), or for measurements at high temperatures (> 60 °C (140 °F)), add more KCl crystals.
- Insert the probe to make sure that the KCl crystals move freely through the liquid. If necessary, shake the probe to loosen the crystals.
- Soak the probe in a warm pH 4 buffer solution for approximately 1 hour to condition the probe. If probe stabilization is slow, soak the probe for 2 hours in a warm pH 4 buffer solution. The soak procedure helps to dissolve KCl crystals in the reference junction.
- Make sure that the meter has the correct date and time settings. The service-life time stamp in the probe comes from the date and time settings in the meter. Some meters automatically open the date and time settings when the meter starts for the first time, or after battery replacement.
- Connect the probe to the meter.
- Remove the filling-hole plug before use. Keep the level of the electrolyte filling solution above the level of the measurement liquid during use. For measurements in low ionic strength (LIS) samples, soak the probe for a maximum of 5 minutes in the sample before use.
Calibration:
- The procedure is applicable to meters that can connect to Intellical pH probes. Refer to the applicable meter documentation for meter operation and probe-specific settings.
- Calibration Notes:
- Use prepared pH buffer solutions or mix pH buffer powder pillows with deionized water for calibration. Discard the prepared buffer solutions after each calibration.
- Use two or three buffer solutions for best results. Two buffer solutions are sufficient if the expected sample pH is between the pH of the two buffer solutions. The sequence in which the pH buffer solutions are used is not important. Use buffer solutions that are 2 or more pH units apart.
- For a one-point calibration, use a pH buffer near the expected sample pH.
- Use the default calibration options or change the options in the probe settings menu.
- Use the single display mode for calibration when more than one probe is connected to the meter (if applicable).
- Calibrate the probes and verify the calibration regularly for best results. Use the meter to set calibration reminders.
- The calibration data is stored in the probe. When a calibrated probe is connected to a different meter with the same calibration options, a new calibration is not necessary.
- Air bubbles below the sensor when in solution can cause a slow response or error in the calibration. Make sure to remove air bubbles during calibration.
- The pH buffer solutions have known pH values at different temperatures. The meter uses the mV and temperature readings of the probe in the pH buffer solutions to calculate a calibration slope. During measurements, the meter adjusts the slope for the sample temperature to determine the pH value of the sample.
- Calibration Procedure:
- Go to the calibrate menu. Select the probe, if applicable. The display shows the pH buffer solutions to use for calibration.
- Prepare or pour the pH buffer solutions in different beakers.
- Open the filling hole.
- Rinse the probe with deionized water. Dry the probe with a lint-free cloth.
- Put the probe in the first pH buffer solution. Make sure that the sensor and reference junction are fully in the solution. Do not put the probe on the bottom or sides of the beaker.
- Shake the probe from side to side to refresh the reference junction and remove air bubbles. Be careful not to hit the beaker and damage the probe.
- Stir slowly, then read the pH value of the buffer solution. The display shows the temperature-compensated pH value when the reading is stable.
- Continue with steps 4 through 7 for the remaining buffers or select Done.
- Save the calibration.
Sample Measurement:
- The procedure is applicable to meters that can connect to Intellical pH probes. Refer to the applicable meter documentation for meter operation and probe-specific settings.
- Sample Requirements:
- Ensure the sample type is compatible with the probe, or probe damage can occur.
- Samples must be aqueous. The probe can also make measurements in samples that are not fully aqueous and in some solvents that dissolve in water. Read the results with caution because the pH scale changes when the solvent system changes.
- Samples can contain components that react with silver (e.g., TRIS, proteins and sulfides). The Red Rod tubes protect the probe from interference with such components.
- Proteins can collect on the sensing element. Make sure that the probe stays clean if proteins are in the sample.
- Do not measure samples that are hotter or colder than the specified operating temperature of the probe.
- High purity or low ionic strength (LIS) samples absorb gases from the air that can change the sample pH. For stable measurements, use an LIS chamber or a flow cell.
- Sample Measurement Notes:
- Rinse the probe with deionized water and dry with a lint-free cloth between measurements to prevent contamination.
- If complete traceability is necessary, enter a sample ID and operator ID before measurement. Refer to the meter manual for instructions.
- The meter automatically saves the measurement data when the user manually reads each data point and when the meter is set to read at regular intervals. The user must manually save each data point when the meter is set to read continuously.
- Air bubbles below the sensor can cause a slow response or error in the measurement. Make sure to remove air bubbles before and during measurements.
- Sample Measurement Procedure:
- Collect the sample.
- Open the filling hole.
- Rinse the probe with deionized water. Dry the probe with a lint-free cloth.
- Put the probe in the sample with the sensor and reference junction fully in the sample. Do not put the probe on the bottom or sides of the beaker.
- Shake the probe from side to side to refresh the reference junction and remove air bubbles. Be careful not to hit the beaker and damage the probe.
- Stir gently, then read the pH value of the sample. The display shows the temperature-compensated pH value when the reading is stable.
Verify the Calibration:
- Measure the pH value of a fresh pH buffer solution to make sure the result is accurate. The meter compares the selected pH buffer value to the measured pH value and accepts or rejects the measurement. The user can change the pH buffer solution and acceptance criteria for verification in the probe-specific settings. Password protection may prevent access to the acceptance criteria.
- Verification Procedure:
- Go to the verification menu. The display shows the pH buffer solution to use for verification. For HQd meters: Run check standard.
- Prepare or pour the pH buffer solution into a beaker.
- Open the filling hole.
- Rinse the probe with deionized water. Dry the probe with a lint-free cloth.
- Put the probe in the pH buffer solution with the sensor and reference junction fully in the solution. Do not put the probe on the bottom or sides of the beaker.
- Shake the probe from side to side to refresh the reference junction and remove air bubbles. Be careful not to hit the beaker and damage the probe.
- Stir gently, then read the pH value of the buffer solution. The meter accepts or rejects the result.
Maintenance Features
Regular maintenance is necessary for the best accuracy, stabilization time, and life of the probe. Keep the probe in the recommended storage solution between measurements.
Clean the Probe:
- Clean the probe regularly to remove contamination and to keep the reference junction open.
- Symptoms of contamination:
- Incorrect or irregular readings
- Slow stabilization times
- Calibration errors
- Sample material stays on the probe
- Cleaning Procedure:
- Rinse the probe with deionized water. Use warm (35–45 °C (95–113 °F)) deionized water to remove storage solution that dries on the probe. Dry the probe body with a lint-free cloth.
- Soak the glass bulb and reference junction in the applicable cleaning solution for the specified time.
- Rinse or soak the probe for 1 minute in deionized water. Dry the probe body with a lint-free cloth.
- Soak the probe in pH 4 buffer for 20 minutes.
- Rinse the probe with deionized water. Dry the probe body with a lint-free cloth.
Cleaning Solutions:
| Contamination |
Cleaning solution |
Active component |
Soak time |
| General contamination |
Electrode cleaning solution for regular maintenance |
KATHON™ CG, DECONEX®11 |
12–16 hours |
| Minerals |
Electrode cleaning solution for minerals/inorganic contamination |
Phosphoric acid (~10%) |
10–15 minutes |
| Fats, grease and oils |
Electrode cleaning solution for fats, oils and grease contamination |
KATHON™ CG, TRITON® X |
2 hours maximum |
| Proteins |
Electrode cleaning solution for proteins/organic contamination |
Pepsin in HCl |
3 hours maximum |
| Wastewater and organic compounds |
Electrode cleaning solution, extra strong |
Sodium hypochlorite |
5–10 minutes |
| Blockage of porous pin/diaphragm reference junctions |
Electrode cleaning solution for porous pin/diaphragm reference junctions |
Thiourea |
3 hours with stirring or until the porous plug becomes white |
Fill the Probe:
- Add electrolyte filling solution to the probe regularly to make sure that the electrolyte flows from the probe to the sample.
- Make sure to use the correct filling solution (saturated KCl). If the dispensing tip becomes clogged, remove the dispensing tip and soak the tip in warm water. Then, fully dry and assemble the tip again.
Add KCl Crystals to the Probe:
- The filling solution in the probe contains crystals of potassium chloride (KCl) that keeps the filling solution saturated with KCl. When the sample temperature is more than 60 °C (140 °F), more crystals are necessary to keep the solution saturated with KCl. Add more KCl crystals when the level of crystals above the glass bulb is less than 0.5 cm (0.2 in.), or when the sample temperature is more than 60 °C (140 °F).
- KCl quantity at high temperatures:
| Temperature |
KCl quantity |
| 60 °C (140 °F) |
0.5 g (0.5 cm (0.2 in.)) |
| 70 °C (158 °F) |
0.625 g |
| 80 °C (176 °F) |
0.750 g |
| 90 °C (194 °F) |
0.875 g |
| 100 °C (212 °F) |
1.0 g (1.0 cm) |
Replace the Filling Solution:
- Replace the filling solution and KCl crystals when one of the conditions that follow occurs:
- The filling solution becomes contaminated.
- The KCl crystals in a probe do not move freely through the liquid when the probe is inverted.
- Procedure:
- Tilt the probe and open the filling hole.
- Use a syringe or small transfer pipet to remove as much of the filling solution and KCl crystals from the probe as possible. Discard the solution and KCl crystals.
- Remove the remaining KCl crystals as follows:
- Fill the probe half full with deionized water. Close the filling hole.
- Shake the probe until the crystals become loose. If the crystals do not loosen, fill the probe with deionized water and put the probe in a warm water bath (maximum 60 °C (140 °F)) for approximately 10 minutes.
- Use a syringe or small transfer pipet to remove the remaining solution and KCl crystals.
- Rinse the inner probe three times with deionized water.
- Rinse the inner probe three times with new filling solution.
- Add new KCl crystals to the probe until there is approximately 0.5 cm (0.2 in.) of crystals above the glass bulb.
- Fill the probe with new filling solution.
Soak Procedure for Dry Probes:
- If the glass bulb becomes dry, complete the steps that follow to hydrate the probe.
- Soak the probe tip in a warm pH 4 buffer solution for 2 hours.
- Rinse the probe with deionized water. Blot dry with a lint-free cloth.
- Calibrate the probe.
Storage:
- Probes can become permanently damaged if kept in a storage solution that is not specified by the manufacturer. Use only the specified storage solution (saturated KCl).
- Do not store the probe in deionized water or in samples of low ionic strength. For short-term storage, the probe can stay in the sample for a maximum of 2 hours if the sample pH is not high. Close the filling hole and put the soaker bottle that contains the storage solution on the probe when not in use. Keep the probe in a vertical position with the sensor and reference junction below the liquid level in the soaker bottle. Add storage solution to the soaker bottle if necessary.
Troubleshooting
| Problem | Possible cause | Solution