Do you have a question about the Halton Capture Jet KVE-WW and is the answer not in the manual?
Inspect unit immediately for shipping damage and notify carrier if damage is found.
Ensure system installation meets project plans, specifications, and local code officials' requirements.
Carefully inspect crating, check local codes, and prepare the unit for installation.
Position the hood correctly and follow procedures for hanging using threaded rods.
Requirements for duct connections (NFPA 96) and electrical circuit connections.
Details on hot water supply, drain connections, and required plumbing components.
Information on standard LED fixtures and options for multiple hood installations.
Instructions for attaching the 1" insulated backsplash assembly to the wall.
Instructions for attaching the flat sheet backsplash assembly to the wall.
Specifies the minimum and maximum installation height for canopy hoods.
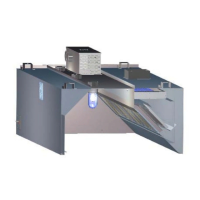
Diagram illustrating essential dimensions, inlets, outlets, and components for hood installation.
Procedure for connecting hoods together when installed end-to-end.
Procedure for connecting hoods together when installed back-to-back.
Steps for installing closure panels on a single hood configuration.
Steps for installing closure panels on end-to-end hood configurations.
Steps for installing closure panels on back-to-back hood configurations.
Steps for installing closure panels on combined end-to-end and back-to-back hoods.
Identifies closure clips, KDS riser attachment hardware, and panel connection hardware.
Detailed steps for attaching closure panels to hoods with KDS risers.
Guidance on balancing airflows using static pressure measurements and T.A.B. ports.
Instructions for adjusting the Capture Jet fan speed via the speed controller.
Chart and explanation for determining exhaust airflow based on T.A.B. pressure readings.
Instructions for cleaning KSA filters and ensuring proper system airflow balance.
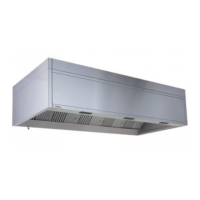
Identifies major components of the hood including water wash systems, extractors, and fan.
Instructions for cleaning the hood canopy, interior, and exterior with mild soap and water.
Step-by-step guide on how to remove, clean, and replace KSA stainless steel filters.
Lists replacement part numbers for KSA Grease Extractors and LED light components.
Details the two types of nozzles used in the water wash system and their specifications.
Routine daily tasks required for efficient operation of the Water Wash hood.
Routine monthly tasks, including filter inspection and cleaning.
Explains the function of the water wash control panel and its warning indicators for safe operation.
Explains the basic operation of the touch screen, including fan control and navigation.
Allows users to monitor the progress of Wash, Soak, and Rinse cycles for each section.
Enables users to set the day and time for automated wash cycles to occur.
Allows users to configure wash cycles, delay, wash time, and rinse time in seconds.
Displays a history of up to 200 alarm messages, with active alarms requiring action.
Procedure to prime the detergent pump after the detergent container has been refilled.
Explains how the Menu Options button provides quick access to various control screen options.
Guides users through depictions and explanations of all touch screen functions.
Details how to set the number of wash cycles and timing parameters for the system.
Provides a view of the current status of the water wash cycle, including alarms and progress.
Allows users to set automatic schedules for the water wash hood operation based on day and time.
Diagram illustrating the electrical connections and components within the control panel.
Diagram showing the external field wiring connections required for the system.
Details the wiring connections for exhaust fan starter, make-up air fan starter, and fire suppression panel.
Fields for inputting essential job name, location, and equipment details for warranty.
Fields for entering contact person, company, and communication details for warranty activation.
Details the warranty period for products manufactured by Halton and third parties.
Explains coverage for labor costs and the requirement for pre-approval by Halton.
Lists conditions and damages that are not covered by the limited warranty.
| Application | Commercial kitchens |
|---|---|
| Type | Wall-mounted hood |
| Control Type | Manual or automatic |
| Material | Stainless steel |
| Installation | Wall mounted |
| Energy Efficiency | High |