29
MAINTENANCE
REPAIRS
Do not attempt to open, repair or modify the
product. The warranty will be invalidated if
the user has opened, repaired or modied the
product.
Image settings
Go to the icon for image settings with the
arrow buttons and press the power switch to
conrm the choice. The brightness, contrast
and saturation (COLOUR) of the image can be
set in this menu.
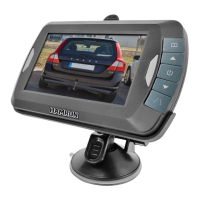
DIGITAL REVERSING CAMERA
Saturation
Select the required settings with the arrow
buttons, conrm the choice with the power
switch, and use the arrow buttons to increase
or decrease the value to the required level.
FIG. 13
Press the menu button to save the settings and
switch o the menu.
Image orientation
The orientation of the shown image can be
changed in this menu. Because it is possible to
change the image orientation the camera can
be mounted in dierent positions and still show
a correctly orientated image on the monitor. Go
to the icon for image orientation with the arrow
buttons and press the power switch to conrm
the choice. The image orientation now changes
every time the power switch is pressed.
Press the menu button to save the settings and
switch o the menu.
Help line button
It is possible to show distance help lines on
the monitor. The lines make it easier to see
the distance between the objects behind the
vehicle. The help line button has a switching
function – the lines are switched on and o
each time the help line button is pressed.
FIG. 14