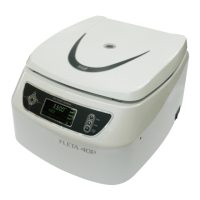
The FLETA 40P is a multipurpose centrifuge designed for various laboratory applications. This manual provides essential information for its operation, maintenance, and troubleshooting, emphasizing safe and effective use.
Function Description:
The FLETA 40P is a centrifuge that separates components of a sample by spinning them at high speeds. It is designed for multipurpose use, accommodating both angle and swing rotors for different sample volumes and separation needs. The device features a digital speed meter for checking RPM and a control board for setting and monitoring operations. Safety mechanisms include a door lock device that prevents operation when the door is open and stops the rotor if the door opens during operation. An auto door lock ensures the door remains closed during centrifugation. The system also incorporates an abnormal vibration sensor that detects imbalance and stops the rotation to prevent damage and ensure safety. A circuit breaker protects the main body from lightning or overvoltage.
Important Technical Specifications:
- Max. Rotational Speed: 4,000 RPM
- Max. Centrifugal Relative Force (RCF): 3,088 xg
- Max. Capacity:
- Angle Rotor: 15ml × 24
- Swing Rotor: 85ml × 4
- Power Consumption: AC 220V, 60Hz, Single Phase
- Motor Drive: AC Induction Motor
- Programmability: 10 Program memories
- Dimension: 448.5 (W) × 531 (D) × 286 (H) mm
- Weight: 18 Kg (without Rotor)
Rotor Specifications:
The FLETA 40P supports various rotors, each with specific capacities and maximum RCFs:
- Swing Rotor (SL85-4): 85ml capacity, Max. RPM 4,000, Max. RCF 3,088 xg, Radius 172.6mm
- Rotor (SL50-6): 50ml capacity, Max. RPM 4,000, Max. RCF 3,088 xg, Radius 172.6mm
- Angle Rotor (AL15-12): 15ml capacity, Max. RPM 4,000, Max. RCF 2,547 xg, Radius 142.4mm
- Rotor (AL15-24): 15ml capacity, Max. RPM 4,000, Max. RCF 2,790 xg, Radius 155.9mm
Usage Features:
- Installation: Must be placed on a rigid, flat, and horizontal surface to prevent vibration and shaft deformation. Requires 30cm of vacant space around the unit for smooth air ventilation. Should be kept in a constant temperature and humidity environment, away from direct sunlight, heaters, and erosive gases. Leveling is crucial, and the shaft must be vertical.
- Rotor Installation: Before installation, wipe the motor shaft and rotor hole with a clean fabric. Ensure the rotor and motor are between 10-30°C. Place the rotor on the motor shaft and tighten clockwise with a hexagonal wrench.
- Weight Loading and Tube Arrangement: Tubes must be placed symmetrically on the rotor, and only recommended tubes should be used. Minimize weight differences between sample tubes to reduce noise and extend durability. Use tubes of the same type for centrifuge stability. For symmetrical arrangement, ensure equal sample volumes after precise measurement. Dissymmetrical loading, even with the same quantity of tubes, can cause heavy vibration and damage the shaft. Use a scale to minimize weight differences.
- Control Panel:
- Display: Shows configuration information and operation status.
- Up/Down Arrows: Increase/decrease set values, select program numbers (0-9). Pressing for 2 seconds activates turbo function for rapid up/down adjustment.
- Left/Right Arrows: Set each menu, move cursor to RCF and time menus.
- Setup/Enter: Sets and finalizes data.
- Program: Calls and saves programs.
- Door: Opens the door (does not open during operation).
- Start/Stop/Short: Stops, ends, or initiates a short operation (press for 3 seconds for short run mode).
- Program Saving and Calling: Select 'PROG', use up/down arrows to choose a program number, then 'SET UP/ENTER' to save or call.
- Input RPM/RCF: Use 'SET UP/ENTER' and up/down arrows to input RPM or RCF values.
- Input Time: Use 'SET UP/ENTER' and 'MOVE' to navigate to the 'Time' menu, then up/down arrows to set the value.
- Deceleration Patterns: The device offers 6 DEC ramps. At DEC 0, it decelerates at the same speed as DEC 3 by 500rpm. Below 500rpm, it stops without brakes.
- Emergency Door Open: In case of power failure, turn off the power switch, wait for the rotor to stop, then insert a 5mm T-wrench into the hole on the right flank side and turn clockwise.
Maintenance Features:
- Exterior Cleaning: Clean the surface with a soft, dry fabric. For heavy contamination, use a soft, soapy cloth and then a dry cloth to remove water. Avoid chemicals like alcohol, benzene, or thinner. Use neutral detergent. Do not scratch with hard or sharp materials. Remove rust from humidity with neutral detergent and dry fabric.
- Interior Cleaning: Periodically remove and clean frost from the rotor and chamber for efficient cooling. Turn off power, remove frost with a dry cloth, and clean the chamber with a soaked sponge or cloth, then dry completely.
- Shaft Maintenance: Keep the shaft clean to prevent unstable rotation due to contaminants. Remove the rotor after operation, clean the shaft with a dry fabric to remove water, and keep it dry. If the rotor sticks tightly, use the specialized rotor removing tool.
- Rotor Maintenance:
- Corrosion & Surface Treatment: Avoid contact with strong acid or basic agents, as they can cause damage and imbalance, leading to heavy vibration and physical damage. The rotor is resistant to neutral aqueous solutions (carbonate, chromate, acetate, sulfide) but not to chloride agents. Corrosion accelerates with increased hydrogen ion content and exposure to sulfuric, phosphoric, and hydraulic acids.
- Cleaning: Remove samples with a soft fabric soaked in warm water, avoiding scratches on the treated rotor surface.
- Drying: Dry narrow grooves efficiently with a hair-drier.
- Keeping: Store in a clean, dry place, with the angle rotor lid separated and kept upside down.
- Sterilization: Rotors, lids, and bucket adapters can be sterilized at 121°C for 20 minutes.
- General Check Points:
- Rotor: Check for cracks, cleanliness, and abrasion.
- Shaft & Hub: Do not separate the hub and bent shaft; check for abrasion.
- Motor Bearing: Check for noise and smooth rotation.
- Control Board: Check bolt connections and functioning.
- Power Supply: Check for loosened connections.
- RPM Check: Install the rotor, set RPM, and verify the actual RPM with a tachometer.
- Time Check: Set 10 minutes and verify the actual time with a stopwatch.
- Imbalance Detection: In case of an imbalanced rotor, check if the imbalance lamp is on with an alarm sound.
- Door Locking Device: Ensure the door does not open during operation.
- Disposal: Centrifuge must be disposed of according to local environmental regulations, not as household waste.
Troubleshooting (Warning Signals):
- E1 (Imbalance error): Caused by dissymmetrical tube placement, irregular sample volume, loosened rotor, or unstable ground. Troubleshooting: Check rotor loading tightness, proper tube loading, and stable ground/worktable.
- E2 (Over Speed): Caused by 2% over the set RPM or incorrect tuning of motor/controller. Troubleshooting: Check controller and motor, switch power on/off and restart.
- E3 (Motor Overheat): Motor temperature 120°C (±5°C) inside. Troubleshooting: Check motor stator, switch power off and wait 1 hour before restarting.
- E4 (Low Speed): Not reaching 200RPM within 2 seconds (RPM -10%). Troubleshooting: Check controller and motor, switch power off and restart.
- E5 (Door open (Start)): Door open during operation. Troubleshooting: Check door-in switch.
- E6 (Under Speed): 2% under the set RPM during operation. Troubleshooting: Switch power off and restart.
- E7 (System error): Error of controlling system or motor overload/IPM module damage. Troubleshooting: Switch power off and restart, contact Hanil A/S center.
- E8 (Over Temp.): Over the preset limit. Troubleshooting: Reset the preset value of the limit (L-Cal in the preset menu).
- E9 (Door Open (Stop)): Door not open in the stop status. Troubleshooting: Check door-in switch.