EasyManua.ls Logo

HANNspree HP248WJB - User Manual

HANNspree HP248WJB
22 pages
Print Icon
To Next Page IconTo Next Page
Loading...
HP248WJB (HSG1370)
LCD Monitor
OSD[V6.0]
Question and Answer IconNeed help?

Do you have a question about the HANNspree HP248WJB and is the answer not in the manual?

Overview

This document serves as the User's Manual for the HANNspree HP248WJB (HSG1370) LCD Monitor, providing comprehensive instructions for its operation, installation, and maintenance. It begins with important safety notices and precautions, emphasizing the need to read the manual thoroughly and retain it for future reference. The monitor complies with EMC directive 2014/30/EU, 2014/35/EU, and 93/68/EEC for electromagnetic compatibility and low voltage. A trademark notice highlights the integration of High-Definition Multimedia Interface (HDMI™) technology, with HDMI terms and logos being trademarks of HDMI Licensing LLC. The manual also includes recycling information, underscoring HANNspree's commitment to environmental protection and encouraging proper disposal and recycling of the product.

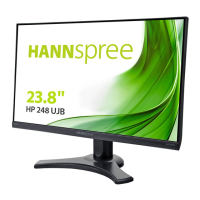
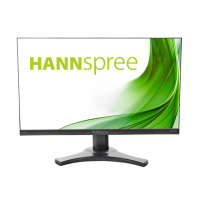
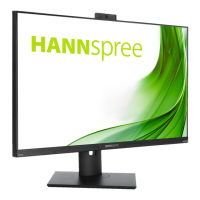
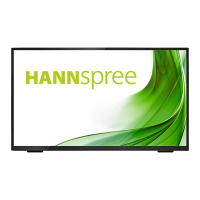
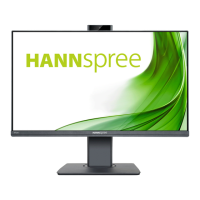
The HANNspree HP248WJB (HSG1370) is a 60.45cm / 23.8" Wide Screen TFT Color LCD Monitor designed to provide a crisp, clear display for Windows operating systems. Its ergonomic design and space-saving, compact case make it suitable for various environments. The monitor supports multiple input sources, including VGA, HDMI, and DisplayPort (DP), ensuring compatibility with a wide range of devices.

Installation and Setup:

The installation process is straightforward, beginning with the assembly of the stand base. Users are guided through attaching the stand to the monitor and securing it. For wall mounting, the manual provides detailed instructions for disassembling the stand base and securing the monitor to a VESA-compatible wall bracket (100x100, M4, 10mm, 8kg). It emphasizes the importance of using a UL-listed wall mount bracket and advises that wall mounting should ideally be performed by qualified service personnel due to the specialized skills required.

Connecting the monitor to a PC involves several steps:

  1. Connecting an HDMI cable from the monitor to the computer's HDMI port.
  2. Optionally, connecting a DP cable from the monitor to the computer's DP port.
  3. Connecting a USB-B cable from the monitor to the computer's USB-B port.
  4. Connecting an audio cable between the monitor's audio input and the PC's audio input.
  5. Connecting the 12V DC adapter to the monitor and the AC power cord to a wall outlet.
  6. Finally, turning on the monitor and computer.

The monitor's viewing angle can be adjusted from -5° to 23° for optimal viewing comfort. Users are cautioned not to touch the LCD screen during adjustment to prevent damage and to be careful of hinges to avoid pinching.

Operating Instructions:

The monitor features a user-friendly control panel located on the front. The power button switches the monitor ON/OFF, with a blue indicator light for power-on mode and a blue flicker for power-saving mode. The MENU/RETURN button accesses the On-Screen Display (OSD) menu or returns to the previous menu. Adjustment buttons (UP/DOWN/LEFT/RIGHT) are used to navigate through OSD icons and adjust functions. A dedicated button allows users to select input sources (VGA, HDMI, etc.) and also serves as an exit function during start-up. Holding this button for more than 3 seconds initiates the "Auto Adjust" function for VGA input, optimizing horizontal position, vertical position, clock, and phase.

OSD Settings:

The OSD menu offers extensive customization options:

  • Brightness/Contrast: Adjusts display brightness and contrast values. An "ACTIVE CONTRAST" option enhances contrast for high-contrast images and videos by automatically detecting and optimizing dark and light areas.
  • Preset Mode: Allows selection of preset modes like PC, MOVIE, GAME, or ECO, depending on the model.
  • Input Setting: Switches between analog (VGA) and digital (HDMI) sources. An "AUTO SEARCH" function can be activated or deactivated for automatic signal search (for DVI/HDMI input only).
  • Color Setting: Adjusts color temperature (WARM, NATURE, COOL) or allows user-defined RGB levels.
  • Image Setting: Includes "AUTO ADJUST" for optimizing H-POSITION, V-POSITION, CLOCK, and PHASE (for VGA input only). "ASPECT RATIO" allows adjustment for distorted screens, with "FULL" indicating full-screen display and "FIT" scaling by proportion of original images. H-POSITION, V-POSITION, CLOCK, and PHASE can also be manually adjusted to shift the screen image, reduce vertical flicker, and reduce horizontal flicker, respectively (for VGA input only). "SHARPNESS" adjusts the display sharpness.
  • Video Mode: Allows selection between "VIDEO MODE" and "PC MODE" for video transmission. "PC MODE" is recommended for complete image viewing when using HDMI or HDMI to DVI ports, as "VIDEO MODE" may slightly cut off the edges.
  • Response Time: Configures display response time to MINIMUM, INTERMEDIATE, or MAXIMUM (feature limited to specific models).
  • OSD Setting: Changes the OSD language, adjusts OSD horizontal and vertical positions, and sets OSD transparency and time-out duration. Users can also choose OSD color combinations.
  • System:
    • AUDIO INPUT: Recommended to set to HDMI when transferring via HDMI. If no sound, set to PC and ensure the PC audio output cable is connected to the monitor's LINE IN (or AUDIO IN) port.
    • VOLUME: Adjusts the volume level (for models with incorporated audio). A warning about the risk of hearing damage at high volumes is included.
    • MUTE: Switches the mute function On or Off.
    • DDC/CI: Switches the DDC/CI function On or Off (dual input mode optional).
    • FACTORY RESET: Resets the monitor to its default settings.
    • INFORMATION: Displays horizontal frequency, vertical frequency, and resolution information.

Plug & Play DDC2B Feature:

The monitor is equipped with VESA DDC2B capabilities, allowing it to communicate its identity and display capabilities to the host system. The DDC2B is a bidirectional data channel based on the I²C protocol, enabling the host to request EDID information. The manual clarifies that the monitor will appear non-functional without a video input signal.

Technical Support (FAQ):

A comprehensive FAQ section addresses common problems and provides solutions:

  • Power LED not on: Check power switch and cord connection.
  • No Plug & Play: Verify PC and video card compatibility, and check for bent pins on VGA or HDMI connectors.
  • Display too dark/bright: Adjust contrast and brightness controls.
  • Picture bounces/wave pattern: Move electrical devices causing interference.
  • Power LED ON but no video: Check computer power, video card seating, monitor's video cable connection, and for bent pins. Verify computer operation by checking CAPS LOCK LED.
  • Missing primary colors: Inspect monitor's video cable for bent pins.
  • Screen image not centered/sized properly: Adjust pixel frequency (CLOCK) and PHASE, or use hot-key.
  • Color defects (white not white): Adjust RGB color or select color temperature.
  • Screen resolution needs adjustment: Use Windows display settings to adjust resolution.
  • No sound from built-in speaker: Ensure PC audio output cable is connected to LINE IN port, check sound volume, verify "System > Silence" option is off, and for HDMI input, select AUDIO INPUT as PC if no sound.

Addendum for Windows 7/8/10:

For display problems under Windows 7, 8, or 10, users are advised to:

  1. Ensure PC hardware supports the respective Windows version.
  2. Ensure the video card supports the respective Windows version.
  3. Install the latest video card driver for the respective Windows version. It also suggests installing the latest video driver, using the recommended display resolution, or trying the second recommended display resolution if the first doesn't work. A table of recommended display resolutions for various screen sizes is provided.

Maintenance Features:

The manual emphasizes the importance of proper placement to avoid heat sources, direct sunlight, excessive dust, or mechanical vibration. It advises saving the original shipping box and packing materials for future use. For cleaning, users should periodically clean the monitor with a soft cloth, using a mild detergent solution for stubborn stains. Crucially, the monitor should always be unplugged before cleaning to ensure safety. Users are warned against using strong solvents or abrasive cleaners, which can damage the cabinet, and against attempting to service the monitor themselves due to dangerous voltages. All servicing should be referred to qualified personnel.

HANNspree HP248WJB Specifications

General IconGeneral
Screen Size23.8 inches
Panel TypeIPS
Brightness250 cd/m²
Contrast Ratio1000:1
Response Time5 ms
Refresh Rate60 Hz
Aspect Ratio16:9
Viewing Angle178°/178°
Power Consumption25W (Typical)
Resolution1920 x 1080 (Full HD)
PortsVGA

Related product manuals