Do you have a question about the Happymodel Mobula 7 1-2S Frsky and is the answer not in the manual?
Configure SPI RX Support, select FRSKY_X (D16) or FRSKY_D (D8) provider.
Set the default Arm/Disarm switch (AUX1) in Betaflight Configurator for motor control.
Use 'bind_rx' or 'bind_rx_spi' CLI commands, or press bind button. Select D8 mode.
Check LED status and toggle AUX1 to confirm successful binding and arming.
Use the frequency table and methods to switch VTX bands and channels.
Enable Smartaudio on UART1 to access the VTX OSD menu for band/channel settings.
Download BLHeliSuite, connect FC, check Device Manager COM ports.
Select SiLabs BLHeli Bootloader, connect, and flash "S-H-50" firmware.
Configure motor direction, timing, startup power, and features like DSHOT600.
Install STM32 Virtual COM Port Driver, STM BOOTLOAD Driver, and replace with WINUSB using Zadig.
Use Betaflight Configurator, select target "CrazybeeF4FR", enter DFU mode, and flash firmware.
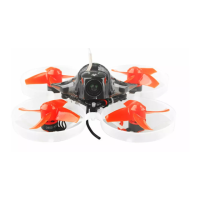
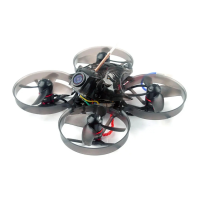
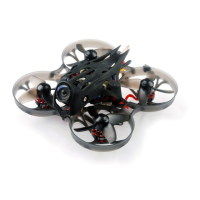
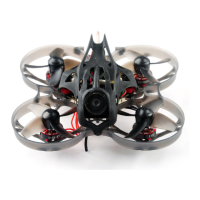
The Happymodel Mobula 7 is a 1-2S Frsky Micro brushless FPV racer drone, designed for both beginners and experienced pilots. This compact drone comes with a basic version package that includes a 75mm Brushless Bwhoop75 Frame, a Crazybee F4 PRO Frsky receiver, four SE0802 KV16000 Motors, one set of 40mm propellers (4cw+4ccw), an AIO Camera & VTX, a buzzer, four 3.8v 250mah 30C/60C batteries, a USB Lipo/LIHV Charger, a propeller disassemble tool, and a screwdriver. A standard version is also available, which adds a 1506 6-way Lipo/LIHV charger.
The Mobula 7 is an FPV racing drone, meaning it is designed for agile flight and real-time video transmission to a pilot's goggles or monitor. Its brushless motors provide efficient and powerful thrust, while the integrated Frsky receiver allows for control with compatible Frsky transmitters. The AIO Camera & VTX (Video Transmitter) captures and transmits the FPV feed. The drone's small size makes it suitable for indoor and outdoor flying in confined spaces.
To set up the receiver, navigate to the "Configuration" tab in Betaflight Configurator. Select "SPI RX Support" for the Receiver mode. For Frsky D16 mode, choose "FRSKY_X Provider," and for Frsky D8 mode, select "FRSKY_D Provider." It's crucial not to enable "Serial RX" as the Crazybee Flight controller has an integrated SPI BUS Receiver.
The VTX (Video Transmitter) has 8 channels across 5 bands.
set vtx_band=3, set vtx_channel=1, set vtx_freq=5705, followed by save. Ensure vtx_freq matches the vtx_band and vtx_channel as per the VTX Channel list. For example, vtx_freq=5732 requires vtx_band=5 and vtx_channel=3.The Mobula 7 uses a "Quad X" mixer type. The motor direction is reversed.
| Brand | Happymodel |
|---|---|
| Model | Mobula 7 1-2S Frsky |
| Category | Drones |
| Language | English |