EasyManua.ls Logo

Happymodel Crux35 - User Manual

Default Icon
2 pages
Print Icon
To Next Page IconTo Next Page
Loading...
Default Propeller installation of Crux35 was set to be Prop Out, please install
CCW propeller to Motor1 and Motor4 and install CW propeller to Motor2 and
Motor3, make sure you have mounted the screws tightly for the propellers.
3) Check the receiver channel map and channel value is correct after bind successful.
1)Turn on your radio transmitter and connect the battery to the Crux35. Then
place Crux35 horizontally on the ground. We recommend 4S 750mah or
4S 850mah Li-po battery for Crux35 and Crux35 HD
2)Prepare your goggles, and match the channel with the VTX_table
3)Toggle Aux1 switch to arm the motors, the Green LED at the bottom of the
ight controller would get be solid once armed, happy ying.
Ultra-lightweight 3.5-inch BNF FPV Freestyle Drone
HD video transmission and analog video transmission are optional
Integrated ExpressLRS UART receiver or Frsky SPI D8/D16 receiver
High eciency EX1404 power system
Can be equipped with Naked Gopro or SMO4K
Support 3-4S battery 4S 750mah battery is recommended, maximum
support 4S 1100mah
Brand: Happymodel
Product name: Crux35 / Crux35 HDZERO / Crux35 HD
Wheelbase: 150mm
Weight: Crux35 87gram Crux35 HD 108gram
Size: 130mmx130mmx45mm(without propellers)
Receiver option: UART ExpressLRS 2.4GHz
SPI Frsky D8/D16 (S-FHSS compatible)
Camera and VTX option:
HD DJI version Nebula+Vista or Runcam Link Wasp Nano
HDZERO version RunCam Nano HDZero Camera + HDZERO WHOOP VTX
Analog version Ant+OVX303 or OVX306 VTX
Flying time: 9min~15min 4s 750mah battery
Bind procedure video for your refrence http://bit.ly/40Kr4H8
1) Supply power to the ight controller by plug USB, wait until the green LED on
the FC is o, immediately turn o the power, and then repeat again the above
steps. When the FC is powered on for the third time, the green LED light will
start to double-ash, which means that the RX enters the binding mode
) 2 Please make sure your ExpressLRS tx module rmware is v3.x.x. And go to
ExpressLRS.lua from TOOLS menu of your radio transmitter. Then hit [Bind]
to binding with the onboard ExpressLRS receiver. The green LED should blinking
slowly rst then turn to solid, that means binding was successfully. If the green
LED still keep double ash after binding ,please change Model Match tab value
from o to on or from on to o
Make sure the VTX band is "OFF" from the vtx administrator, sometimes it would
aect VTX or RX quality .
Noticed: Onboard ELRS RX was connected to TX2 and RX2 default. Short
connect with +5V and E5, then TX2 and RX2 could used for other equipment.
ET
ER
E5
GND
VOUT
VIN
+5V
GND
TX1 RX1
+5V
GND
LED S_BUZ-
+5V
GND
TX2
RX2
Crux35 Crux35 HDZERO
Crux35 Frame
Option1: ELRS X1 FC with
SPI ELRSDiscontinued
Option2:CrazyF411 ELRS FC
with UART ELRS
Option3: CrazyF411 FRSKY FC SPI Frsky
CaddxFPV Nebula Nano Kit
Or Runcam Link Wasp Nano
HDZERO Whoop VTX+ Rucam
HDZERO Camera
Analog FPV Camera Caddx Ant
OVX303/OVX306 5.8G analog VTX
Happymodel EX1404 Kv3500
HQProp T3.5X2X3Grey (4cw+4ccw)
Screw Driver
Buckle Velcro for battery
Crux35 HD DJI
1
1
0
0
1
1
4
1
1
1
1
1
1
0
0
0
4
1
1
1
1
1
0
1
0
0
4
1
1
1
S M32F411 BOOTT
(Flight controller BOOT)
BAT+
GND
ESP8285 BOOT
(Onboard ELRS RX boot)
IPEX connector
Receiver
Status
LED
Question and Answer IconNeed help?

Do you have a question about the Happymodel Crux35 and is the answer not in the manual?

Summary

Drone Features and Specifications

Package Contents

Lists all items included in the drone package, such as frame, FC, motors, and accessories.

Motor Arming and Disarming Procedure

Initiate Arming Process

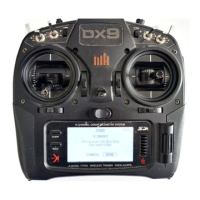
Turn on the radio transmitter and connect the drone battery, placing it horizontally.

Match Goggles and VTX Settings

Prepare goggles, match VTX channel, and ensure VTX band is 'OFF' in the administrator.

Arm Motors with Aux1 Switch

Use the Aux1 switch to arm motors; a solid green LED on the flight controller confirms arming.

Flight Controller Wiring and Binding

Propeller and Antenna Holder Installation

Install CCW propellers on motors 1 & 4, CW on motors 2 & 3, ensuring screws are tight.

ExpressLRS Receiver Binding Steps

Cycle power to the FC until the green LED double-flashes, then use the radio transmitter to bind.

Electronic Hardware Connections

Analog Version Wiring Diagram

Illustrates the wiring for analog FPV camera and VTX units like OVX306 and OVX303.

HD DJI and HDZERO Version Wiring

Shows connection diagrams for HD DJI and HDZERO versions including camera and VTX.

Port Settings and Receiver Configuration

Analog Version Serial Port Setup

Configures UART ports for receiver and telemetry output for analog versions in Betaflight.

HDZERO;DJI Version Serial Port Setup

Configures UART ports for receiver and telemetry output for HDZERO/DJI versions in Betaflight.

Drone Tuning and VTX Channel Setup

Analog Version PID Tuning Parameters

Displays PID and filter settings for tuning the flight performance of the analog version.

HD DJI;HDZERO PID Tuning Parameters

Shows PID and filter settings for tuning the flight performance of HD DJI/HDZERO versions.

VTX Band and Channel Switching

Explains methods to switch VTX bands/channels via Betaflight CLI or the OSD menu.

Overview

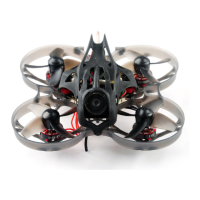
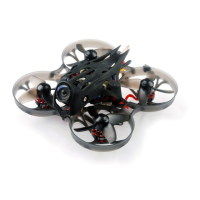
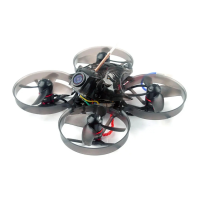
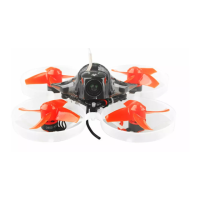
The Happymodel Crux35 is an ultra-lightweight 3.5-inch BNF (Bind-N-Fly) FPV (First-Person View) Freestyle Drone, designed for both beginners and experienced pilots seeking a compact and agile flying experience. It offers flexibility in video transmission, supporting both HD and analog systems, and comes with integrated receiver options for seamless compatibility with various radio transmitters.

Function Description:

The Crux35 serves as a versatile FPV freestyle drone, capable of agile maneuvers and stable flight. Its primary function is to provide an immersive flying experience through FPV goggles, allowing pilots to see a real-time video feed from the drone's perspective. The drone is designed for freestyle flying, which involves performing dynamic aerial tricks and maneuvers. It supports both high-definition (HD) video transmission, offering crisp and clear visuals, and analog video transmission, known for its low latency. The inclusion of an integrated ExpressLRS UART receiver or Frsky SPI D8/D16 receiver simplifies the binding process with compatible radio transmitters, making it ready to fly out of the box after a quick setup. The drone's efficient power system, featuring EX1404 motors, ensures a good balance of power and flight time. It also offers the capability to carry external cameras like Naked GoPro or SMO4K, expanding its utility for capturing high-quality aerial footage.

Important Technical Specifications:

  • Brand: Happymodel
  • Product Name: Crux35 / Crux35 HDZERO / Crux35 HD
  • Wheelbase: 150mm, indicating a compact size suitable for agile flight.
  • Weight:
    • Crux35: 87 grams (ultra-lightweight)
    • Crux35 HD: 108 grams
  • Dimensions: 130mm x 130mm x 45mm (without propellers), highlighting its small form factor.
  • Receiver Options:
    • UART ExpressLRS 2.4GHz (for long-range and robust control)
    • SPI Frsky D8/D16 (S-FHSS compatible) (for compatibility with popular Frsky transmitters)
  • Camera and VTX (Video Transmitter) Options:
    • HD DJI Version: Nebula+Vista or Runcam Link Wasp Nano (for high-definition digital video)
    • HDZERO Version: RunCam Nano HDZero Camera + HDZERO WHOOP VTX (another option for HD digital video)
    • Analog Version: Ant+OVX303 or OVX306 VTX (for traditional analog video with low latency)
  • Power System: High efficiency EX1404 motors, providing ample thrust for freestyle maneuvers.
  • Battery Support: 3-4S Li-po batteries.
    • Recommended: 4S 750mAh or 4S 850mAh
    • Maximum Support: 4S 1100mAh
  • Flight Time: 9-15 minutes with a 4S 750mAh battery, offering a decent duration for practice and enjoyment.
  • Included Components (Package):
    • Crux35 Frame (1 unit for all versions)
    • Flight Controller Options:
      • ELRS X1 FC with SPI ELRS (Discontinued)
      • CrazyF411 ELRS FC with UART ELRS (1 unit for Crux35 and Crux35 HDZERO)
      • CrazyF411 FRSKY FC SPI Frsky (1 unit for Crux35)
    • Camera/VTX Kits:
      • CaddxFPV Nebula Nano Kit or Runcam Link Wasp Nano (1 unit for Crux35 HD DJI)
      • HDZERO Whoop VTX + Rucam HDZERO Camera (1 unit for Crux35 HDZERO)
      • Analog FPV Camera Caddx Ant (1 unit for Crux35)
      • OVX303/OVX306 5.8G analog VTX (1 unit for Crux35)
    • Happymodel EX1404 Kv3500 motors (4 units for all versions)
    • HQProp T3.5X2X3Grey (4cw+4ccw) propellers (1 set for all versions)
    • Screw Driver (1 unit for all versions)
    • Buckle Velcro for battery (1 unit for all versions)

Usage Features:

  • Propeller Installation: The drone is designed for "Prop Out" configuration. It's crucial to install CCW (Counter-Clockwise) propellers on Motor1 and Motor4, and CW (Clockwise) propellers on Motor2 and Motor3, ensuring screws are tightly mounted.
  • Binding Procedure:
    1. Power the flight controller via USB. Wait for the green LED to turn off, then immediately disconnect power. Repeat this step.
    2. On the third power-up, the green LED will double-flash, indicating the RX is in binding mode.
    3. Ensure your ExpressLRS TX module firmware is v3.x.x.
    4. Access the ExpressLRS.lua script from the "TOOLS" menu on your radio transmitter and hit [Bind].
    5. A successful bind is indicated by the green LED blinking slowly then turning solid. If the LED continues to double-flash, adjust the "Model Match" tab value from "off" to "on" or vice-versa.
  • Arming/Disarming Motors:
    1. Turn on your radio transmitter and connect the battery to the Crux35.
    2. Place the drone horizontally on the ground.
    3. Prepare your FPV goggles and match the channel with the VTX_table.
    4. Toggle the Aux1 switch to arm the motors. The green LED at the bottom of the flight controller will become solid once armed, indicating readiness for flight.
  • VTX Channel Setup:
    • CLI Commands: For specific channel settings (e.g., Channel 5705), use Betaflight CLI commands: Set VTX_band=3, Set VTX_channel=1, followed by save.
    • OSD Menu: Disarm the Crux35. Move the transmitter sticks (THR MID + YAW LEFT + PITCH UP) to enter the OSD Menu. Navigate to "Features," then "VTX SA" to set VTX Band and channel.
  • Receiver Channel Map Verification: After successful binding, verify the receiver channel map and channel values are correct in your radio transmitter's settings (e.g., RadioMaster Zorro). Ensure the VTX band is set to "OFF" in the VTX administrator to prevent interference with VTX or RX quality.
  • Flight Controller Connection Diagram: Detailed diagrams are provided for Analog, HDZERO, and DJI HD versions, showing connections for TX1, RX1, BUZ-LED_S, GND, +5V, and battery. This is crucial for troubleshooting and custom modifications.
  • Port Setting and Receiver Setting: Instructions are provided for configuring UART ports for Serial Rx and Telemetry Output in Betaflight, ensuring proper communication between the receiver and flight controller. It warns against disabling MSP on the first serial port unless the user knows what they are doing, as it may require re-flashing the configuration.
  • Voltage and Current Meter Settings: Guidance on configuring voltage and amperage meters in Betaflight, including scale, divider value, multiplier value, and offset, to ensure accurate battery monitoring during flight.
  • PID Settings: Default PID (Proportional-Integral-Derivative) tuning values are provided for both Analog and HD/HDZERO versions, offering a baseline for flight performance. These settings can be further adjusted by the user to suit their flying style.

Maintenance Features:

  • Propeller Replacement: Regular inspection of propellers for damage is recommended. Damaged propellers should be replaced to maintain flight stability and efficiency. The manual specifies the correct orientation (CW/CCW) for replacement.
  • Firmware Updates: Keeping the ExpressLRS TX module firmware updated to v3.x.x or later is important for optimal performance and compatibility. Betaflight firmware updates for the flight controller are also recommended for bug fixes and new features.
  • Component Inspection: Periodically check all screws, especially those holding the propellers and motors, to ensure they are tightly secured. Inspect wiring for any signs of wear or damage.
  • Battery Care: Adhere to recommended battery types (3-4S Li-po) and capacities (4S 750mAh/850mAh recommended, max 1100mAh) to ensure safe operation and optimal flight times. Proper battery charging and storage practices are essential for longevity.
  • Troubleshooting: The manual provides critical information, such as the receiver channel map verification and VTX band settings, which are common points for troubleshooting connectivity and video issues. The detailed connection diagrams are invaluable for diagnosing hardware problems.
  • CLI Commands: The ability to use Betaflight CLI commands for VTX channel setup offers a direct and precise method for configuration, which can be useful for advanced users or for resolving issues that cannot be addressed through the OSD.

Happymodel Crux35 Specifications

General IconGeneral
BrandHappymodel
ModelCrux35
CategoryDrones
LanguageEnglish

Related product manuals