B))/'2(,'I2%e'F)X"/'?(.*2&&2*$)(
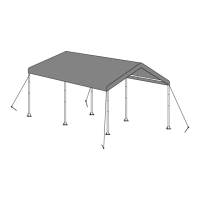
1. Position the Door Cover (16) near where you want
the front of the Portable Garage, and turn it so
that the zipper faces the outside of the Portable
Garage, and the warning tag faces inside.
2. Disconnect the Rail (4) from the
3-Way Ridge Connector (A), and place the
gap at the top center of the Door Cover
around the Ridge Connector, as shown.
Note that the Door Cover’s flaps wrap
around the Rafters (3), and the strap is
positioned inside the frame.
DO NOT ATTEMPT TO INSERT ANY FRAMEWORK
TUBING INTO THE HEM ON THE COVER FLAPS.
c
V&2%"'.*/24'
2(,'6&24.'
$(.$,"'6/28"-
b
<
c
L$7+/"'J3''B))/'F)X"/'?(.*2&&2*$)(
3. Reconnect the Rail securely to the
3-Way Ridge Connector.
4. Repeat step #2 for the
3-Way Side Connectors A/B (A1, A2)
so that the Door Cover looks as shown
in Figure O and Figure P.
\$44"/
L$7+/"'V3'';/24'</)+(,'D$,"'F)(("%*)/.
5. Use Ratchet Tie-Downs (8) to attach the Cover
to the Corner Legs (6); see Securing Ratchet
Tie-Downs on page 10 and Figure Q.
Q
L$7+/"'f3''D"%+/$(7'B))/'F)X"/
6. Repeat steps #1 – 4 above to install the Back
Cover (17) to the other end of the Portable Garage.
["8')('
F)X"/'6&24-
<a
<O
<
Page 11L)/'*"%#($%2&'M+".*$)(.N'4&"2."'%2&&'OPQQQPQRRPSTUT-Item 62859
D<L9EGJV9=<E?J>H<?>E9><>F9 D9EWV